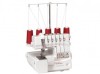
Singer 14T967DC Quantumlock Support Question
Singer 14T967DC Quantumlock Support Question
Find answers below for this question about Singer 14T967DC Quantumlock.Need a Singer 14T967DC Quantumlock manual? We have 2 online manuals for this item!
Question posted by floraspector on June 7th, 2014
Help Locating Parts
Hello, I am DESPERATELY seeking the following parts for this machine: G1067 stitch plate G1041 Fixed lever G1288 standard presser foot Can you help please? I bought the machine used and the previous owner had the coverstitch needle plate on and corresponding presser foot. She lost the origional. UGH
Current Answers
Answer #1: Posted by BusterDoogen on June 7th, 2014 3:32 PM
BusterDoogen

Member since:
October 30th, 2011 Points: 28,565,417

Member since:
October 30th, 2011 Points: 28,565,417
Go here for 2 of the parts you need & here for the g1041.
I hope this is helpful to you!
Please respond to my effort to provide you with the best possible solution by using the "Acceptable Solution" and/or the "Helpful" buttons when the answer has proven to be helpful. Please feel free to submit further info for your question, if a solution was not provided. I appreciate the opportunity to serve you!
Related Singer 14T967DC Quantumlock Manual Pages
Instruction Manual 26 - Page 2

... the machine by following the Instruction Book page by GS (Certification of Electro-technical Materials) according to European standards, and corresponds to operate the machine. This SINGER sewing machine, model 14T967DC, has been tested by page. PREFACE
14T967DC
Thank you for your sewing machine, read the entire Instruction Book before attempting to the guidelines for proper use , will...
Instruction Manual 26 - Page 3

... the sewing machine needle. * Do not pull or push fabric while stitching. Keep ventilation openings of the machine and foot controller free from all instructions before using the machine. It may deflect the needles causing them to replace the face plate which covers the light bulb before re-lamping. Return the machine to break. * Do not use only identical replacement parts...
Instruction Manual 26 - Page 5

... type presser foot 67 *Optional presser feet 68
1) Elastic foot 68 2) Blind hem foot 68 3) Shirring foot 68 4) Pearl/Sequin foot 68 5) Piping/Cording foot 68 6) Taping foot 68 28. Troubleshooting Chart 69 29. Specification 71
4 How to Adjust the Seam width 31 *Width adjustment by chaining off 63 26. How to Sew a Rolled hem 54 1) 3-thread standard rolled hem stitching 55...
Instruction Manual 26 - Page 13

..., the faster the machine will sew. Note: Machine will go. PRINCIPAL PARTS BEHIND THE LOOPER COVER
73
21
8
1. Upper looper 2. Plug power line into electric outlet.
Lower looper 6. Upper looper clutch
5
6 4
8.
6. Presser foot 4. Rolled Hem lever 8. To stop the machine from sewing, remove your foot from the controller.
9
OFF ON
WARNING: Use only foot controller provided with...
Instruction Manual 26 - Page 18

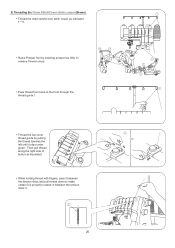
...pass it slips under
guide. Raise Presser foot to turn off power switch. The motion allows a clear path for information on this page and the following pages will guide you through the ...sewing.
Note: The instructions on Stitch Types, Settings, Needle Sockets and Color Coded Threading Paths.
1) Threading the Upper Looper (Green)
Thread the upper looper as
illustrated. To Thread The Machine...
Instruction Manual 26 - Page 21
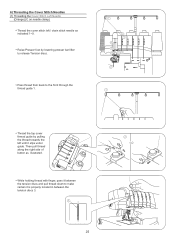
...side of
2
button as indicated 1~11.
Raise Presser foot by pulling
the thread towards the
left until it is properly located in between the tension discs and pull thread down...presser bar lifter to release Tension discs.
10
11
9
Pass thread from back to make certain it slips under
guide. 3) Threading the Chain Stitch/Cover stitch Looper (Brown)
Thread the chain stitch/cover stitch...
Instruction Manual 26 - Page 26
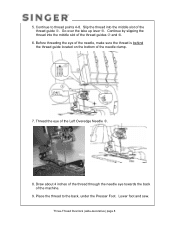
While holding thread with finger, pass it between the tension discs 3.
3
25
2 3 Raise Presser foot by pulling
the thread towards the
left / chain stitch needle as illustrated.
Then pull thread
along the right side of
button as indicated 1~9.
6) Threading the Cover Stitch Needles
(1) Threading the Cover Stitch Left Needle (Orange) (C on needle clamp) Thread the cover...
Instruction Manual 26 - Page 35

... stretch
Set differential feed adjusting lever knob above
setting "N".
2.0
1.5
N
0.8 0.6
To sew a seam, apply gentle tension to graduation "N" for sewing decorative collars, sleeves, skirt hems, etc.
Stretch Overedge
Stretch overedge is apt to shift away from the needle resulting in improperly sewn overedge seam. Note: *if amount of the presser foot. In such case, reset differential...
Instruction Manual 26 - Page 39

... threads across the needle plate and slightly to the left under the front of the sample, continue to chain off and sew a text sample to Sew a Cover Stitch." Lower presser foot by lowering presser bar lifter. Note: In case it to start the thread chain. 21. Place fabric under the presser foot.
Cut thread. Use this machine. Hold the threads and...
Instruction Manual 26 - Page 65

...lubricate the internal working parts. Oiling the Machine Danger: Before lubricating your machine, disconnect power line ...use any
other oil or damage could result.
64
A B
C
D
Cleaning the Machine
Danger: Before cleaning your machine, disconnect power line plug from the wall receptacle. Clean the lint from the looper and knife area often with a dry lint brush. Note: Use only sewing machine...
Instruction Manual 27 - Page 2

... works side by side with this easy-to-use machine, feature-packed machine! Congratulations on the purchase of the Singer Company Ltd. Enjoy! Sew one-of-kind projects with the special effects of sewing enjoyment with your conventional sewing machine and adds new creative possibilities to your projects.
The Quantumlock® 14967DC is divided into fourteen individual sections...
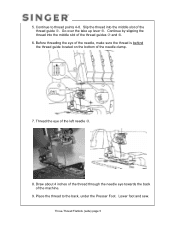
Instruction Manual 27 - Page 13

... the middle slot of the needle clamp for the Cover Stitch or Chainstitch.
6 7
4 8
5
7. Before threading the eye of the needle, make sure the thread is in front of the thread guide located on the bottom of the thread guide . Place the thread to thread points 4-8.
Go over the take up lever . Lower foot and sew. 5.
Instruction Manual 27 - Page 45

...wide) page 4 Continue to the back, under the Presser Foot. Before threading the eye of the needle, make sure the thread is behind the thread guide located on the bottom of the thread guide . Draw about... points 4-8. Thread the eye of the machine.
9. Go over the take up lever . 5. Continue by slipping the thread into the middle slot of the needle clamp.
7. Lower foot and sew.
Instruction Manual 27 - Page 74
... clamp.
7. Three-Thread Overlock (wide-decorative) page 8 Continue to the back, under the Presser Foot. Before threading the eye of the needle, make sure the thread is behind the thread guide located on the bottom of the machine.
9.
Lower foot and sew. Thread the eye of the thread guides and .
6. Place the thread to thread points...
Instruction Manual 27 - Page 95
5. Go over the take up lever . Before threading the eye of the needle, make sure the thread is behind the thread guide located on the bottom of the left needle .
8. Place the ... towards the back of the thread guides and .
6. Lower foot and sew. Continue to the back, under the Presser Foot. Three-Thread Flatlock (wide) page 5 Slip the thread into the middle slot of the machine.
9.
Instruction Manual 27 - Page 108

... needle, make sure the thread is behind the thread guide located on the bottom of the machine.
9. Lower foot and sew. Slip the thread into the middle slot of the Left Overedge Needle .
8. Three-Thread Ultra-Stretch Mock Safety Stitch page 11 Go over the take up lever . Thread the eye of the thread guides and...
Instruction Manual 27 - Page 124

Go over the take up lever .
Continue to the back, under the Presser Foot. Thread the eye of the machine.
9. Draw about 4 inches of the thread through the needle... thread is behind the thread guide located on the bottom of the thread guides and .
6. Lower foot and sew. Place the thread to thread points 4-8. Four-Thread Ultra-Stretch Mock Safety Stitch page 14 5. Slip the thread ...
Instruction Manual 27 - Page 139

... thread to thread points 4-8. Go over the take up lever . Four-Thread Safety Stitch page 13 Before threading the eye of the needle, make sure the thread is in front of the thread guide located on the bottom of the machine.
9. Thread the eye of the thread guide .
5. Continue to the back, under the Presser Foot.
Instruction Manual 27 - Page 155

... of the machine.
9. Five-Thread Safety Stitch Wide page 14 Continue to the back, under the Presser Foot. Draw about 4 inches of the thread through the needle eye towards the back of the Left Overedge Needle .
8. Before threading the eye of the needle, make sure the thread is behind the thread guide located on the...
Instruction Manual 27 - Page 157

... of the thread guide located on the bottom of the thread guides and .
6. Lower foot and sew. Continue by slipping the thread into the middle slot of the middle needle .
8. Place the thread to thread points 4-8. Continue to the back, under the Presser Foot and then towards the back of the machine.
9. Thread the eye of...
Similar Questions

Parts For A Pixie Plus Singer Sewing Machine
Are the following parts available for the Pixie Plus Singer sewing machine:The jack to put into the ...
Are the following parts available for the Pixie Plus Singer sewing machine:The jack to put into the ...
(Posted by dckrowas 1 year ago)

I Get E7 Error Message On My Singer Model 7258 Sewing Machine. There Is No Refe
Error message E7 is up on my Singer Stylist model 7258 sewing machine. It is not working at all. I t...
Error message E7 is up on my Singer Stylist model 7258 sewing machine. It is not working at all. I t...
(Posted by ebellamybellamy9 5 years ago)

How To Thread Singer Fashionmate Sewing Machine Twin Needle?
How to thread the singer fashionmate sewing machine with twin needle without inertwining the threads...
How to thread the singer fashionmate sewing machine with twin needle without inertwining the threads...
(Posted by sindssly 9 years ago)

How Do You Thread Quantumlock For Cording Foot
(Posted by Rejoyce11 9 years ago)
Beeping From Singer Sewing Machine Stylist Ii 5625
My sewing machine will beep and stop sewing after three inches of sewing. I have taken it to be repa...
My sewing machine will beep and stop sewing after three inches of sewing. I have taken it to be repa...
(Posted by arusheria 9 years ago)