
Sharp CV10NH Support Question
Sharp CV10NH Support Question
Find answers below for this question about Sharp CV10NH - 10,000 BTU Portable Air Conditioner.Need a Sharp CV10NH manual? We have 1 online manual for this item!
Question posted by tmoser6495 on June 21st, 2012
Installation In Casement Or Crank Type Window
I have casement windows in my apartment and am not sure how the unit can be installed.
Current Answers
Related Sharp CV10NH Manual Pages
CV-10NH Operation Manual - Page 3
....
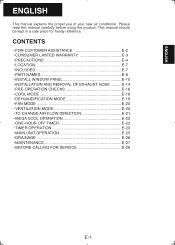
ENGLISH
ENGLISH
This manual explains the proper use of your new air conditioner. CONTENTS
• FOR CUSTOMER ASSISTANCE E-2 • CONSUMER LIMITED WARRANTY E-3 • PRECAUTIONS E-4 • LOCATION E-7 • INCLUDED E-7 • PART NAMES E-8 • INSTALL WINDOW PANEL E-10 • INSTALLATION AND REMOVAL OF EXHAUST HOSE .........E-14 • PRE-OPERATION CHECKS E-16...
CV-10NH Operation Manual - Page 6
... the socket and make sure it is connected. • Consult the dealer or an experienced radio/TV technician for help. WARNINGS FOR USE
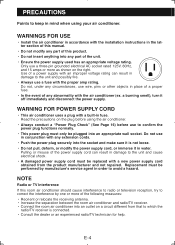
• Install the air conditioner in order to correct ... a hazard. WARNING FOR POWER SUPPLY CORD
• This air conditioner uses a plug with a new power supply cord obtained from that to the unit and cause electrical shock. • A damaged power supply ...
CV-10NH Operation Manual - Page 7
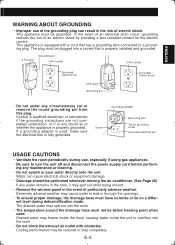
...air conditioner...point when used , make sure the electrical box is properly ...installed and grounded.
3-Pin plug
Grounding pin 3-Pin socket
3-Pin socket
Grounded electrical box
3-Pin plug Grounding pin
Grounded electrical box
• Do not under any water remains in the tank, it may spill out while being moved. • Remove the window..., causing water inside the unit to overflow into...
CV-10NH Operation Manual - Page 9
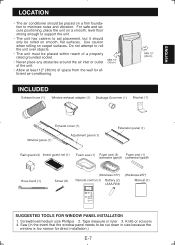
... TOOLS FOR WINDOW PANEL INSTALLATION 1. Tape measure or ruler 3. Do not attempt to roll the unit over objects.
• The unit must be placed within reach of a properly rated grounded socket.
• Never place any obstacles around the air inlet or outlet of space from the wall for direct installation.)
E-7 ENGLISH
LOCATION
• The air conditioner should only...
CV-10NH Operation Manual - Page 10
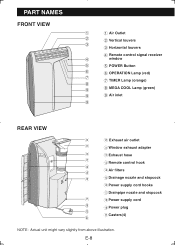
... Button
6
6 OPERATION Lamp (red)
7 7 TIMER Lamp (orange)
8
9
8 MEGA COOL Lamp (green)
9
9 Air inlet
9
REAR VIEW
0
0 Exhaust air outlet
q
q Window exhaust adapter
w
w Exhaust hose
e
e Remote control hook
r
t
r Air filters
y
t Drainage nozzle and stopcock
y Power supply cord hooks
u Drainpipe nozzle and stopcock
u
i Power supply cord
i
o Power plug
o
p
p Casters...
CV-10NH Operation Manual - Page 12
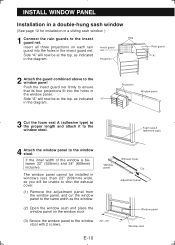
... "A" in the window panel. Projection
Window panel
3 Cut the foam seal A (adhesive type) to the proper length and attach it to the window 22"~ 24" stool with 2 screws.
If the inner width of the window is between 22" (559mm) and 24" (609mm) inclusive.
INSTALL WINDOW PANEL
Installation in a double-hung sash window
(See page 12 for installation in the insect...
CV-10NH Operation Manual - Page 13
... panel to the adjustment panel.
(2) Open the window sash and place the window panel on the window stool.
(2) Slide the adjustment panel to fit the window frame width.
(3) Secure the window panel to the stool with 3 screws. Foam seal A (adhesive type)
Foam seal B (adhesive type)
7 Cut the foam seal to the window stool with 4 screws. ENGLISH
If the...
CV-10NH Operation Manual - Page 14

... shut the exhaust cover.
(1) Remove the adjustment panel from the window panel, and cut the window panel to the insect guard net. Window panel
E-12
"A" Rain guard Window panel "A"
Foam seal A (adhesive type)
Cut
22"~24" INSTALL WINDOW PANEL
Installation in a sliding sash window
(See page 10 for installation in the window panel.
Push the insect guard net firmly to ensure...
CV-10NH Operation Manual - Page 15

.... Adjustment panel
Extension panel
24"~36.8" 36.8"~48"
5 Cut the foam seals (adhesive type) A and B to the proper length and attach them to an appropriate length and seal the opening between the side of the inner window sash and the outer window sash.
8 Attach the bracket with a screw. Attach foam seal A to the...
CV-10NH Operation Manual - Page 16
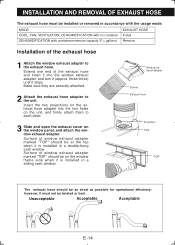
... bent. however, it must be on the window panel, and attach the window exhaust adapter. Surface of window exhaust adapter marked "TOP" should be installed or removed in accordance with container(minimum capacity 31/2 gallons) Remove
Installation of the exhaust hose
1 Attach the window exhaust adapter to the unit. Surface of the exhaust hose and insert it...
CV-10NH Operation Manual - Page 17
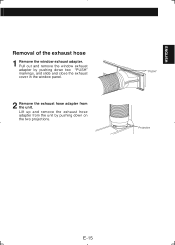
Lift up and remove the exhaust hose adapter from the unit by pushing down on the two projections. Pull out and remove the window exhaust adapter by pushing down two "PUSH" markings, and slide and close the exhaust cover in the window panel.
2 Remove the exhaust hose adapter from the unit.
"PUSH" Projection
E-15 ENGLISH
Removal of the exhaust hose
1 Remove the window exhaust adapter.
CV-10NH Operation Manual - Page 18
...sure they are properly installed.
3 Reattach the battery cover.
4 Press the RESET button using the unit for service.
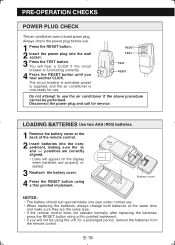
polarities are correctly aligned. • Lines will appear on the display when batteries are the same type... will hear a CLICK if the circuit breaker is now ready for use the air conditioner if the above procedure cannot be using a thin pointed implement. RESET TEST
TEST...
CV-10NH Operation Manual - Page 19
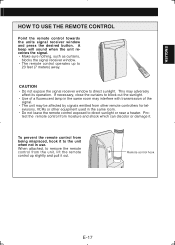
A beep will sound when the unit receives the signal. • Make sure nothing, such as curtains,
blocks the signal receiver window. • The remote control operates up slightly and pull it . ...operation. ENGLISH
HOW TO USE THE REMOTE CONTROL
Point the remote control towards the units signal receiver window and press the desired button. This may be affected by signals emitted from being...
CV-10NH Operation Manual - Page 20
...nozzle
"CLOSE" position
Stopcock
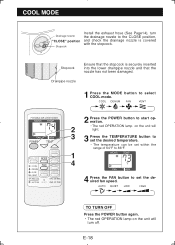
Install the exhaust hose (See Page14), turn off. COOL DEHUM FAN
VENT
2 Press the POWER button to start operation.
2
• The red OPERATION lamp on the unit will light.
3
3 ...HIGH
TO TURN OFF Press the POWER button again. • The red OPERATION lamp on the unit will
turn the drainage nozzle to set within the range of 64°F to 86°F.
1...
CV-10NH Operation Manual - Page 21
...water container whenever dehumidify mode is not desirable, install the exhaust hose (See Page 14), turn off . E-19 Dehumidification with the unit turned off . Be sure to the OPEN position.
3 Pull the ...the room temperature will blink. Do not operate in water.
In this mode, the air conditioner dehumidifies the room.
Failure to empty the water container can cause the ...
CV-10NH Operation Manual - Page 22
... OPERATION lamp on the unit will light.
• The temperature cannot be set.
1
3 Press the FAN button to the CLOSE position, and check the drainage nozzle is securely inserted into the room, the external ventilation fan speed changes.
FAN MODE
In this mode, the air conditioner ventilates the air to outdoors.
Install the exhaust hose...
CV-10NH Operation Manual - Page 25
...return to a maximum of 12 hours. E-23 ENGLISH
TIMER OPERATION
ON TIMER
The unit will turn on 6.5 hours later. Point the remote control at the signal receiver window on the unit.
1 Press the ON TIMER button. • The time setting will operate using ... (30 minutes) to the time display. • If you do not change the setting, the unit will change as you set from 10 to your setting.
CV-10NH Operation Manual - Page 26
... increments and from a minimum of 12 hours. Point the remote control at the signal receiver window on the unit.
1 Press the OFF TIMER button and set together. NOTES ON TIMER SETTING AND OPERATION
&#...setting will be retrieved even after the power is set from 10 to turn off 2.5 hours later. TIMER OPERATION
OFF TIMER
The unit will turn off.
Only the most recent TIMER setting will be...
CV-10NH Operation Manual - Page 29
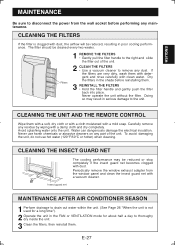
...sure to disconnect the power from the window panel and clean the insect guard net with a vacuum cleaner. CLEANING THE FILTERS
If the filter is not used for about half a day to remove any dust. To avoid damaging the unit...
MAINTENANCE AFTER AIR CONDITIONER SEASON
1 Perform drainage to drain out water within the unit. (See Page 26 "When the unit is clogged with dust, the airflow ...
CV-10NH Operation Manual - Page 30
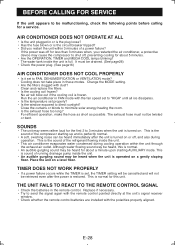
... the air conditioner in or is the plug loose? • Has the fuse blown or is full. This is the sound of running drainage pump inside the unit.
• An audible gurgling sound may cause the compressor to send the signal again with the remote control pointed directly at the unit's signal receiver
window. •...
Similar Questions

Replacement Window Exhaust Unit For Sharp Portable Air Conditioner Model Cv-10nh
Do you have a replacement window exhaust kit available for sharp portable air conditioner model cv-1...
Do you have a replacement window exhaust kit available for sharp portable air conditioner model cv-1...
(Posted by jnohner18 2 years ago)

How To Drain Sharp 10000 Btu Portable Air Conditioner
(Posted by jddans 9 years ago)

Where Can I Buy The Window Panel Kit For Sharp 10,000 Btu Portable Air
conditioner
conditioner
(Posted by buEdna 10 years ago)
How To Install Sharp 10000 Btu Portable Air Conditioner #cv10ctxb
(Posted by cmarbi 10 years ago)
How To Drain Water From 10,000 Btu Sharp Portable Air Conditioner
(Posted by DBIBLEto 10 years ago)