Sanyo PLC-XR70N Support Question
Sanyo PLC-XR70N Support Question
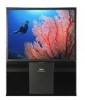
Find answers below for this question about Sanyo PLC-XR70N - 70" Rear Projection TV.Need a Sanyo PLC-XR70N manual? We have 2 online manuals for this item!
Question posted by wrjlarthur on May 19th, 2013
How Do I Set Up Stereo Sound On My Sanyo Led Tv
Stereo mode is not allowing as an option
Current Answers
Related Sanyo PLC-XR70N Manual Pages
Installation - Page 1
... PART OR TOOL LIKE SCREW INTO THE SYSTEM.
ASSEMBLE STORAGE SPACES
7. Rear Projection Display Installation Manual
REQUEST A SALES DEALER FOR INSTALLATION
Please read "SAFETY PRECAUTIONS...have questions, contact a sales dealer. AND NEVER TOUCH THE SURFACE OF THE PROJECTION SCREEN AND THE PROJECTION MIRROR DIRECTLY. IF IT SHOULD, CONTACT A SERVICE. IT MAY CAUSE ELECTRICAL SHOCK OR FIRE...
Owners Manual - Page 2
...instruction manual, may result in fire hazard.
This projector produces intense light from the projection lens. Be especially careful that many features included in your projector's features. If the...IS PRESENT WITHIN THIS UNIT.
TO THE OWNER
As the owner of a new Rear-Projection Display, you will be set in the way indicated. You can radiate radio frequency energy and, if not ...
Owners Manual - Page 4
... ADJUSTMENT
32
PICTURE SCREEN ADJUSTMENT
32
VIDEO MODE
34
SELECTING VIDEO MODE
34
SELECTING COLOR SYSTEM
35
SELECTING VIDEO SOURCE
35
PICTURE IMAGE ADJUSTMENT
36
PICTURE SCREEN ADJUSTMENT
37
BEFORE OPERATION
18
SETTING
38
CONTROLS AND INDICATORS
18
SETTING MENU
38
OPERATION OF THE REMOTE CONTROLS 20
SETTING LANGUAGE
38
OPERATING ON-SCREEN MENU
22...
Owners Manual - Page 5
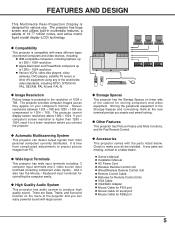
...Rear-Projection Display is free from complicated adjustments to project picture images from most personal computers currently distributed.
l Various VCRs, video disc players, video cameras, DVD players, satellite TV... ´ 768.
u Automatic Multiscanning System
This projector can enjoy powerful sound with large screen. u Wide Input Terminals
This projector has wide input terminals...
Owners Manual - Page 12

...When the audio input of the audio equipment is monaural, connect it to the left jack. Rear Terminal
COMPUTER IN 1
AUDIO 1
(STEREO)
CONTROL PORT 1
VIDEO IN 1 VIDEO/Y C/Cb(B-Y) Cr(R-Y)
S-VIDEO
R-AUDIO-L (MONO)
... (Refer to page 14 and 15.)
COMPUTER IN 2
COMPUTER IN 3
AUDIO 2
(STEREO)
CONTROL PORT 2
AUDIO 3
(STEREO)
CONTROL PORT 3
VIDEO IN 3 VIDEO/Y C/Cb(B-Y) Cr(R-Y)
S-VIDEO
(MONO) L-...
Owners Manual - Page 14
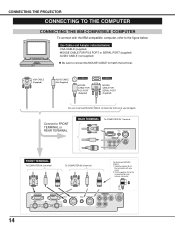
... CABLE (not supplied)
u Be sure to connect the MOUSE CABLE to match the terminal. Pull the portion (A) to FRONT TERMINAL or REAR TERMINAL
REAR TERMINAL To COMPUTER IN 1 terminal
COMPUTER IN 1
AUDIO 1 (STEREO)
CONTROL PORT 1
VIDEO IN 1 VIDEO/Y C/Cb(B-Y) Cr(R-Y)
S-VIDEO
R-AUDIO-L (MONO)
FRONT TERMINAL
To COMPUTER IN 2 terminal
To COMPUTER IN 3 terminal...
Owners Manual - Page 15

...MODE
SWITCHES 1
2
3
4
5
6
13"MODE (640 x 480) ON ON OFF OFF OFF OFF
16"MODE (832 x 624) OFF ON OFF ON OFF OFF
19"MODE (1024 x768) OFF ON ON OFF OFF OFF
21"MODE...TERMINAL
u MAC/VGA ADAPTER Set the switches as shown in the table below .
Pull the portion (A) to FRONT TERMINAL or REAR TERMINAL
REAR TERMINAL To COMPUTER IN 1 terminal
COMPUTER IN 1
AUDIO 1 (STEREO)
CONTROL PORT 1
VIDEO ...
Owners Manual - Page 16

... on both terminals. The S-VIDEO jack has priority over the VIDEO jack. REAR TERMINAL To VIDEO IN 1 or 2 terminal
VIDEO R
COMPUTER IN 1
AUDIO 1
(STEREO)
CONTROL PORT 1
L
VIDEO IN 1
S-VIDEO
VIDEO/Y C/Cb(B-Y) Cr(R-Y)...Video input includes S-VIDEO Jacks to allow connection to the terminal. BNC Cable (not supplied)
Connect to FRONT TERMINAL or REAR TERMINAL
Connect either the Video cable or...
Owners Manual - Page 17
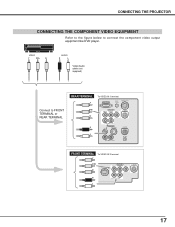
CONNECTING THE PROJECTOR
CONNECTING THE COMPONENT VIDEO EQUIPMENT
Refer to the figure below to FRONT TERMINAL or REAR TERMINAL
REAR TERMINAL
Y
To VIDEO IN 1 terminal
COMPUTER IN 1
AUDIO 1
(STEREO)
CONTROL PORT 1
C/Cb Cr
VIDEO IN 1 VIDEO/Y C/Cb(B-Y) Cr(R-Y)
S-VIDEO
R-AUDIO-L (MONO)
VIDEO IN 2
R
VIDEO
VIDEO(BNC)
S-VIDEO
L
R/C JACK
R-AUDIO-L (MONO)
FRONT TERMINAL To VIDEO...
Owners Manual - Page 21
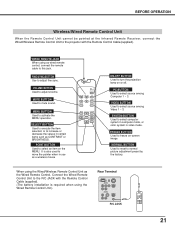
...mute sound.
MUTE... SYSTEM BUTTON Used to turn the projection lamp on or off.
P C
MUTE
VIDEO SYSTEM
MENU
... FREEZE BUTTON Used to increase or decrease the values in video mode.
FINE SYNC BUTTON Use to activate the MENU operation. MENU ...
WIRED REMOTE JACK When using the Wired Remote Control Unit.)
Rear Terminal
R/C JACK
21
POINT BUTTON Used to the projector with...
Owners Manual - Page 23
... input signal format. (Refer to P28)
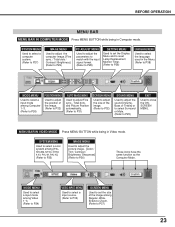
SETTING MENU
Used to set the size of the image. (Refer to P32)
SOUND MENU
Used to adjust the sound [Volume, Bass or Treble] or to ...select Surround or Mute. (Refer to P25)
EXIT
Used to P36)
These icons have the same function as the Computer Mode...
Owners Manual - Page 25

... Mute to "Surround" sound. To restore the sound to its previous volume level, set the Surround, turn the Surround "On" by pressing the POINT UP/DOWN buttons.
Press the POINT LEFT/RIGHT buttons to and then press the SELECT (REAR CLICK) button.
To increase the volume, point the arrow to select by pressing the...
Owners Manual - Page 27

... will be available. The system being selected.
Move the arrow to select SYSTEM and press the SELECT (REAR CLICK) button.
VGA 1 VGA 1 VGA 2 VGA 3 MODE 1 MODE 2
It terminates the SYSTEM Menu. Adjust and set , and then press SELECT (REAR CLICK) button.
VGA 1
SYSTEM BOX It displays the SYSTEM being selected. When selecting "Computer 1," "Computer 2," or...
Owners Manual - Page 28
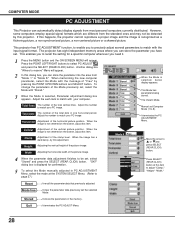
... of the picture image.
When the image is displayed for a specific computer whenever you have set Computer Mode (1 to 8). When the image has a dark bar(s), try this projector. Mode 4 Free
Move the arrow to or and
press SELECT (REAR CLICK) button.
4 When the parameter data adjustment finishes to be detected by pressing the POINT...
Owners Manual - Page 31
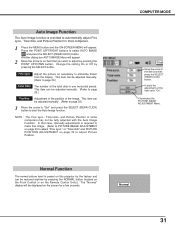
...
and press the SELECT (REAR CLICK) button to select AUTO IMAGE and press the SELECT (REAR CLICK) button. or "Total dots" and PICTURE POSITION ADJUSTMENT on the item set to adjust Picture Position.
... of some computers may not be restored anytime by pressing the POINT UP/DOWN button. COMPUTER MODE
Move the arrow to adjust by pressing the NORMAL button (located on the Front Control or ...
Owners Manual - Page 32
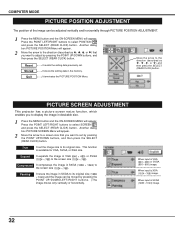
... image in SXGA to the direction (described as or ê),and then press the SELECT (REAR CLICK) button.
It stores the setting data in VGA (640 ´ 480) or SVGA (1024 ´ 768) to the... POINT UP/DOWN buttons, and then press the SELECT (REAR CLICK) button. Expand
It expands the image in the memory.
COMPUTER MODE
PICTURE POSITION ADJUSTMENT
The position of the image can be ...
Owners Manual - Page 37

... button and the ON-SCREEN MENU will appear.
Zoom It adjust the Wider Video image (16:9) to Wider Video Image size. VIDEO MODE
Move the pointer to the item that you want to set , and then press the SELECT (REAR CLICK) button. Move the arrow to the screen size that you want to...
Owners Manual - Page 38

...the ON-SCREEN MENU will appear. SETTING LANGUAGE
The language used in the "On" position, this function "Off.")
Preparation Display (The Number-counting down Display)
Mode Display Volume Display Mute Display Normal ... the screen when the video source is designed to select SETTING and press the SELECT (REAR CLICK) button. When replacing the lamp, reset the lamp replacement monitor timer by ...
Owners Manual - Page 43
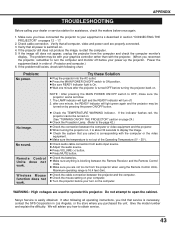
... service station for assistance, check the matters below once again.
1. l Check the mouse setting on . Do not attempt to ON position. We will advise you have connected the projector... this projector. l When turning the projector on page 24.)
l Check the Projection Lamp. (Refer to display the image.
Sanyo Service is about 30 seconds to the page 42.)
l Check the connection between...
Owners Manual - Page 44

...Rear-Projection Display
1.3" TFT Active Matrix type ´ 3
1,024 ´ 768 dots
2,359,296 ( 786,432 {1,024 ´ 768} ´ 3 )
800 TV lines
F = 2.5 / f = 23.7 mm
UHP, 120watt type
70"... 1
Separated Video Input : DIN 4 pin (S-VIDEO) ´ 3
Audio Input Jack
: RCA Jack (stereo / Right and Left) ´ 3
Terminals (Others)
Built-in Speaker Voltage Power Consumption Dimensions (W ´...
Similar Questions

I Need A Replacement Screen For A 46-inch Slim Led Tv.my Number 7403435700 Cory
need a replacement screen for a 46 Sanyo inch slim LED TV on cracked the screen and need a new one t...
need a replacement screen for a 46 Sanyo inch slim LED TV on cracked the screen and need a new one t...
(Posted by Coryadkins 6 years ago)

Losing Setting Every Time The Tv Is Turned Off
I have my Sanyo DP5541 hooked up to my Cox reciever on Video 3 input. evry time I turn the TV off it...
I have my Sanyo DP5541 hooked up to my Cox reciever on Video 3 input. evry time I turn the TV off it...
(Posted by imaricktripp 8 years ago)

Can I Buy A Replacement Remote For A Tv? I Can't Get The Channel To Change On Tv
(Posted by coakes 10 years ago)
Sound On My Led Tv
My sound goes off then I have to turn my LED TV off. I restart LED and it works. Model # FVM4012
My sound goes off then I have to turn my LED TV off. I restart LED and it works. Model # FVM4012
(Posted by Vernonlw65 11 years ago)
