
Sanyo DP55441 Support Question
Sanyo DP55441 Support Question
Find answers below for this question about Sanyo DP55441.Need a Sanyo DP55441 manual? We have 1 online manual for this item!
Question posted by reginaldvaughan on February 2nd, 2013
Troubleshooting
My 55" DP 55441 Sanyo screen goes black and turns back on after a few seconds. What is the cause.
Current Answers
Answer #1: Posted by tintinb on February 3rd, 2013 7:36 PM
tintinb

Member since:
October 26th, 2012 Points: 7,056,560

Member since:
October 26th, 2012 Points: 7,056,560
Your Sanyo DP55441 might have a problem with the power source. The best thing you have to do is to carefully check all the cable connections especially the power cables of your Sanyo device.
If you have more questions, please don't hesitate to ask here at HelpOwl. Experts here are always willing to answer your questions to the best of our knowledge and expertise.
Regards,
Tintin
Related Sanyo DP55441 Manual Pages
Owners Manual - Page 3

..., specifies that produce heat. The wide blade or the third prong are provided for choosing SANYO. Protect the power cord from being walked on the apparatus.
19. NATIONAL ELECTRICAL CODE
NEC...contact with liquides, such as when a power-supply cord or plug is connected to the television equipment, be
mounted to a wall or ceiling only as recommended
by the manufacturer and listed...
Owners Manual - Page 4

...is Listed by the cabinet only. PROTECTING THE LCD SCREEN
The screen can be determined by turning the equipment off and on a circuit different from Dolby Laboratories. Do...installation. To ensure your television is not maintained properly. NEVER spray liquids on the screen can cause permanent discoloration or dark spots. "As an Energy Star® Partner, Sanyo Electric co., Ltd. CAUTION...
Owners Manual - Page 5

... INSTRUCTIONS..2
FCC INFORMATION 3 ENERGY STAR® USER INFORMATION.3
TRADEMARKS 3 PROTECTING THE LCD SCREEN 3 HANDLING PRECAUTIONS 3
INSTALLING AND UNINSTALLING STAND 5
INSTALLATION 6 POSITIONING THE LCD HDTV 6...OUT JACKS 12
PC CONNECTIONS 13 PC MONITOR OPERATION 13
SPORTS MODE 14
ON-SCREEN MENU OPERATION 15 MENU NAVIGATION MAP 15 CHANNEL ADJUSTMENT 15 CHANNEL LIST OPERATION 16...
Owners Manual - Page 6

... place.
Leaving any object under the screen may fall, causing not only serious damage to the products but serious injury to use a trained, authorized dealer. SAFETY NOTE
For correct installing, mounting and uninstalling of the LCD TV and its stand. Installing Stand (55")
1 Place the LCD TV on a flat surface place where
2 Secure the...
Owners Manual - Page 7

NOTE: 1. Do not position the unit in inches.
* Diagonal screen: 54.6 inches
WALL MOUNTING (OPTIONAL)
Use the screws that are ...mounting kit shall be able to a wall mounting kit. VESA standard interface: TV 200 x 400mm
Wall Mounting Inserts
Mounting screws measurements: 55" TV M8 Diameter, Length - 13mm (min.); 16mm (max.)
Wall
• (60mm)
6 Wall Mounting kit is not supplied....
Owners Manual - Page 8

... Remote Control. English
GETTING STARTED
1 Install batteries in the Remote.
This HDTV can receive ANY unscrambled RF signal being broadcast.
7 Match the "+" and "-" signs on -screen MENU to Search for off -air signals from a direct Cable TV connection.
Please recycle used up batteries.
2 Antenna Connection for Clear QAM Cable channels. (see...
Owners Manual - Page 9

...
V DEO 1 NPUT
GETTING STARTED-CONTROLS AND JACKS
Input / OK button
LEFT-SIDE PANEL BACK-SIDE PANEL
Y
PC INPUT
PC AUDIO
INPUT
Pb
Pr
Pb
L
Pr
R
L
R
DEO3...INPUT (INPUT1, INPUT2 or INPUT3), PAGE 12 - A digital AV interface that accepts uncompressed video signals for updating the television's firmware and accessing JPEG files.
8
PC AUDIO INPUT, PAGE 12, 20 - USB PORT, PAGE 25 - ...
Owners Manual - Page 10

... need to choose options Football, Winter Sports, Marine Sports, Indoor Sports, and Off in turn .
Press this button to mute or restore the sound. PIX SHAPE Button- Press to ... execute RESET function, the TV will be reset to show the information window about the current channel on -screen menu. Press to set Off Timer function among "Off", "CC Display" and "Muted=On".
Press ...
Owners Manual - Page 12
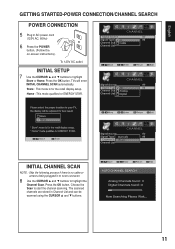
... qualifies for the retail display setup. The scanned channels are stored in AC power cord (120V AC, 60Hz)
6 Press the POWER button, (Follow the on-screen instructions). INITIAL setup 7 Use the CURSOR ▲ and ▼ buttons to start the channel scanning. English
GETTING STARTED-POWER CONNECTION/CHANNEL SEARCH
POWER CONNECTION
5 Plug...
Owners Manual - Page 13

...
device with this function)
1 Use an adapter (not supplied) to connect a DVI device to page 20)
2 Connect the audio out of a Digital input on the screen. This is available
from the Digital Audio output terminal only when receiving a part of the device to a multichannel
receiver as shown. BACK-SIDE VIEW OF...
Owners Manual - Page 15

..." button is pushed, an OSD showing the current sports mode will appear on the upper right of the screen.
14 If the channel or input source is changed under the "Sports Off" status, the "Sports Off..." OSD will appear on the upper right of the screen. Once the channel or the input source is changed , the sports mode will automatically be set to "...
Owners Manual - Page 16
... item).
4 Use the CURSOR ▲ and ▼ buttons to highlight
All. Use the CURSOR ◄ and ►
buttons to start the channel scanning. English
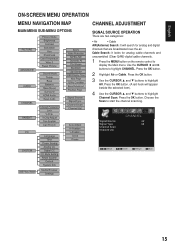
ON-SCREEN MENU OPERATION
MENU NAVIGATION MAP
MAIN MENU SUB-MENU OPTIONS
CHANNEL ADJUSTMENT
SIGNAL SOURCE OPERATION
There are broadcasted over-the-air. Press the OK button...
Owners Manual - Page 17
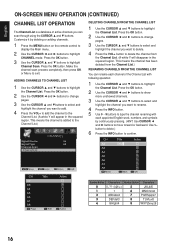
... channels you want to add.
4 Press the VOL+ to add the channel to the Channel List. (A white Y will disappear in the squared region. English
ON-SCREEN MENU OPERATION (CONTINUED)
CHANNEL LIST OPERATION
The Channel List is added to the Channel List.)
DELETING CHANNELS FROM THE CHANNEL LIST
1 Use the CURSOR ▲...
Owners Manual - Page 18

... using this password to access the PARENT menu from the second time.
1 Press the MENU button and then use the... (the new password you make when setting up the PARENT menu. Note:Turn on V-Chip function,you can operate V-Chip Adjust. Then the option you ...
2 Enter your password. ON-SCREEN MENU OPERATION (CONTINUED)
English
PARENT ADJUSTMENT
This SANYO television is equipped with an electronic V-...
Owners Manual - Page 19

... enter password again or press the MENU button to return to PARENT menu.
3 Use the CURSOR ▲ and ▼ buttons to highlight PARENT. English
ON-SCREEN MENU OPERATION (CONTINUED)
MPAA OPERATION
MPAA- Press the OK button.
2 Enter your password. If the password is correct, it will appear in the squared region...
Owners Manual - Page 22

... NR. Press the OK button.
4 Use the CURSOR ◄ and ► buttons to User then can turn on the Light sensor function.
• Please set PICTURE MODE to choose
from 20 Seconds, 30 Seconds, 40 Seconds, 50 Seconds or 60 Seconds. NEXT PAGE OPERATION
NEXT PAGE - Press the OK button.
3 Use the CURSOR ▲ and ▼...
Owners Manual - Page 23

...and ▼ buttons to Off. • When display happened double shadow or Outer Glow
,please turn off the 120Hz CONDITION. Return to previous page.
1 Press the MENU button on the remote control... to highlight
Time. of Eastern, Central, Mountain, Pacific, Alaska, and Hawaii, for the on-screen display of setting all displayed time zone on the remote control to display the Main menu.
2 Use...
Owners Manual - Page 24

...types of captions for Digital TV signal for your choice of setting the desired caption type to be turned off by itself. On Time Function- Press the OK button.
4 Use the CURSOR ▲ and...ANALOG CLOSED-CAPTION OPERATION Analog CC- A red hook will appear in the squared and blank region. turn on TV at your panel.
1 Press the MENU button on the remote control to display the Main menu.
2 Use the...
Owners Manual - Page 25

...OPERATION
System Info- Turning captioning ON causes the HDTV to open these captions (Digital or Analog) and superimpose them on the screen (Local broadcasters ... Custom
Font Size
Standard / Large / Small
Font Color
White / Red / Green / Blue / Yellow / Magenta / Cyan / Black
Font Style
Style1 / Style2 / Style3 / Style4 / Style5 / Style6 / Style7
Edge Type
None / Raised / Depressed / Outline...
Owners Manual - Page 30
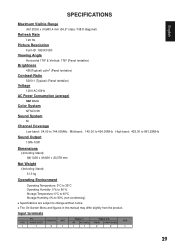
... 1920X1080
Viewing Angle
Horizontal 178° & Vertical: 178° (Panel tentative)
Brightness
450(Typical) cd/m2 (Panel tentative)
Contrast Ratio
5000:1 (Typical) (Panel tentative)
Voltage
120V AC 60Hz
AC Power Consumption (average)
342 Watts...Specifications are subject to change without notice. ■■ The On-Screen Menu and figures in this manual may differ slightly from the product.
Similar Questions

Can I Connect My Care Sara Hydrophone To My Sanyo Dp46840 Flat Panel Tv
(Posted by freespirittonya 9 years ago)
Can I Connect My Care Sara Hydrophone To My Sanyo Dp46840 Flat Panel Tv And How
(Posted by freespirittonya 9 years ago)


Why Does My Sanyo Dp55441 Keep Showing Start Up Screen After Its Turned Back On
(Posted by scottaz1jo 10 years ago)

I Would Like To Purchase A Factory Remote For Model Dp55441. (55 Inch Hdtv)
(Posted by alern 11 years ago)