
Sanyo DP55441 Support Question
Sanyo DP55441 Support Question
Find answers below for this question about Sanyo DP55441.Need a Sanyo DP55441 manual? We have 1 online manual for this item!
Question posted by scottaz1jo on January 17th, 2014
Why Does My Sanyo Dp55441 Keep Showing Start Up Screen After Its Turned Back On
The person who posted this question about this Sanyo product did not include a detailed explanation. Please use the "Request More Information" button to the right if more details would help you to answer this question.
Current Answers
Related Sanyo DP55441 Manual Pages
Owners Manual - Page 3

... near water. The product should be maintained. Apparatus shall not be exposed to the television equipment, be maintained. Heat build-up static charges. When installing an outside antenna is...your outlet, consult an electrician for replacement of the NEC that provides guidelines
for choosing SANYO.
Do not defeat the safety purpose of your LCD TV, and can also
be ...
Owners Manual - Page 4

... separation between the equipment and receiver. - "As an Energy Star® Partner, Sanyo Electric co., Ltd. NEVER spray liquids on the nameplate means the product is not ...television reception, which the receiver is not covered under license from that this television meet rigid U.L. It is encouraged to try to correct the interference by turning the equipment off and on the screen...
Owners Manual - Page 5

... 3 ENERGY STAR® USER INFORMATION.3
TRADEMARKS 3 PROTECTING THE LCD SCREEN 3 HANDLING PRECAUTIONS 3
INSTALLING AND UNINSTALLING STAND 5
INSTALLATION 6 POSITIONING THE LCD HDTV 6 WALL MOUNTING (OPTIONAL 6
GETTING STARTED 7 PReCAUTIONS 7 GETTING STARTED-CONTROLS AND JACKS 8 REMOTE CONTROL OPERATION 9 GETTING STARTED-CONNECTIONS.....10 POWER CONNECTION 11 INITIAL SETUP 11 INITIAL...
Owners Manual - Page 6

... TV by holding (moving or lifting) the LCD Display, hold the display's body. The desk's surface must be installed on a flat surface with soft material (such as a blanket) for protecting the display screen.
2 Remove screws in damage.
• Before installing, provide a desk (or a part of it) which is strong enough to support...
Owners Manual - Page 7

NOTE: 1. English
INSTALLATION POSITIONING THE LCD HDTV
Always use a firm-flat surface when positioning your HDTV to secure it to a wall mounting kit. Do not position the unit in inches.
* Diagonal screen: 54.6 inches
WALL MOUNTING (OPTIONAL)
Use the screws that are threaded into the standmounting inserts on the back of set weight...
Owners Manual - Page 8

..., connect your Cable box or Satellite receiver to HDMI or component (VIDEO3) jacks.
English
GETTING STARTED
1 Install batteries in the Remote.
Analog or Clear QAM cable channels from an antenna.
OR
b. Match the "+" and "-" signs on -screen MENU to moisture or heat such as sunshine. (the size of battery is AAA). Digital...
Owners Manual - Page 9

... PAGE 25 - A digital AV interface that accepts uncompressed video signals for updating the television's firmware and accessing JPEG files.
8 Standard (composite) video and audio inputs while ...DIGITAL AUDIO OUT (Coaxial), PAGE 12 - English
V DEO 1 NPUT
GETTING STARTED-CONTROLS AND JACKS
Input / OK button
LEFT-SIDE PANEL BACK-SIDE PANEL
Y
PC INPUT
PC AUDIO
INPUT
Pb
Pr
Pb
L
Pr
R
L
R...
Owners Manual - Page 10

... - Press hese buttons to select Energy saving mode options Off, ECO1, ECO2, and ECO3 in turn . Press to exit from menu.
9
Press to display channel information banner. Press to choose options...on your HDTV screen.( only for digital channels). Press 6 then 1-- SPORTS Button- GUIDE Button-
Channel Up / Down (CH+ / - ) Buttons-
RECALL Button-
Press to show the information window...
Owners Manual - Page 11

... - The Component jacks on your HDTV to select the input signal as a HD Cable Box, HD Satellite Receiver, DVD Player, and Game System. English
GETTING STARTED-CONNECTIONS
3 Analog Signal Connections - VIDEO1 or VIDEO2 (Shared with older analog devices such as a VCR. (Cables are included on this HDTV will accept HDTV, EDTV...
Owners Manual - Page 12
...
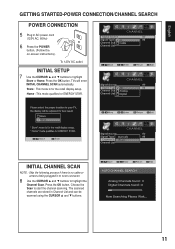
Store or Home. INITIAL setup 7 Use the CURSOR ▲ and ▼ buttons to start the channel scanning. Press the OK button.
Press the OK button.
The scanned channels are ...the POWER button, (Follow the on-screen instructions). To 120V AC outlet. Home : This mode qualifies for the retail display setup. English
GETTING STARTED-POWER CONNECTION/CHANNEL SEARCH
POWER CONNECTION
5...
Owners Manual - Page 13

This is available
from the Digital Audio output terminal only when receiving a part of a Digital input on the screen. The signal can also include Dolby® Digital or PCM audio when available. 1 Connect the HDMI input and your external
device with this function)
1 Use ...
Owners Manual - Page 14

... and tighten the screws. (Monitor Cable not supplied).
2 Insert one end of both from the PC and the HDTV VOLUME + / -
Press the MENU button to start automatically adjust function. PC MENU NAVIGATION MAP
PC MENU-
Phase- Move the image horizontally. HINT: Volume can be adjusted both the HDTV and Personal Computer...
Owners Manual - Page 15

...banging sounds
NOTE : When the "SPORTS" button is pushed, an OSD showing the current sports mode will appear on the upper right of the screen.
14 If the channel or input source is changed under the "Sports... Off" status, the "Sports Off" OSD will appear on the upper right of the screen. Once the channel or the input source is changed , the sports mode will automatically be set ...
Owners Manual - Page 16
...highlight
All.
Press the OK button.
3 Use the CURSOR ▲ and ▼ buttons to start the channel scanning. Press the OK button.
Press the OK button. (A red hook will search ... the CURSOR ◄ and ►
buttons to
display the Main menu. English
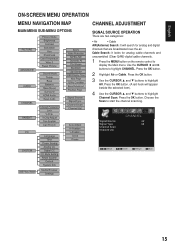
ON-SCREEN MENU OPERATION
MENU NAVIGATION MAP
MAIN MENU SUB-MENU OPTIONS
CHANNEL ADJUSTMENT
SIGNAL SOURCE OPERATION
There...
Owners Manual - Page 17
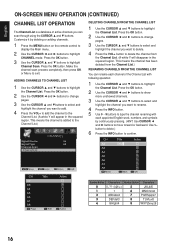
...highlight
the Channel List. Press the OK button.
2 Use the CURSOR ◄ and ► buttons to show
more unshowed channels.
3 Use the CURSOR ▲ and ▼ buttons to select and
highlight the channel...; buttons. Use 1-button to delete.)
6 Press the INFO button to confirm. English
ON-SCREEN MENU OPERATION (CONTINUED)
CHANNEL LIST OPERATION
The Channel List is added to the Channel List.)
...
Owners Manual - Page 18

...and enter "Confirm" numbers in the Channel List can operate V-Chip Adjust.
ON-SCREEN MENU OPERATION (CONTINUED)
English
PARENT ADJUSTMENT
This SANYO television is equipped with a D and V content rating could still be viewed.
1...rating can block portions of the TV rating by choosing one or more of classified channel in turn. Press the OK button.
2 Use the 0 - 9 buttons to enter "NEW PIN" ...
Owners Manual - Page 19

... PARENT. Press the OK button.
2 Enter your password. If the password is without RRT5 data, this function will appear in the squared region). English
ON-SCREEN MENU OPERATION (CONTINUED)
MPAA OPERATION
MPAA- Press the OK button.
4 Use the CURSOR ► buttonto highlight ADVANCED.
5 Use the CURSOR ▲ and ▼ buttons to...
Owners Manual - Page 23

... and ▼ buttons to Off. • When display happened double shadow or Outer Glow
,please turn off the 120Hz CONDITION. Press the OK button.
English
NOTES : • When you select to ...
Time. of Eastern, Central, Mountain, Pacific, Alaska, and Hawaii, for the on-screen display of setting all ON- Screen Menu.
1 Press the MENU button on all displayed time zone on the remote control ...
Owners Manual - Page 25

....
1 Use the CURSOR ◄ and ► buttons to the RESET button on the screen (Local broadcasters decide which caption signals to highlight
SYSTEM.
DEFAULT OPERATION
Default-
Press the OK...9650; and ▼ buttons to highlight
Reset System. SYSTEM INFO OPERATION
System Info- Turning captioning ON causes the HDTV to open these captions (Digital or Analog) and superimpose ...
Owners Manual - Page 29

...
CHANNEL menu. (Set Signal Type
• MUTE function may be turned ON.
• Check the Audio / Video connections.
• Press...
broadcasted.
• Selec Channel List to add channels or start channel scan in .
• Replace batteries. • ...mode.
• Select another channel. Cannot display picture on a full screen
• Press the PIX SHAPE button on the remote control to ...
Similar Questions

Can I Connect My Care Sara Hydrophone To My Sanyo Dp46840 Flat Panel Tv
(Posted by freespirittonya 9 years ago)
Can I Connect My Care Sara Hydrophone To My Sanyo Dp46840 Flat Panel Tv And How
(Posted by freespirittonya 9 years ago)

Sanyo 55' Lcd Model Dp55441: No Picture, No Sound, No Backlight?
Sanyo 55" LCD TV. Model DP55441. A little more than 3 years old. Green power button is on but there'...
Sanyo 55" LCD TV. Model DP55441. A little more than 3 years old. Green power button is on but there'...
(Posted by Klau1210 10 years ago)

How Do I Stop My Sanyo Dp55441 From Wanting To Turn Off Every Couple Of Hours
(Posted by camioJimp 10 years ago)

I Have A Sanyo Dp55441 And Every Time I Turn It On It Goes To The Set Up Screen
(Posted by lad2007 12 years ago)