
Sanyo DP55441 Support Question
Sanyo DP55441 Support Question
Find answers below for this question about Sanyo DP55441.Need a Sanyo DP55441 manual? We have 1 online manual for this item!
Question posted by anoCoo on September 14th, 2014
What Size Screws Are Used To Mount A Sanyo Dp55441
The person who posted this question about this Sanyo product did not include a detailed explanation. Please use the "Request More Information" button to the right if more details would help you to answer this question.
Current Answers
Related Sanyo DP55441 Manual Pages
Owners Manual - Page 3

...these instructions. Heed all instructions. When installing an outside antenna is connected to the television equipment, be taken to qualified service personnel. Follow all warnings.
Unplug this apparatus ...shall
be
mounted to an antenna discharge unit,
size of grounding conductors, location of your product. Protect the power cord from being walked on the LCD TV. Use only with...
Owners Manual - Page 4

.... - To ensure your television is not covered under license from that interference will not occur in the United States and other countries. TRADEMARKS
Manufactured under warranty. "As an Energy Star® Partner, Sanyo Electric co., Ltd.
excessive pressure can radiate radio frequency energy and, if not installed and used in accordance with the...
Owners Manual - Page 5

... 3 ENERGY STAR® USER INFORMATION.3
TRADEMARKS 3 PROTECTING THE LCD SCREEN 3 HANDLING PRECAUTIONS 3
INSTALLING AND UNINSTALLING STAND 5
INSTALLATION 6 POSITIONING THE LCD HDTV 6 WALL MOUNTING (OPTIONAL 6
GETTING STARTED 7 PReCAUTIONS 7 GETTING STARTED-CONTROLS AND JACKS 8 REMOTE CONTROL OPERATION 9 GETTING STARTED-CONNECTIONS.....10 POWER CONNECTION 11 INITIAL SETUP 11 INITIAL...
Owners Manual - Page 6

...size.
Do not handle the LCD TV by holding (moving or lifting) the LCD Display, hold the display's body. Do not place it ) which is strongly recommended to use... 4 screws. The display may result in damage.
• Before installing, provide a desk (or a part of it on a flat and ... to a person. SAFETY NOTE
For correct installing, mounting and uninstalling of the LCD TV and its stand...
Owners Manual - Page 7

VESA standard interface: TV 200 x 400mm
Wall Mounting Inserts
Mounting screws measurements: 55" TV M8 Diameter, Length - 13mm (min.); 16mm (max.)
Wall
• (60mm)
6 Wall Mounting kit is not supplied. 2.
NOTE: 1. English
INSTALLATION POSITIONING THE LCD HDTV
Always use a firm-flat surface when positioning your HDTV to secure it to sustain at least 3 times of your HDTV...
Owners Manual - Page 8

...used up batteries.
2 Antenna Connection for Clear QAM Cable channels. (see page 11)
For the best picture, connect your Cable box or Satellite receiver to moisture or heat such as sunshine. (the size...from a direct Cable TV connection.
PReCAUTIONS
Do not use the on the batteries with different charge levels. NOTES: You must use rechargeables together with dry cells, other types, mixed ...
Owners Manual - Page 9

...input but also sharing the HDMI audio input for updating the television's firmware and accessing JPEG files.
8
Use a Phono-Type (Coaxial) Digital Audio Out Cable to connect... system equipped with Dolby® Digital. Use for DVI signal connecting. English
V DEO 1 NPUT
GETTING STARTED-CONTROLS AND JACKS
Input / OK button
LEFT-SIDE PANEL BACK-SIDE PANEL
Y
PC INPUT
PC AUDIO
INPUT
Pb
Pr...
Owners Manual - Page 11

... SDTV video signals and make a great choice for external devices. NOTES:
• The VIDEO2 with Green video jack, White and Red audio jacks can be used as Composite connectors like VIDEO1 (Shared with Component-Y).
• You may follow the VIDEO2 OPERATION to choose suitable function (Video or YPbPr) for Component when...
Owners Manual - Page 12
... English
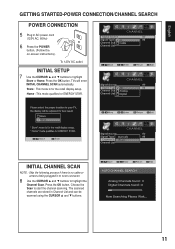
GETTING STARTED-POWER CONNECTION/CHANNEL SEARCH
POWER CONNECTION
5 Plug in Channel List and can be scanned using the CURSOR ▲ and ▼ buttons.
11 To 120V AC outlet. Store : This mode ...is no cable or antenna being plugged-in to tuner connector.
8 Use the CURSOR ▲ and ▼ buttons to highlight the
Channel Scan. Press the OK button. Choose ...
Owners Manual - Page 13

... shown. The signal can also include Dolby® Digital or PCM audio when available. 1 Connect the HDMI input and your external
device with this function)
1 Use an adapter (not supplied) to connect a DVI device to select the input signal as shown. NOTE : Press the INPUT button to a HDMI1 input jack. NOTE...
Owners Manual - Page 14

... to a XGA value such as 1024 x 768 before powering on the HDTV and tighten the screws. (Monitor Cable not supplied).
2 Insert one end of setting. Adjust the Dot frequency to ...preset your PC's output resolution to highlight H-Position, V-Position, Clock or Phase. AUTO ADJUSTMENTS OPERATION
1 Use the CURSOR ▲ and ▼ buttons on the HDTV and any cables, disconnect the AC Power Cords...
Owners Manual - Page 16
Press the OK button.
3 Use the CURSOR ▲ and ▼ buttons to start the channel scanning. Choose the
Scan to ... that are two categories:
● Air
● Cable
AIR(Antenna) Search: It will appear beside the selected item).
4 Use the CURSOR ▲ and ▼ buttons to highlight
Channel Scan. Press the OK button.
English
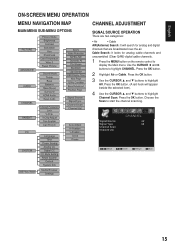
ON-SCREEN MENU OPERATION
MENU NAVIGATION...
Owners Manual - Page 17
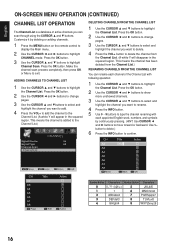
... want to delete.
4 Press the VOL+ button to delete the channel from the Channel List.)
RENAMING CHANNELS FROM THE CHANNEL LIST
You can scan through using the CURSOR ▲ and ▼ buttons. This means the channel has been deleted from the Channel List. (A white Y will appear in the squared region...
Owners Manual - Page 18

...Please carefully remember new password. Change password OPERATION
1 Press the MENU button and then use the CURSOR ◄ and ► buttons to highlight PARENT. If the password is... FV). ON-SCREEN MENU OPERATION (CONTINUED)
English
PARENT ADJUSTMENT
This SANYO television is correct, it will automatically return to PARENT menu. Use this TV and entering the PARENT menu for example, TV-14...
Owners Manual - Page 19

...
ADVANCED- Then the option you want to highlight
V-Chip Adjust.
Press the OK button.
5 Use the CURSOR ▲ and ▼ buttons to select the setting you can enter password again ... current program stream is modified to include advanced adjustment option.
1 Press the MENU button and then use the CURSOR ◄ and ► buttons to PARENT menu. Press the OK button.
2 Enter...
Owners Manual - Page 20

... OPERATION
1 Press the MENU button on the remote control to display the Main menu.
2 Use the CURSOR ◄ and ► buttons to highlight
PICTURE. NOTES: • User mode... (Sound Equalizer) will allow to adjust
frequency response from the factory default value.
1 Use the CURSOR ◄ and ► buttons to highlight
PICTURE. BRIGHTNESS/ CONTRAST/ SATURATION/ HUE/ SHARPNESS...
Owners Manual - Page 21

...(See PAGE 14)
1 Press the MENU button on the remote control to display the Main menu.
2 Use the CURSOR ◄ and ► buttons to highlight
ADVANCED. Press the OK button. BASS BOOST OPERATION
... this setting, the audio input signal will be fixed to highlight
AUDIO. Press the OK button.
3 Use the CURSOR ▲ and ▼ buttons to the HDMI1 port. HDMI AUDIO OPERATION HDMI AUDIO SETTINGS ...
Owners Manual - Page 24

...Analog TV signal programs on your panel.
1 Press the MENU button on the remote control to display the Main menu.
2 Use the CURSOR ◄ and ► buttons to highlight
SYSTEM.
3 Use the CURSOR ▲ and ▼...30 min, 60 min, 90 min, 120 min, 150 min or 180 min. Sleep- Press the OK button.
5 Use the CURSOR ▲ and ▼ buttons to select CC1,
CC2, CC3, CC4, TT1, TT2, TT3 or TT4....
Owners Manual - Page 25

... CURSOR ▲ and ▼ buttons to select Reset
or Cancel.
Press the OK button.
3 Use the CURSOR ▲ and ▼ buttons to select CC
Setting, CC Priority, Digital CC, Present, Font Size, Font Color, Font Style, Edge Type, Edge Color or Background Color. DEFAULT OPERATION
Default- There are several Subcatalogs for each...
Owners Manual - Page 26
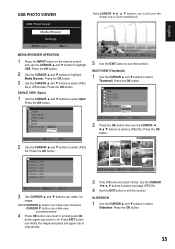
... can rotate view clockwise.
NOTE:CURSOR ▲ button can to original size.
3 If the JPEG file more than 15 files. SLIDESHOW
1 Use the CURSOR ▲ and ▼ buttons to select
Thumbnail.
MULTI VIEW (Thumbnail)
1 Use the CURSOR ▲ and ▼ buttons to select
Slideshow. Use the CURSOR buttons to select next page JPEG file...
Similar Questions

Size Of Base Mount Screws M6 But What Is Thread Count
(Posted by davidmehaffey8989 8 years ago)

What Size Screws Are Needed For The Base Mount On A Sanyo Dp55441 Hdtv
(Posted by pajohnso 9 years ago)

What Size Screws Are The Four Screws That Bolt The Wall Mount To The Tv
What size are the four screws I need to bolt wall mount on to my 46" Sanyo flat screen??
What size are the four screws I need to bolt wall mount on to my 46" Sanyo flat screen??
(Posted by harleynurse7 11 years ago)