
Sanyo DP55441 Support Question
Sanyo DP55441 Support Question
Find answers below for this question about Sanyo DP55441.Need a Sanyo DP55441 manual? We have 1 online manual for this item!
Question posted by whatawurld on November 24th, 2018
Screws For Base Are Lost. It Had Been Wall Mounted.
I have a 55" Sanyo DP55441 TV. I need screw size for the plastic base on bottom stand
Current Answers
Answer #1: Posted by Odin on November 24th, 2018 8:29 AM
Odin

Member since:
April 10th, 2010 Points: 41,236,700

Member since:
April 10th, 2010 Points: 41,236,700
Your first step should be to call the manufacturer. use the contact information here--https://www.contacthelp.com/sanyo/customer-service. Sanyo may just send you what you need, or, if not, should provide the information for getting it yourself.
Hope this is useful. Please don't forget to click the Accept This Answer button if you do accept it. My aim is to provide reliable helpful answers, not just a lot of them. See https://www.helpowl.com/profile/Odin.
Related Sanyo DP55441 Manual Pages
Owners Manual - Page 3

..., stand, tripod...TV cabinet for the grounding electrodes.
16. In the U.S. The product should be placed on the LCD TV....
English
Thank you for your product. Please read all servicing to grounding electrodes, and requirements
for allowing air circulation and
cooling the LCD TV...TV...television equipment, be ...TV... a wall or... SANYO. Wall or Ceiling Mounting ...TV, and can fall into ...
Owners Manual - Page 4

... Dolby Laboratories. "As an Energy Star® Partner, Sanyo Electric co., Ltd.
Connect the equipment into an outlet...Licensing LLC in a residential installation. To ensure your television is designed and manufactured to meet ENERGY STAR requirements...cabinet only. Consult the dealer or an experienced radio/TV technician for energy efficiency." CAUTION: FCC Regulations state that...
Owners Manual - Page 5

... INSTRUCTIONS..2
FCC INFORMATION 3 ENERGY STAR® USER INFORMATION.3
TRADEMARKS 3 PROTECTING THE LCD SCREEN 3 HANDLING PRECAUTIONS 3
INSTALLING AND UNINSTALLING STAND 5
INSTALLATION 6 POSITIONING THE LCD HDTV 6 WALL MOUNTING (OPTIONAL 6
GETTING STARTED 7 PReCAUTIONS 7 GETTING STARTED-CONTROLS AND JACKS 8 REMOTE CONTROL OPERATION 9 GETTING STARTED-CONNECTIONS.....10 POWER CONNECTION...
Owners Manual - Page 6

...; Before putting the LCD Display on a flat surface with this stand should be larger than the LCD Display's screen size. SAFETY NOTE
For correct installing, mounting and uninstalling of the LCD TV Stand, it is no object on non flat, unlevel or unstable cart or stand. Do not handle the LCD TV by holding (moving or lifting) the LCD...
Owners Manual - Page 7

... 3 times of your HDTV. Wall Mounting kit is not supplied. 2. Wall mounting kit shall be able to a wall mounting kit. Do not position the unit in inches.
* Diagonal screen: 54.6 inches
WALL MOUNTING (OPTIONAL)
Use the screws that are in a confined area.
VESA standard interface: TV 200 x 400mm
Wall Mounting Inserts
Mounting screws measurements: 55" TV M8 Diameter, Length - 13mm (min...
Owners Manual - Page 8

...-air signals.
Do not expose the Remote or batteries to Search for off -air signals from a direct Cable TV connection. NOTES: You must use rechargeables together with dry cells, other types, mixed new and old or batteries ...7 Match the "+" and "-" signs on -screen MENU to moisture or heat such as sunshine. (the size of battery is AAA). Analog or Clear QAM cable channels from an antenna.
Owners Manual - Page 9

...
LEFT-SIDE PANEL BACK-SIDE PANEL
Y
PC ...INPUT
PC AUDIO
INPUT
Pb
Pr
Pb
L
Pr
R
L
R
DEO3 INPUT V DEO2 INPUT
Y/VIDEO
DV
L
INPUT1
INPUT2
ANT R
COMPOSITE VIDEO INPUT VIDEO1, PAGE 10 -
DIGITAL AUDIO OUT (Coaxial), PAGE 12 -
HDMI INPUT (INPUT1, INPUT2 or INPUT3), PAGE 12 - A digital AV interface that accepts uncompressed video signals for updating the television...
Owners Manual - Page 10

...Buttons - CURSOR ◄ (left and right. INFO Button- RECALL Button- NOTE : The Off Timer will need to select Energy saving mode options Off, ECO1, ECO2, and ECO3 in turn . Press to exit from...Memory database will clear all analog channel enabled). Digital Captions can be canceled when the TV is turned off or when a power failure occurs. Digital Banner may contain: Channel Number...
Owners Manual - Page 12
....
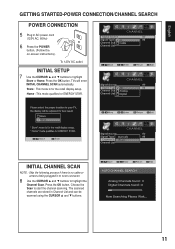
8 Use the CURSOR ▲ and ▼ buttons to highlight the
Channel Scan. To 120V AC outlet.
Home : This mode qualifies for the retail display setup. TVs will enter INITIAL CHANNEL SCAN automatically. English
GETTING STARTED-POWER CONNECTION/CHANNEL SEARCH
POWER CONNECTION
5 Plug in Channel List and can be scanned using the...
Owners Manual - Page 14

....
NOTE: Power on the HDTV and any cables, disconnect the AC Power Cords of both from the monitor output on the HDTV and tighten the screws. (Monitor Cable not supplied).
2 Insert one end of a Stereo Mini-Audio cable into the PC Audio Out jack and the other end into the HDTV...
Owners Manual - Page 15

..." OSD will appear on the upper right of the screen.
14 English
SPORTS MODE
By simply pressing the " SPORTS" button on the remote control, the TV will automatically optimize both picture and sound settings for the programs shown.
■■ Off ■■ Football
−− For golf, football programs etc...
Owners Manual - Page 18

... and FV). ON-SCREEN MENU OPERATION (CONTINUED)
English
PARENT ADJUSTMENT
This SANYO television is wrong, you can enter the password again or press MENU button ...TV-14 rated programs with content you want to adjust and press the OK button. (MPAA,Block All,TV-Y,TV-Y7,TV-G,TV-PG,TV-14,and TV...On or Off. If the password is correct, it will need to adjust and press the OK button. Press the OK ...
Owners Manual - Page 22

...User then can turn on this function. Press the OK button. NOTE:
• This item will not need noise reduction. Press the OK button. Press the OK button.
3 Use the CURSOR ▲ and &#...► buttons to adjust the 120Hz Condition setting to select the
OSD Display Time option. Try having the TV setting on the remote control to display the Main menu.
2 Use the CURSOR ◄ and ► ...
Owners Manual - Page 24

... highlight
SYSTEM.
3 Use the CURSOR ▲ and ▼ buttons to highlight
SYSTEM. turn on TV at your panel.
1 Press the MENU button on the remote control to display the Main menu.
2 Use the CURSOR..., CS4, CS5 or CS6. DIGITAL CLOSED-CAPTION OPERATION
Digital CC- Automatic power saving, when no TV signal input display on your setting time.
1 Press the MENU button on the remote control to ...
Owners Manual - Page 25

... Display / Muted=On / Off
CC Priority
Automatic / Analog CC / Digital CC
Digital CC Preset
Default / Custom
Font Size
Standard / Large / Small
Font Color
White / Red / Green / Blue / Yellow / Magenta / Cyan / Black...9650; and ▼ buttons to select CC
Setting, CC Priority, Digital CC, Present, Font Size, Font Color, Font Style, Edge Type, Edge Color or Background Color. NOTE: Be sure you...
Owners Manual - Page 26
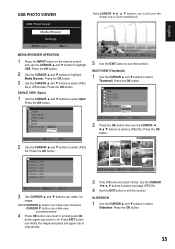
... and press exit again can to exit this function. Use the CURSOR buttons to select next page JPEG file.
4 Use the EXIT button to original size.
3 If the JPEG file more than 15 files. Press the OK button.
MULTI VIEW (Thumbnail)
1 Use the CURSOR ▲ and ▼ buttons to select JPEG...
Owners Manual - Page 29

... English
Problem:
Check these Conditions:
Try these Solutions:
Page No. to
Closed -
up and cool down of TV.
7, 9
Cabinet makes popping sound
• This is broadcasting a • Press the CAPTION button to All...website at http://www.sanyoctv.com or call us toll free at front of the plastic cabinet parts.
No USB Media message appears on screen
• Check the external ...
Owners Manual - Page 30
...
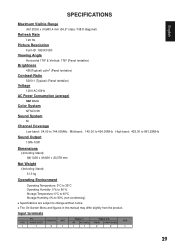
5000:1 (Typical) (Panel tentative)
Voltage
120V AC 60Hz
AC Power Consumption (average)
342 Watts
Color System
NTSC3.58
Sound System
M
Channel Coverage
Low band: 54.00 to 144.00MHz Mid band: 145.00 to 424.00MHz High band: 425.00 to 861.25MHz
Sound Output
10W+10W
Dimensions
(Including Stand) (W)1328 x (H)926...
Owners Manual - Page 31
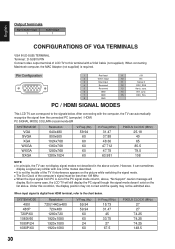
... Dot Clock of the computer's signal must be admitted also.
DDC_SCL
This LCD TV can sometimes display a signal very similar with one of the modes described.
■■ It is ...PIXELS CLOCK (MHz) 25.18 40 65 85.5 79.5 108
NOTE:
■■ In principle, the TV can automatically recognize the signal from HDMI terminal, refer to the chart below . After connecting with a VGA ...
Similar Questions


Does The Sanyo Tv Dp55441 Come With Wall Mounting Screws
(Posted by justeidi 10 years ago)

Wall Mounting
Sanyo DP39842 just purchased and I do not understand how my standard wall mount works with it. Someo...
Sanyo DP39842 just purchased and I do not understand how my standard wall mount works with it. Someo...
(Posted by irishksm 11 years ago)

What Size Screws Are The Four Screws That Bolt The Wall Mount To The Tv
What size are the four screws I need to bolt wall mount on to my 46" Sanyo flat screen??
What size are the four screws I need to bolt wall mount on to my 46" Sanyo flat screen??
(Posted by harleynurse7 11 years ago)