
Sanyo DP55441 Support Question
Sanyo DP55441 Support Question
Find answers below for this question about Sanyo DP55441.Need a Sanyo DP55441 manual? We have 1 online manual for this item!
Question posted by shunetco on August 17th, 2014
Sanyo Dp55441 How To Change To Home Settings
The person who posted this question about this Sanyo product did not include a detailed explanation. Please use the "Request More Information" button to the right if more details would help you to answer this question.
Current Answers
Related Sanyo DP55441 Manual Pages
Owners Manual - Page 3

...
When installing an outside antenna system should not be
mounted to the television equipment, be fatal.
6. Install in a proper position. Only use caution when moving... the cart/ appliance combination to grounding electrodes, and requirements
for choosing SANYO. English
Thank you for the grounding electrodes.
16. NO USERSERVICEABLE PARTS INSIDE. A...
Owners Manual - Page 4

...not use excessive pressure when cleaning the screen;
"As an Energy Star® Partner, Sanyo Electric co., Ltd. Do not use hard objects such as hard cloth or paper. ...; guidelines for ENERGY STAR qualification. Changing Picture Settings may increase energy consumption, possibly beyond the limits required for energy efficiency." To ensure your television is encouraged to try to operate ...
Owners Manual - Page 7

... standmounting inserts on the back of your HDTV. NOTE: 1. English
INSTALLATION POSITIONING THE LCD HDTV
Always use a firm-flat surface when positioning your HDTV to secure it to sustain at least 3 times of set weight.
VESA standard interface: TV 200 x 400mm
Wall Mounting Inserts
Mounting screws measurements: 55" TV M8 Diameter, Length...
Owners Manual - Page 9

...digital AV interface that accepts uncompressed video signals for updating the television's firmware and accessing JPEG files.
8 This HDMI input ...1 NPUT
GETTING STARTED-CONTROLS AND JACKS
Input / OK button
LEFT-SIDE PANEL BACK-SIDE PANEL
Y
PC INPUT
PC AUDIO
INPUT
Pb
Pr
Pb
L
Pr
R
L...Digital Audio Output to an advanced stereo home theater system equipped with analog audio and composite video output...
Owners Manual - Page 10

...CURSOR ▲ (up and down ) Buttons -
RECALL Button- Press this button to default (all customized settings.
Volume Up / Down (VOL+ / - )Buttons- Available options depend on your HDTV screen.( only ... the menu, when required.
CAPTION Button- Digital Captions can be changed through the SYSTEM CC Stytle Settings from menu.
9 Press to switch to mute or restore the ...
Owners Manual - Page 11

... connector colors to jack colors.
2 Press the INPUT button to step through the signal inputs to select Video1 or Video2.
3 Press the INPUT button to set Green, Blue, and Red video jacks asVIDEO2 or VIDEO3(YPbPr) on the HDTV andto your analog AV equipment as Composite connectors like VIDEO1 (Shared with...
Owners Manual - Page 12
... button. Move
OK Enter
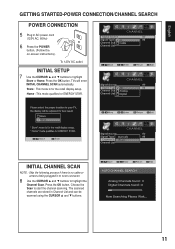
INITIAL CHANNEL SCAN
NOTE : Skip the following process if there is for ENERGY STAR. Choose the Scan to highlight
Store or Home. Home : This mode qualifies for the retail display setup. The scanned channels are stored in AC power cord (120V AC, 60Hz)
6 Press the POWER button, (Follow...
Owners Manual - Page 13

... AMPLIFIER
Cable not supplied
12 BACK-SIDE VIEW OF HDTV
DIGITAL AUDIO 1 Connect the Digital Audio output to a multichannel
receiver as shown. NOTE : HDMI Audio setting is a digital AV interface that accepts uncompressed video signals for the best picture quality possible.
It supports HDCP copy protection and allows transmission of copy...
Owners Manual - Page 14

...input will not affect other end into the PC Audio Out jack and the other input settings.
AUTO ADJUSTMENTS OPERATION
1 Use the CURSOR ▲ and ▼ buttons on the...MAP
PC MENU- MANUAL ADJUSTMENT OPERATION
The Clock, Phase, Horizontal Position, and Vertical Position are set automatically when Auto Adjustment is completely done. Adjust the phase when the picture appears flicker or ...
Owners Manual - Page 15

If the channel or input source is changed , the sports mode will automatically be set to "Off", and the "Sports Off" OSD will appear on the upper ...MODE
By simply pressing the " SPORTS" button on the remote control, the TV will automatically optimize both picture and sound settings for the programs shown.
■■ Off ■■ Football
−− For golf, football programs etc. ...
Owners Manual - Page 17
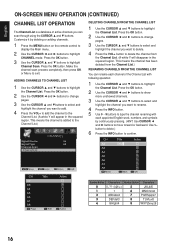
...Press the OK button. Press the OK button.
2 Use the CURSOR ◄ and ► buttons to change
pages.
3 Use the CURSOR ▲ and ▼ buttons to select and
highlight the channel you can rename...and ▼ buttons. Press the OK button.
2 Use the CURSOR ◄ and ► buttons to change
pages.
3 Use the CURSOR ▲ and ▼buttons to select and
highlight the channel you want to...
Owners Manual - Page 18

...English
PARENT ADJUSTMENT
This SANYO television is equipped with an...yellow lock will automatically return to enter "NEW PIN" (the new password you make when setting up the PARENT menu. NOTE : Please carefully remember new password. button 4 times to... menu.
3 Use the CURSOR ▲ and ▼ buttons to highlight Change Password.
By blocking just the L and S content ratings of America) and...
Owners Manual - Page 19

...Press the OK button.
5 Use the CURSOR ▲ and ▼ buttons to select the setting you selected will be locked. (A yellow lock will automatically return to highlight
Can English. CAN ENGLISH...in the squared region). If the password is wrong, you want to make or cancel the selected settings. Press the OK button.
2 Enter your password. V-Chip Adjust OPERATION
ADVANCED- If the password ...
Owners Manual - Page 20

...highlight
PICTURE.
Press the OK button. RESET PICTURE OPERATION Reset Picture- Make the previous adjustment settings under the PICTURE mode recovered from 100Hz to highlight
AUDIO. BRIGHTNESS/ CONTRAST/ SATURATION/ HUE/... value.
1 Use the CURSOR ◄ and ► buttons to adjust the
audio setting.(Off/Rock/Pop/Jazz/Vocal/User). COLOR TEMPERATURE OPERATION
1 Press the MENU button to ...
Owners Manual - Page 22

... ► buttons to highlight
ADVANCED.
NOTE : The remote controls of Light sensor in your home. Try having the TV setting on the remote control to display the Main menu.
2 Use the CURSOR ◄ and ... NR OPERATION
1 Press the MENU button on this setting to Middle, Low or Off if a picture is too dark in the Home mode is High.
• Change this function. NOTE:
• This item will ...
Owners Manual - Page 23

...8226; When you select to PC source or USB mode, the120Hz
CONDITION default setting is set to select
Reset or Cancel. Press the OK button.
3 Use the CURSOR..., Alaska, and Hawaii, for the on-screen display of setting all ON- Press the OK button.
RESET ADVANCED OPERATION Reset Advanced- Reset the previous adjustment settings under the ADVANCED mode to the factory default value.
1 Use...
Owners Manual - Page 24

...of captions for Digital TV signal for your choice of setting the desired caption type to be displayed with Analog TV signal programs on your panel.
1 Press the MENU button on the remote control to...
Choose from eight types of captions for Analog TV signal for your choice of setting the counting down of setting the desired caption type to highlight
SYSTEM. A red hook will appear in the ...
Owners Manual - Page 25

... HDTV to open these captions (Digital or Analog) and superimpose them on your choice of setting the desired caption style superimposed on the screen (Local broadcasters decide which caption signals to transmit). Digital Captions can be changed by your HDTV memory.
1 Use the CURSOR ◄ and ► buttons to highlight
SYSTEM. There...
Owners Manual - Page 29

...Cannot display picture on a full screen
• Press the PIX SHAPE button on the remote control to change settings.
7, 11, 15 - 16
9, 23 9, 21
Poor Picture/ Sound (watching Analog)
"No Signal...• Weak Signal.
• Check CHANNEL menu, Signal Source item should set to Cable.
• Set Signal Source to Cable, Set Signal Type to All and execute Channel Scan to find one or more possible ...
Owners Manual - Page 30
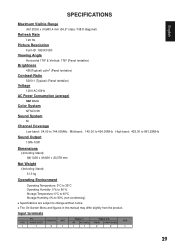
... Angle
Horizontal 178° & Vertical: 178° (Panel tentative)
Brightness
450(Typical) cd/m2 (Panel tentative)
Contrast Ratio
5000:1 (Typical) (Panel tentative)
Voltage
120V AC 60Hz
AC Power Consumption (average)... 90% (non-condensing)
■■ Specifications are subject to change without notice. ■■ The On-Screen Menu and figures in this manual may differ slightly from the ...
Similar Questions

Why Do I Have To Change Tv Settings Everytime I Turn It On
(Posted by eduarnait 9 years ago)


How Do I Set My Sanyo Television Model Dp55441 To A Permanent Setup Setting
(Posted by tuvshchr 9 years ago)

How To Change Pix Shape Flat Screen
(Posted by araCH 10 years ago)
How Do I Change Screen Settings? Only Have Picture At Half Screen >
(Posted by cweatherly 12 years ago)