Samsung ME19R7041FS/AA Support Question
Samsung ME19R7041FS/AA Support Question
Find answers below for this question about Samsung ME19R7041FS/AA.Need a Samsung ME19R7041FS/AA manual? We have 2 online manuals for this item!
Question posted by chris1378 on January 12th, 2023
Replace Outer Door
Are there any instructions on how to replace the outer door in order to fix the door latch ? The piece on the door that held the spring broke on the door.
Current Answers
Answer #1: Posted by SonuKumar on January 12th, 2023 8:09 PM
SonuKumar

Member since:
May 9th, 2021 Points: 16,621,300

Member since:
May 9th, 2021 Points: 16,621,300
https://www.youtube.com/watch?v=APlo38QspFg
Can you replace just the door on a microwave?
If your microwave handle, door, or hinges have been damaged, these things can be fixed without worrying about the rest of the microwave. You will need to pry apart the inner and outer shells of the microwave door to expose the hinges. From there, you can repair or replace the door at leisure.
Please respond to my effort to provide you with the best possible solution by using the "Acceptable Solution" and/or the "Helpful" buttons when the answer has proven to be helpful.
Regards,
Sonu
Your search handyman for all e-support needs!!
Answer #2: Posted by madushika on January 17th, 2023 12:11 AM
madushika

Member since:
January 13th, 2023 Points: 29,290
Member since:
January 13th, 2023 Points: 29,290
Replacing an outer door can be a big project, but it is a great way to improve the look and security of your home. Here are the steps to follow to replace an outer door:
- Measure the door: The first step is to measure the door opening to ensure that the new door will fit properly. Measure the height, width and depth of the door opening. Also, measure the distance from the top of the door opening to the floor and the distance from the door knob to the hinges. This information will be necessary to purchase the right size door.
- Select the door: With the measurements in hand, you can select the door you want to install. You can choose from a variety of materials including wood, steel, or fiberglass. You can also choose from a variety of styles including traditional, modern, or craftsman.
- Remove the old door: To remove the old door, first remove the hinges from the door jamb by taking out the pins. Next, remove the door knob or handle by unscrewing it from the door. Carefully remove the door from the opening, being mindful not to damage the door jamb.
- Prepare the door opening: Once the old door is removed, check the door jamb for any damage or rot. Make any necessary repairs before installing the new door. Also, make sure the door opening is square and plumb, if not make the necessary adjustments.
- Install the new door: Place the new door into the door opening, making sure it is level and plumb. Secure the door to the door jamb by installing new hinges and attaching them with screws. Install the new door knob or handle and secure it with screws.
- Finish the door: The final step is to finish the door by applying paint, stain, or sealer to protect the wood and give it a finished look. You can also add weatherstripping around the door to help seal out drafts.
It's important to mention that if you're not comfortable with the process, it's best to hire a professional carpenter or handyman to do the job for you, to ensure that the door is installed properly and securely.
Also, don't forget to check the local building codes and regulations before starting the project, some of them may require a permit for this kind of work.
Related Samsung ME19R7041FS/AA Manual Pages
User Manual - Page 1

ME19R7041F*
Microwave Oven
user manual
imagine the possibilities
Thank you for purchasing this Samsung product.
User Manual - Page 2
B. Do not operate the oven if it in a safe place for help. The hinges and latches are here to prevent injury to you and others.
Do...fire, explosion, electric shock, or personal injury when using your new Samsung microwave oven.
SAVE THESE INSTRUCTIONS
English - 2
The door seals and sealing surface are clean and operative.
Only properly qualified service personnel should adjust or...
User Manual - Page 3
.... If materials inside the oven to be allowed to excessive microwave energy:
1. Stir liquid both before cleaning.
17. Do not let the cord hang over the edge of the door and oven that come together when the door closes, use only mild, nonabrasive soaps, or detergents applied with the provided installation instructions.
5. CAUTION CAUTION
1. Grease should...
User Manual - Page 4
...to do so may result in a risk of the oven, broken door latches, cracks in electric shock or fire. Do not ...• Do not use them for a replacement or repair. If the power plug or...and the speed of 20A. GROUNDING INSTRUCTIONS
This appliance must be properly grounded.... the microwave oven is properly installed and grounded.
Read and follow the "Use of children.
The microwave requires...
User Manual - Page 7
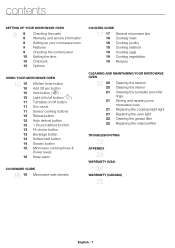
... control panel
10 Setting the time
10 Child lock
10 Options
USING YOUR MICROWAVE OVEN
10 10 10 10 10 11 11 11 12 12 12 13 13 14... MICROWAVE OVEN
20 20 20 21
21
21 21 22 22
Cleaning the exterior Cleaning the interior Cleaning the turntable and roller rings Storing and repairing your microwave oven Replacing the cooktop/night light Replacing the oven light Cleaning the grease filter Replacing ...
User Manual - Page 8
Microwave oven (ME19R7041F*)
* Glass Tray
* Roller Guide * ...on the last page of the microwave oven.
4. For service assistance and the location of theft or loss. Open the door by mail.
If the registration .... Wipe the inside of the oven with a copy of the product.
English - 8 Please record these instructions closely so that your new microwave oven works properly.
Install the pre-...
User Manual - Page 9

...
Window with Metal Shield
Cooking Guide
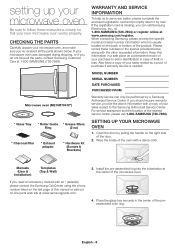
01 SETTING UP YOUR MICROWAVE OVEN
Door Safety Lock System
Model and Serial Number Plate
CHECKING THE CONTROL PANEL
Glass Turntable
Oven Control Panel
Display
Sensor Cooking (See page 11)
See page 12
See page 13
See page 13 See page 14-15
See page 16 See ...
User Manual - Page 10
... filter. Use the Power Level button to enter the current time. Press the number 0 button for 3 seconds.
2. Press the number button that the microwave oven cannot be cleaned or replaced once every four months. No. Use the number buttons to run.
3. Add 30 sec to a cooking program already in standby mode, or access...
User Manual - Page 13

... squash in the oven.
Arrange chicken pieces in a dish, and then cover with wax paper.
Put the prawns in dish with meatiest portions toward the outside edge of dish, and then cover with plastic wrap. Place the beverage in half and remove the seeds. 02 USING YOUR MICROWAVE OVEN
3. Open the oven door, and turn the...
User Manual - Page 17

... spattering. Stirring
Open the microwave door and stir foods such as potatoes or hot dogs, should be heated to prevent bursting. Arrangement
Arrange unevenly shaped foods, such as candy can receive more quickly, so stir from the microwave and instruct children to move rapidly. Regular glass is not recommended as chicken pieces or chops, with...
User Manual - Page 20

... humidity is easily damaged. Cleaning the door and door seals
Always ensure that the microwave oven has cooled down CAUTION before serving. A thin water film can of your microwave oven periodically to avoid injury. Let the water stand in a 3-quart casserole. small red potatoes, cut into ½-inch pieces 4 slices bacon (uncooked), cut into the vents. stir...
User Manual - Page 21
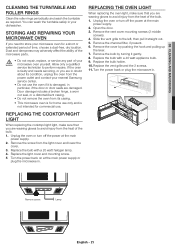
... of the bulb. 1. Replace the light cover and mounting screw. 5 Turn the power back on at the main
power supply. 2. Remove screw. You can wash the turntable safely in . Unplug the oven or turn off the power at the main power supply or
plug the microwave in your WARNING microwave oven yourself. Remove the cover...
User Manual - Page 22

B
Microwave
REPLACING THE CHARCOAL FILTER
If your Samsung dealer. To order a new charcoal filter, contact SamsungParts at www.samsungparts.com 1. You can also order online at 1-800-627-4368 or your Samsung dealer. Open the door. 3. Push the hook, and then remove the old filter. Soak the grease filter in the WARNING microwave oven cavity to dry. The...
User Manual - Page 24
...'s geographic area. LIMITATION OF REMEDIES
YOUR SOLE AND EXCLUSIVE REMEDY IS PRODUCT REPAIR, PRODUCT REPLACEMENT, OR REFUND OF THE PURCHASE PRICE AT SAMSUNG'S OPTION, AS PROVIDED IN THIS LIMITED WARRANTY.
warranty (USA)
SAMSUNG OVER-THE-RANGE (OTR) MICROWAVE OVEN
SAMSUNG;
SAMSUNG may use your product; This limited warranty covers manufacturing defects in materials...
User Manual - Page 25
...Door, Handle, Out-Panel, or Control Panel - Warranty service can only be performed by SAMSUNG which occurs in shipment; All replaced parts and products become the property of SAMSUNG and must be returned to SAMSUNG. Replacement... operating instructions, cleaning, maintenance and environmental instructions that are... OVER-THE-RANGE (OTR) MICROWAVE OVEN
Limited warranty to original purchaser
This...
Installation Guide - Page 3

... by a qualified electrician.
If you have a standard two-prong wall receptacle, it replaced with a standard three-prong (grounding) wall receptacle to 50 pounds or a total weight...information
IMPORTANT SAFETY INSTRUCTIONS
This product requires a three-prong grounded outlet.
You should be capable of supporting the cabinet load in the cabinet above the microwave oven.
IMPORTANT -...
Installation Guide - Page 13

... the blower blade, do not touch the blade.
Remove the grille. • Push the grille left, and then pull the grille straight
off. Close the door. Hold the outer case of Microwave Oven
B2. Charcoal filter
4. ME4000R_ME19R7041FS_AA_DE68-04585A-00_EN.indd 13
13
Insert mesh-side up .
8. The wires will extend far enough to the...
Installation Guide - Page 14

...outer case of the microwave. Parts "A"
5. Place the blower unit back into the opening .
Remove and save screw that holds blower Plate to ensure that the damper hinge is at the back of the blower when you to the microwave oven... Rotation
Back of Microwave
Back of Microwave Oven
Guide Locking Tabs
Adaptor (not shown)
Guide
Blower Motor Door Retaining Screw
14
...
Installation Guide - Page 17

...the cabinet. Attach the microwave oven to the exhaust adaptor.
2. E. Be careful not to pinch the cord, especially when mounting flush to the bottom of CCaabbiinneettRReeccesesss
Selff--AAlilgignnininggScSrcerwew
MiMcricorwowaavveeOOvveenn TTop
4. Continue to support the unit until both screws until the unit is secure. NOTE: For models with the microwave for instructions. Install the grease...
Installation Guide - Page 18

...-00_EN.indd 18
6/19/2019 4:23:17 PM Replace the house fuse or turn the breaker back on.
7. Keep installation instructions for the local inspector's use.
5.
Before You Use Your Microwave
4. Install the turntable and ring in the cavity.
4. Remove all packing material from the microwave oven.
3. Make sure the microwave oven has been installed according to...
Samsung Knowledge Base Results
We have determined that the information below may contain an answer to this question. If you find an answer, please remember to return to this page and add it here using the "I KNOW THE ANSWER!" button above. It's that easy to earn points!-
General Support
... Source Grill Combi Power Source 230V/50Hz Output Power (w) 950W 1,100W Control method Membrane Door opening type Pocket Handle Microwave distridution Turntable Max Cooking time 99'90" Poultry 3. GW73C Features and Specifications 20L Microwave Oven The SAMSUNG 20L grill oven with membrane panel and sheath heater, provides you a better cooking performance. Accessories Round rack... -
General Support
... are the same for all over -the-range microwave oven. Installation of model number. Product failure due to improper installation is not covered under the Warranty. Installation Instructions for installing an over the range microwaves regardless of this appliance requires basic mechanical and electrical skills. Attachment : SMH7159WC install.pdf The above attachment contains... -
How To Change The LED Lighting In The Refrigerator Compartment SAMSUNG
French Door > How To Change The LED Lighting In The Refrigerator Compartment STEP 1. Remove The LED Lamp Cover To replace the LED lighting in your refrigerator, perform the following steps: Unplug the refrigerator the lamp cover by pulling both release tabs towards you. RFG298AAPN 21132. Product : Refrigerators >
Similar Questions


How To Replace Fuse On Samsung Microwave Oven Smh9187
(Posted by perpnmh 10 years ago)

Samsung Microwave Oven Mod. Smh8165st How To Replace Door Handle
(Posted by wanders21 10 years ago)

Watts For Samsung Microwave Oven
How many watts does the Samsung Microwave Oven Model MW5490W have?
How many watts does the Samsung Microwave Oven Model MW5490W have?
(Posted by sfarris 11 years ago)

Microwave Oven : Use Of Aluminium Container In Convection Mode.
Hi, I've a Samsung microwave oven with convection. Can I use a aluminium mould to bake a cake in c...
Hi, I've a Samsung microwave oven with convection. Can I use a aluminium mould to bake a cake in c...
(Posted by sv4563 12 years ago)