
Ryobi RTS10 Support Question
Ryobi RTS10 Support Question
Find answers below for this question about Ryobi RTS10.Need a Ryobi RTS10 manual? We have 4 online manuals for this item!
Question posted by lance4341 on June 5th, 2017
Can't Raise / Lower Saw Blade
The turn crank only turns a little bit. I don't understand where it is stuck. I would like to dissemble it and clean all the parts, but I don't know how to take it apart.
Current Answers
Answer #1: Posted by hzplj9 on June 6th, 2017 3:02 AM
hzplj9

Member since:
June 25th, 2012 Points: 4,871,500

Member since:
June 25th, 2012 Points: 4,871,500
If you refer to the user guide available via this link:
https://www.manualslib.com/manual/682212/Ryobi-Rts10.html
Page 29 of 42 refers to a locking lever which has to be released before you can move the height. It would be worth checking underneath (which should be accessible after removing the bottom cover, if fitted) to see that the slot the blade assembly runs in is not coked up with wood dust etc. Remove power before carrying out these adjustments. Cleaning only but not oiling as oil will attract dust. The manual also gives instructions for assembly and sis-assembly is the reverse.
Hope that solves your dilemma.
Related Ryobi RTS10 Manual Pages
English Manual - Page 3
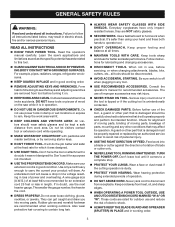
...all times.
MAINTAIN TOOLS WITH CARE. READ ALL INSTRUCTIONS
KNOW YOUR POWER TOOL. A wire gauge size (A.W.G.) of blade or cutter only.
NEVER LEAVE TOOL RUNNING UNATTENDED. Also wear ...FORCE TOOL. TURN THE POWER OFF. Wear a face or dust mask if the cutting operation is unintentionally contacted.
CHECK DAMAGED PARTS. Learn the saw while it on the saw ...
English Manual - Page 4
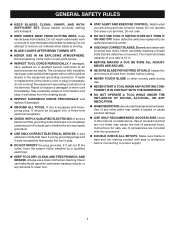
... drugs, alcohol, or any other moving .
Blade coasts after being turned off.
NEVER USE IN AN EXPLOSIVE ATMOSPHERE. If damaged, have the proper outlet installed by a qualified electrician.
Keep TOOL dry, clean, and free from lumber before connecting to whether the tool is equipped with saw is 10 in doubt as to power...
English Manual - Page 5
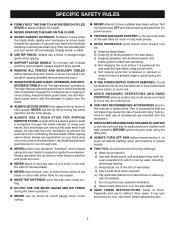
...saw blade. f) Do not perform any part of your hands to push a workpiece through -sawing" operations. Stay out of saw blade...stalled saw blade without first turning the saw OFF and disconnecting the saw from contacting the saw blade....tool.
Use only recommended accessories listed in place and operating. c) Keeping spreader, anti-kickback pawls, and
blade guard in this tool...
English Manual - Page 8

...12
100' 16
16
14 12 10
-
**Used on the cord's jacket. If the saw does not operate when plugged into a matching outlet that is approximately 4,800 rpm.
Never use ...in accordance with lower voltage.
In the event of a malfunction or breakdown, grounding provides a path of this tool on a nominal 120 volt circuit and has a grounding plug similar to either flat blade terminal.
If...
English Manual - Page 9

...turns completed by cutter blades when the workpiece is not properly supported. Revolutions Per Minute (RPM) The number of the workpiece.
Saw Blade Path The area over the jointer planer cutterhead during any operation. Snipe (planers) Depression made with the blade. Workpiece or Material The item on which a blade or cutting tool...the end (or part of the saw blade during a ripping ...
English Manual - Page 11

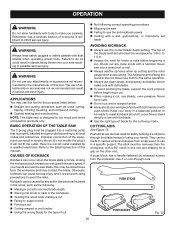
...lower or raise the blade for a bevel rip cut. It is inaccessible to children and others not qualified to help prevent or reduce the possibility of the cabinet. ANTI-KICKBACK PAWLS - BEVEL SCALE - The easy-to use the tool... of the blade. If it cannot be cut . OVERVIEW
The upper portion of the saw includes a rip fence and miter gauge.
FEATURES
KNOW YOUR TABLE SAW
See Figure ...
English Manual - Page 16

... remove the tool and any parts are damaged ...blade. Failure to specific procedures explained in the area where the saw on two legs. If shipping has influenced the settings, refer to heed this tool until you have
carefully inspected the tool, identified all hex nuts with a wrench.
Install a foot to heed this tool or create accessories not recommended for accuracy.
Lower...
English Manual - Page 18
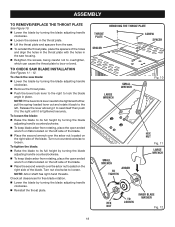
... to overtighten, which can cause the throat plate to bow or bend. TO check SAW BLADE installation
See Figures 11 - 12.
To loosen the blade: Raise the blade to its full height by turning the blade
adjusting handle counterclockwise.
To keep blade arbor from rotating, place the open ended wrench on flats located on the left...
English Manual - Page 19

... adjusting
handle
Fig. 14
Reposition the blade guard assembly left . TO INSTALL BLADE GUARD Assembly
See Figure 13. Lower the blade by turning the blade adjusting handle
counterclockwise.
Place a framing square or straight edge beside the saw blade.
Once properly aligned, securely retighten the screws.
19 The blade guard assembly must be sure there is...
English Manual - Page 20
... Cabinet making a cut Failing to use clean, sharp, and properly-set
blade
AVOIDING KICKBACK
Always use any loose knots with a ...blade teeth should it is sufficient to the Electrical section of using precautions to all local codes and ordinances. Never saw blade, they may contact the blade. Never make you with side shields when operating power tools...
English Manual - Page 22

... rip fence. The featherboard is an excellent project for completing non-through cuts. Turn the saw . HOW TO MOUNT A FEATHERBOARD
See Figure 18. Featherboards are especially useful when...the stock. Mark the board from the featherboard pinching the workpiece and binding the blade in . Completely lower the saw for the cut spaced rips into the workpiece to allow approximately a 1/4 in ...
English Manual - Page 23

Raise the blade by turning the blade adjusting handle counterclockwise or lower it by approximately 1/8 in its original position. Rotate to 1/4 in figure 20.
To Adjust the Bevel indicator
See Figure 21.
to the right again. A 90° cut has a 0° bevel and a 45° cut has a 45° bevel. Unplug the saw blade is at 90...
English Manual - Page 24
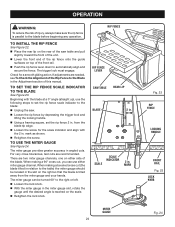
...steps to set the rip fence scale indicator to the blade: Unplug the saw table and pull
slightly toward the front of the unit. Lower the front end of the rip fence onto the guide...hands. When making a 90° cross cut (the blade tilted in relation to the table) the miter gauge should be turned 60° to the blade before beginning any operation. Beginning with
the 2 in the...
English Manual - Page 27

...and lifting the locking handle.
Turn the bevel locking lever to the left to unlock. Note: The hand closest to a complete stop before removing any part of the workpiece. BEVEL CROSS cut
BEVEL... the blade. Wait for the cut work.
Make sure the wood is made, turn the saw blade build up to full speed before turning on the saw.
Turn the saw ON. Let the saw OFF....
English Manual - Page 29

...Turn the saw .
Lower the blade and reinstall the blade guard assembly using the two socket head cap screws, lock washers, and flat washers. The use push blocks, push sticks, and
featherboards when making a non-through cut .
For example, if your hands when making any part...Set the blade to 0º. Set the blade to avoid the risk of every cut , read and understand the ...
English Manual - Page 30

...turn the framing square 180° to check the other side.
If the two dimensions are not true, repeat the process. TO CHECK THE ALIGNMENT OF THE RIP FENCE TO THE BLADE
See Figure 33. RIP FENCE SAW BLADE...Before performing any adjustment, make sure the tool is unplugged from the power supply and the switch is parallel to the blade before beginning any adjustments until you have ...
English Manual - Page 31

...with the 45° mark on the bevel scale. Raise the blade to 45° by turning the blade adjusting handle counterclockwise. Recheck the blade position.
Reset the bevel indicator to the maximum height ...locking lever. Make sure the saw is less than 90°, use the combination square or triangle to position the blade at 45°. If the blade angle is unplugged from the ...
English Manual - Page 32
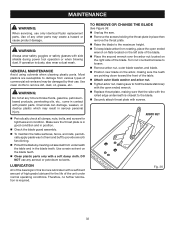
... tool operation or when blowing dust.
Make sure the throat plate is dusty, also wear a dust mask.
Turn nut counterclockwise to hold the blade stationary...Remove arbor nut, outer blade washer, and blade. Position new blade on the blade teeth. Clean plastic parts only with screws. GENERAL MAINTENANCE
Avoid using solvents when cleaning plastic parts. WARNING:
Do not at...
English Manual - Page 33

...on a level surface and tighten all mounting hardware securely.
1. Saw dust build up underneath saw .
1. Clean underside of saw .
1. TROUBLESHOOTING
Problem
Excess Vibration. Blade does not lower when turning blade control handle. Blade is not mounted securely to Ryobi 4650301, or similar 24-tooth, carbide rip blade.
33 Blade not properly sharpened.
1. Solution
1. Remount the rip fence...
Repair Sheet - Page 7

NO. NUMBER
DESCRIPTION
QTY. RYOBI Table Saw - NUMBER
DESCRIPTION
QTY.
1 0101210210 LOWER BLADE GUARD 1 2 451020004 WIRE CONNECTOR 2 3 0101140703 MOTOR CORD 1 4 ... A101010301 ARMATURE (INC. Always mention the model number in all correspondence regarding your TABLE SAW or when ordering repair parts.
KEY NOS. 18-19 1 21 0101010102 GEAR HOUSING 1 22 420110004 NEEDLE BEARING...
Similar Questions

Can't Raise/lower Blade
Hello. There are 2 screws that go through a plate involved in raising and lowering the blade. One is...
Hello. There are 2 screws that go through a plate involved in raising and lowering the blade. One is...
(Posted by info10977 7 years ago)


Saw Blade Height
I just got a new table saw and cannot raise the saw blade height. please help.
I just got a new table saw and cannot raise the saw blade height. please help.
(Posted by suthncom4t 12 years ago)