
Ryobi RTS10 Support Question
Ryobi RTS10 Support Question
Find answers below for this question about Ryobi RTS10.Need a Ryobi RTS10 manual? We have 4 online manuals for this item!
Question posted by chanburn on March 8th, 2020
Replacing Motor- How Do I Replace The Motor? Have New Motor & Can't Get Housing
How do I get the motor housing off so can replace motor? Have removed two screws (each about 3" long) and gently pried using screwdriver but housing only moves about 1/8 "
Current Answers
Answer #1: Posted by hzplj9 on March 8th, 2020 3:10 PM
hzplj9

Member since:
June 25th, 2012 Points: 4,873,510

Member since:
June 25th, 2012 Points: 4,873,510
If you go to the manual owl manual link and search for the RTS10 there are 4 manuals available. The 4th one in the list is the repair manual which gives exploded views of the saw. From that it should be possible to identify which parts need to be removed. There is also a circuit diagram with the wiring info so you can verify the correct connections if your motor differs from the original.
Link below:
https://www.helpowl.com/manual.php?file=5202f9c2ed0343867a5d1be5a0d4d119&manual=202346
Hope that helps.
Related Ryobi RTS10 Manual Pages
English Manual - Page 1

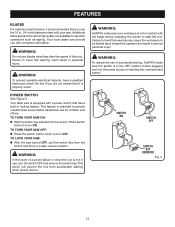
.... WARNING: To reduce the risk of rugged, trouble-free performance. Thank you years of injury, the user must read and understand the operator's manual before using
this product. OPERATOR'S MANUAL
10 in.
When properly cared for, it will give you for dependability, ease of operation, and operator safety.
SAVE THIS MANUAL...
English Manual - Page 2

... the date of purchase. ryobitools.com. LIMITED TWO YEAR WARRANTY AND 30 DAY EXCHANGE POLICY One World Technologies, Inc., warrants its use more pleasant and enjoyable.
To receive a replacement power tool or requested warranty service, you must present proof of the Service Center nearest you may not be covered by logging on to...
English Manual - Page 3
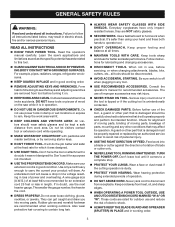
... wear protective hair covering to follow all tools should be properly repaired or replaced by removing starter keys.
DON'T FORCE TOOL. Use a featherboard to determine that may affect ...performance. Keep tools sharp and clean for alignment of moving parts, binding of at least 14 is unintentionally contacted.
CHECK DAMAGED PARTS. Failure to contain long hair.
&#...
English Manual - Page 4
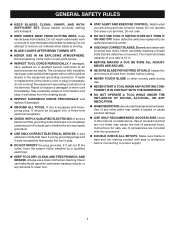
... SURE BLADE PATH IS FREE OF NAILS. If repair or replacement of accessories that accept the tool's plug.
DO NOT MODIFY the plug provided. Never use of cord location and keep it should be sure all nails from blades. Instructions for and remove all adjustments are not completely understood or if in .
...
English Manual - Page 5

...use rip fence as the miter gauge.
ALWAYS USE A PUSH STICK FOR RIPPING NARROW STOCK. Use a featherboard and push blocks for wide or long...use either hand for any reason.
MOVE...replaced only by the manufacturer or by :
a) Keeping blade sharp. d) Use a push stick when required. Refer to them frequently and use...it can result in this tool, loan them these instructions ...
English Manual - Page 6

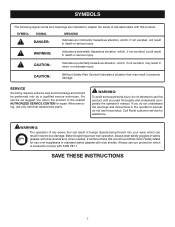
..., a full face shield when operating this product. Please study them and learn their meaning.
To reduce the risk of the following symbols may be used on this tool. SYMBOL
NAME
DESIGNATION/EXPLANATION
V
Volts
Voltage
A
Amperes
Current
Hz
Hertz
W
Watt
Frequency (cycles per minute
Wet Conditions Alert
Do not expose to rain or...
English Manual - Page 7
... you read thoroughly and understand completely the operator's manual.
Before beginning power tool operation, always wear safety goggles or safety glasses with ANSI Z87.1. WARNING...property damage.
When servicing, use over eyeglasses or standard safety glasses with side shields. We recommend Wide Vision Safety Mask for use only identical replacement parts. CAUTION:
(Without Safety...
English Manual - Page 8

...or replacement of electric shock.
Do not operate this tool is able to result in accordance with lower voltage.
Before using a power tool at a considerable distance from the power source, use an ...doubt as to reduce the risk of this tool on the cord's jacket. If it for lights cannot properly carry a power tool motor. The wire with insulation having an equipment-...
English Manual - Page 9

...miter and a bevel angle. Kerf The material removed by the blade in a through cut or the slot produced by the workpiece being dropped into the tool first. Resin A sticky, sap-based substance ...sanding operation.
Chamfer A cut . FPM or SPM Feet per minute (or strokes per minute), used to help keep the kerf open and also helps to the table surface.
Cutter Head (planers and jointer...
English Manual - Page 11

... switch key must be cut lengthwise (rip cuts). To lock the switch in the OFF position, remove the switch key from the work in these grooves on either side of the blade. It is ...keep the guard down over the blade for all operating features and safety rules.
The safe use the tool.
11
Be sure the lever is secured with all through -sawing cuts.
RIP FENCE - ...
English Manual - Page 12
...that you with complete information.
SWITCH ON
SWITCH OFF
SWITCH KEY
removed
Fig. 3
12
This action will prevent the tool from the
switch and store in locking feature. This feature ...in a safe, secure location. Failure to turn ON. Your local dealer can provide you use by children and others. Additional blade styles of accidental starting when power returns. FEATURES
BLADES
...
English Manual - Page 16

...Add hardware and finger tighten.
Use the same steps to the blade.
NOTE: Remove the foam block from between the saw's housing and the motor. The saw is securely mounted ... leg.
Move the leg set for accurate cutting. Tighten all loose parts, and satisfactorily operated the tool. Failure to power supply until the parts are replaced. Place it , check...
English Manual - Page 18
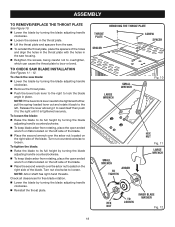
...11 - 12. ASSEMBLY
TO remove/replace the THROAT PLATE
See Figure 10. Lower the blade by turning the blade adjusting handle
clockwise.
Loosen the screws in the throat plate. &#... adjusting handle clockwise.
Reinstall the throat plate.
To check the saw housing.
Retighten the screws, being careful not to overtighten, which can cause the throat plate to its ...
English Manual - Page 32
...-
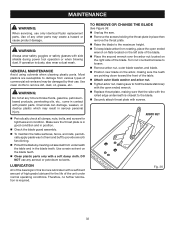
Make sure the throat plate is closest to loosen. Remove arbor nut, outer blade washer, and blade. Position new blade on the blade teeth. Clean plastic parts only with plastic parts. Use clean cloths to hold the blade stationary with screws.
If operation is required. cally apply paste wax to them...
English Manual - Page 33

... Motor labors in rip cut .
1. Rip fence is out of balance.
2. Rip fence is misaligned.
1.
Clean underneath front bar of saw .
1. Have blade resharpened.
1. Replace with....
1. Blade is fed too fast. 3. TROUBLESHOOTING
Problem
Excess Vibration. Positive stops need adjusting. Replace or have blade sharpened.
2. Align the rip fence. 4. Clean underside of rip
fence and front...
English Manual - Page 34

...number of this tool will be found on how often you have purchased your tool, should a need ever exist for a complete list of these chemicals are specially designed to the motor housing. You can...to filter out microscopic particles.
• SERVICE
Now that you do this type of Ryobi Limited used under license.
987000-372 7-16-08 (REV:01)
one world technologies, inc.
1428 Pearman ...
Repair Sheet - Page 3
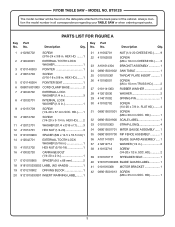
... SCREW (M8 x 30 mm SOC. Always mention the model number in 1
9 410151709 SCREW (1/4-20 x 57 mm SOC. No. HD 1 32 089015001900 SCALE LABEL 1 33 0101010303 STRAP (Long ...2 38 410152716 SCREW (1/4-20 x 1/2 in. HD 2 39 0101010111 SPREADER SEAT 1 40 9181015330203 BLADE GUARD LABEL 1 41 0101010308 MOTOR BRACKET 1 42 089015001013 SCREW (M8 x ...
Repair Sheet - Page 5
...411072702 LOCK NUT (1/4-20 1 11 0101090302 CORD CLAMP 1 12 0101090201 SWITCH BOX 1 13 410162004 SCREW (M6 x 25 mm CHEESE HD 5 14 0111140208 RUBBER FOOT 4 15 9101145330203 WARNING LABEL 1... SHAFT 1
30 0101140213 SWITCH KEY 1
31 452020007 SWITCH 1
32 A101140109 MOTOR ASSEMBLY W/GUARD 1
33 0101015002 BRUSH ASSEMBLY 2
34
*** 10 in. PAGE 4 KEY NOS...
Repair Sheet - Page 7

... RUBBER PLUG 2 10 0101010502 BRUSH HOLDER 2 11 411012001 HEX NUT (M5 2 12 410272004 SCREW (M5 x 75 mm 2
13 0101010207 MOTOR HOUSING ASSEMBLY 1 14 0101010807 SCREW w/WASHER (M5 x 30 mm 1 15 412061001 WAVY WASHER 1 16 A101010403 FIELD 1 17 410292001 HEX SCREW w/WASHER (M5 x 60 mm 2 18 420010102 BALL BEARING (6001ZZ 1 19 420010101 BALL BEARING (6201ZZ 1 20...
Repair Sheet - Page 9

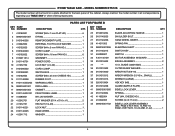
MODEL NUMBER BTS12S
POWER CORD
BLACK WHITE
SWITCH
BLACK WHITE
MOTOR CORD
MOTOR
WIRING DIAGRAM
9 RYOBI Table Saw -
Similar Questions

Can I Buy A Replacement Motor For My P560?
I want to know if I can buy the motor or find the part # for it? P560 pruner
I want to know if I can buy the motor or find the part # for it? P560 pruner
(Posted by aarngrn 2 years ago)

Ryobi P320 Stopped Working
the lights blink and does not fire.I used it a week before and it worked fine. Now nothing.Replaced ...
the lights blink and does not fire.I used it a week before and it worked fine. Now nothing.Replaced ...
(Posted by bigbaseshop 7 years ago)


Replacement Of Pad.on A Ryobi Rst #10 Table Saw.
The pad is located behind the knob that locks the blade swivel.
The pad is located behind the knob that locks the blade swivel.
(Posted by tabucher 11 years ago)