Ryobi A25RT02 Support Question
Ryobi A25RT02 Support Question
Find answers below for this question about Ryobi A25RT02.Need a Ryobi A25RT02 manual? We have 4 online manuals for this item!
Question posted by bigbro2 on June 22nd, 2013
What Routers Are Compatible With This Table
what routers are compatible with this router table
Current Answers
Related Ryobi A25RT02 Manual Pages
English Manual - Page 1
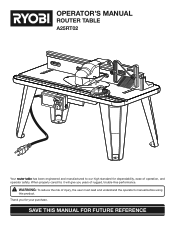
OPERATOR'S MANUAL
ROUTER TABLE
A25RT02
3 2 1 0 1
Inch
inch
3 2 1 0 1
Inch
Your router table has been engineered and manufactured to our high standard for your purchase. Thank you years of operation, and operator safety. SAVE THIS MANUAL FOR FUTURE ...
English Manual - Page 2

...30 DAY EXCHANGE POLICY One World Technologies, Inc., warrants its RYOBI® power tools with the original product. ryobitools.com. We will complete the work properly due...Just return the power tool, properly packaged and postage prepaid, to you must present proof of purchase and return all defects in workmanship or materials in the design of this warranty. TABLE OF CONTENTS
...
English Manual - Page 3
... performance. The use and reduce the risk of personal injury.
NEVER LEAVE TOOL RUNNING UNATTENDED. DO NOT LEAVE TOOL UNTIL IT COMES TO A COMPLETE STOP.
USE THE RIGHT DIRECTION OF FEED. Keep cord from receptacle.
Carefully read the router table operator's manual and the manual for outdoor use of wood on .
...
English Manual - Page 4
... before operating the router or using the router table.
ALWAYS USE THE ARTICULATING ROUTER CUTTER BIT GUARD.
WHEN USING THE ROUTER ON THE ROUTER TABLE, the router must be plugged into the router table switch outlet.
KEEP HANDS AWAY FROM CUTTING AREA. If damaged, have repaired by a qualified service technician at any time while the tool is connected...
English Manual - Page 6
...
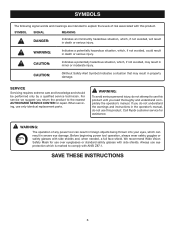
The following signal words and meanings are intended to explain the levels of any power tool can result in foreign objects being thrown into your eyes, which is marked to the nearest... AUTHORIZED SERVICE CENTER for repair.
Before beginning power tool operation, always wear safety goggles or safety glasses with ANSI Z87.1. Always use only identical ...
English Manual - Page 7
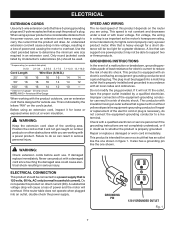
...resistance for lights cannot properly carry a power product motor.
If it for use on the router you are not completely understood, or if in doubt as the motor's horsepower rating. Improper ... pin like the one power product may not be able to a live terminal.
If the router table does not operate when plugged into a matching outlet that the product will not fit the outlet...
English Manual - Page 8
...3 2 1 0 1
Inch
RESE T
PUSH
THROAT PLATES
SWITCH ASSEMBLY
RESET BUTTON
MITER GAUGE
Fig. 2
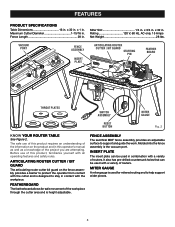
KNOW YOUR ROUTER TABLE
See Figure 2. x 32 in . Miter Slot 1/4 in .
Rating 120 V, 60 Hz, AC only, 15 ... 28 lbs.
The safe use of this operator's manual as well as a knowledge of routers. Molded into the fence assembly is designed to help support wider pieces.
8 Maximum Cutter Diameter...
English Manual - Page 9
...
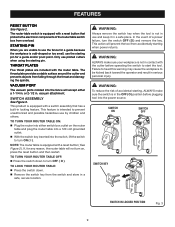
RESET BUTTON
See Figure 2.
or 2-1/2 in locking feature. This action will prevent the tool from the switch and store in . SWITCH ASSEMBLY
See Figure 3.
If, for any reason, the router table will accept either switch box outlet on , press the reset button and then restart.
WARNING:
To reduce the risk of a power failure...
English Manual - Page 10

... (2)
18
DIFREEECDTION
23 19 22
3
20
3 2 1 0 1 Inch
17
21 16 15 14 13
12 11
Fig. 4
12. Router Insert Plate Screws (10-24 x 5/8 in place before using the router table. Miter Gauge 18. Fence Lock Knobs (2) 20. Featherboard 21. Operator's Manual (not shown)
10
Any such alteration or modification is complete. Failure to...
English Manual - Page 11
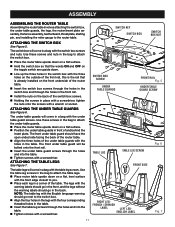
...throat plate, starting pin, and installing the miter gauge to attach the switch box.
Place the router table upside down on a flat surface.
Hold the switch box so that the words ON and OFF... the front rail, this is the rail that is already installed on the front underside of the router table.
Insert the switch box screws through the holes in the switch box and through the ...
English Manual - Page 12
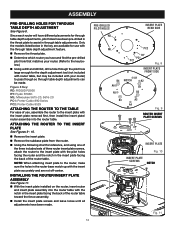
... THE INSERT PLATE
See Figures 9 - 10.
Remove the insert plate.
Remove the subbase plate from the router.
Using the following chart for the depth adjustment tool (not included with router table, but may be made . NOTE: When attaching insert plate to the insert plate with the notch in the insert plate...
English Manual - Page 14
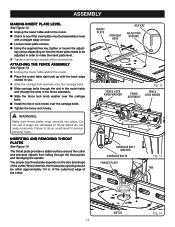
...ATTACHING THE FENCE ASSEMBLY
See Figure 13.
Unplug the router table and/or the router.
Place the router table right side up with the back edge closest to you.
...61550; Install the fence lock knobs over the carriage bolts. Failure to do not snap in the router table and through the throat plate and damaging the spindle. SLOT
CARRIAGE BOLT WASHER
CARRIAGE BOLTS
THROAT PLATE
...
English Manual - Page 15

... THE MITER GAUGE
See Figure 17.
Unplug the router table and/or the router.
With the router table right side up, and the front edge closest to you ... 1
Inch
POINTER
3
2
1
0
DIFREEECDTION
Inch
1
SLOT 15
Fig. 17
Inch
Unplug the router table and/or the router.
Place the starting pin on the right.
NOTE: It is not necessary to use it snaps ...
English Manual - Page 16

.... e.g., leg stand, workbench, counter top. Using a clamp, insert the top front of clamp through the work surface. Place the router table back on a sturdy work surface. NOTE: Position the router table surface at approximately hip height. Insert four bolts (not included, 1/4-20 recommended) and tighten securely with a pencil. Remove the...
English Manual - Page 17
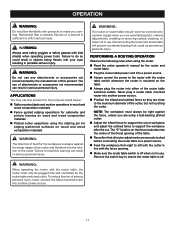
WARNING:
Always wear safety goggles or safety glasses with side shields when operating power tools. The use of a second is always against the fence, unless you careless. Disconnecting the router and router table will prevent accidental starting pin for the workpiece is sufficient to inflict serious injury. The "0" location on wood and wood composition materials...
English Manual - Page 18
... fence.
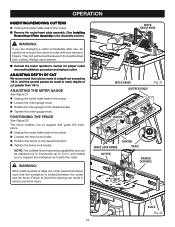
Failure to touch the cutter or collet with your hands or fingers. OPERATION
INSERTING/REMOVING CUTTERS
Unplug the router table and/or the router.
Remove the router/insert plate assembly. (See Installing Router/Insert Plate Assembly in the Assembly section.)
WARNING:
3 2 1 0 1
Inch
If you are changing a cutter immediately after use a wrench. They...
English Manual - Page 19

....
19 WARNING:
Do not at any other parts may create a hazard or cause product damage. Electric tools used on these materials, it is dusty, also wear a dust mask. Consequently, we do work on...of these types of commercial solvents and may result in contact with side shields during power tool operation or when blowing dust. Most plastics are highly abrasive to damage from various types of...
English Manual - Page 20
OPERATOR'S MANUAL
ROUTER TABLE
A25RT02
WARNING:
Some dust created by calling 1-800-525-2579. Some examples of work with approved safety ...-07 (REV:01)
20
To reduce your model and serial number from the product data plate.
• MODEL NUMBER
A25RT02
• SERIAL NUMBER
• HOW TO OBTAIN REPLACEMENT PARTS:
Replacement parts can also be purchased online at www.ryobitools.com...
Repair Sheet - Page 2
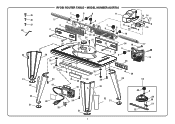
45 46 47 44
34
31 43 42 31
RYOBI ROUTER TABLE - MODEL NUMBER A25RT02
5
3 2
7 6 4
6
8
6
11 12 14 15
14
7
12
9
6
13
16
1
25
26 27
4 3 2 1 0 1
Inch
3 2
30
35
1 37
36 29
34 29
41 38
23 22
10
24
21
35
54 18
6
1 20 8
DIFREEECDTION
4 3 2 1 0 1
Inch
28
17 19
35
1
28
34
33
29
30
53
48
6
40 39
34 31
32 31
49 50 51
52
2
Repair Sheet - Page 3
...(NOT SHOWN)
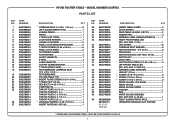
* STANDARD HARDWARE ITEM - MAY BE PURCHASED LOCALLY 3 x 20 x 1/4 in 2 FEATHERBOARD 1 ROUTER TABLE TOP 1
* INSERT PLATE SCREW (10-24 x 3/4 in 2 T-TRACK NUT (10-24 8
* HEX ... 5/8 in 3 * SCREW (10-32 x 5/8 in 3 FRONT RAIL 1 SWITCH BOX (INC. MODEL NUMBER A25RT02
PARTS LIST
DESCRIPTION
QTY
* CARRIAGE BOLT (1/4-20 x 1 3/4 in 6 LEFT SLIDING FENCE FACE 1 JOINING FENCE 1...
Similar Questions


I Need The Manual For The Router Table, Not The Router Itself. Can't Find That!
Need parts list and assembly instructions for the router TABLE shown in the Ryobi R163RTA 'Combo', w...
Need parts list and assembly instructions for the router TABLE shown in the Ryobi R163RTA 'Combo', w...
(Posted by JulietBrown 10 years ago)

Ryobi A25rt02 Fence Problem
I recently bought a RYOBI A25RT02 Router Table. I'm very pleased with it but can't figure out why th...
I recently bought a RYOBI A25RT02 Router Table. I'm very pleased with it but can't figure out why th...
(Posted by mstaff3 11 years ago)
Ryobi R163 And The Ryobi R163k Routers
What is the difference between the Ryobi R163 and the Ryobi R163K routers?
What is the difference between the Ryobi R163 and the Ryobi R163K routers?
(Posted by chchls3 11 years ago)
