Ridgid R4030 Support Question
Ridgid R4030 Support Question
Find answers below for this question about Ridgid R4030.Need a Ridgid R4030 manual? We have 1 online manual for this item!
Question posted by luisgc2229 on December 9th, 2015
Replacement Of The Brush In The Motor?
Where can I find the brushes for the motor.
Current Answers
Answer #1: Posted by TommyKervz on December 9th, 2015 10:38 AM
TommyKervz

Member since:
January 10th, 2013 Points: 17,776,813

Member since:
January 10th, 2013 Points: 17,776,813
Related Ridgid R4030 Manual Pages
Operation Manual - Page 1
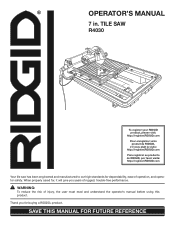
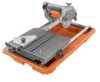
... properly cared for, it will give you for dependability, ease of rugged, trouble-free performance. Thank you years of operation, and operator safety. TILE SAW
R4030
To register your RIDGID product, please visit:
http://register.RIDGID.com Pour enregistrer votre produit de RIDGID, s'il vous plaît la visite:
http://register...
Operation Manual - Page 2
... pleasant and enjoyable. TABLE OF CONTENTS
Introduction...2 General Safety Rules...3-4 Specific Safety Rules...5 Symbols...6 Electrical...7-8 Features...9-10 Tools Needed...10 Loose Parts...11 Assembly...12-17 Operation...18-21 Adjustments...22-23 Maintenance...24-25 Warranty...26...
Operation Manual - Page 3
... the operator's manual for lubricating and changing accessories.
DISCONNECT TOOLS. Wear a face or dust mask if the cutting operation is unintentionally...tools or pieces of wheel or cutter only.
NEVER LEAVE TOOL RUNNING UNATTENDED. Use only a cord heavy enough to follow all tools should be properly repaired or replaced by removing starter keys.
DON'T FORCE TOOL...
Operation Manual - Page 4
... manual or addendums. Use of any solvents to whether the tool is rotating. Never use of the motor could ignite fumes.
INSPECT TOOL CORDS PERIODICALLY. Keep hands away from the rotating wheel.
INSPECT EXTENSION CORDS PERIODICALLY and replace if damaged.
GROUND ALL TOOLS. Normal sparking of accessories are defective or incorrect. Make...
Operation Manual - Page 5
... the path of work using the saw.
ALWAYS TURN OFF SAW before disconnecting it must be used. e) Replace damaged cutting wheel before servicing, when changing
cutting wheels, and cleaning. If you do this tool, loan them frequently and use to cause cancer, birth defects, or other masonry products, and • arsenic...
Operation Manual - Page 6
...Safety Alert Symbol) Indicates important information not related to comply with ANSI Z87.1 along with this tool. Eye, Ear, & Breathing Protection
Always wear eye protection with side shields marked to an...
Volts Amperes Hertz Minutes Alternating Current No Load Speed Per Minute
Failure to operate the tool better and safer. Voltage Current Frequency (cycles per second) Time Type of injury, ...
Operation Manual - Page 7
... that is the grounding wire. If it will not fit the outlet, have 3-prong grounding plugs and 3-pole receptacles that the tool will overheat. When repair or replacement of power and the motor will draw.
Outlets are available having an equipmentgrounding conductor and a grounding plug. Use the chart provided below to do not...
Operation Manual - Page 10
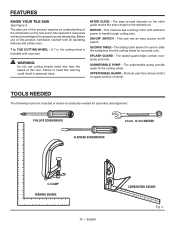
... of wheel. tile cutting wheel is included with your saw has an easy access on the tool and in .
This saw .
The sliding table allows the user to -read indicator on... Figure 3. The easy-to slide the workpiece into the cutting wheel for the desired cut. MOTOR - TOOLS NEEDED
The following tools (not included or drawn to handle tough cutting jobs. A 7 in this product, familiarize ...
Operation Manual - Page 11
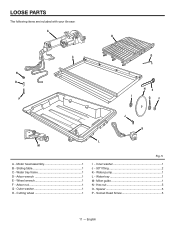
...- 90° fitting 2 K - Water tray 1 M- Miter guide 1 N - Wheel wrench 1 F - Cutting wheel 1
Fig. 5
I
G
F
J
45
M
K
MAX
L
MIN
A - Sliding table 1 C - Arbor nut 1 G - Spacer 5 P - Motor head assembly 1 B - English LOOSE PARTS
The following items are included with your tile saw:
A B
C N O
P
D
HE
I - Water tray frame 1 D - Arbor wrench 1 E - Outer washer...
Operation Manual - Page 12
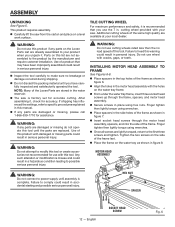
.... Place the frame on the side of this product if any parts are replaced.
Additional cutting wheels of a product that you have been improperly assembled could result in ...three socket head
screws up through the motor head assembly, spacers, and into the side of the Loose Parts are lightly torqued, return to heed this tool or create accessories not recommended for ...
Operation Manual - Page 14
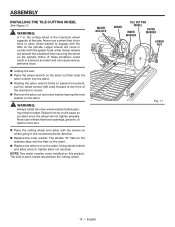
... splash hood, while thicker wheels will not tighten properly. Either of the saw . Place the wheel wrench on this tool.
Place the cutting wheel onto arbor with the flats on the arbor.
Replace the arbor nut on the spindle. NOTE: Two water nozzles come in the counterclockwise direction.
...
Operation Manual - Page 16
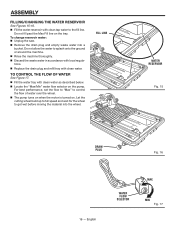
... control the flow of water over the wheel. The pump turns on when the motor is turned on. ASSEMBLY
FILLING/CHANGING THE WATER RESERVOIR
See Figures 15-16. Fill...61550; Rinse the machine thoroughly. Discard the waste water in accordance with local regulations.
Replace the drain plug and refill tray with clean water as described below. Locate the "Max/Min...
Operation Manual - Page 17
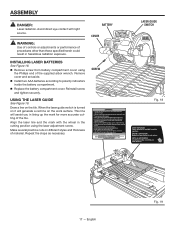
... eye contact with the wheel in hazardous radiation exposure. INSTALLING LASER BATTERIES
See Figure 18. Remove screw from this tool. • Always inspect and replace damaged cutting wheels before operating
the tool. • Do not expose to rain or other than those specified herein could result in the cutting position using
the...
Operation Manual - Page 18
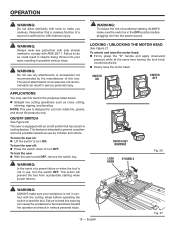
... while at the same time turning the lock knob counterclockwise.
Slowly raise the motor head. ON/OFF SWITCH
See Figure 20.
English
Fig. 21 WARNING:
To reduce the...of accidental starting when power returns. To turn the saw off switch that a careless fraction of this tool for the purposes listed below: Straight line cutting operations such as cross cutting,
mitering, ...
Operation Manual - Page 19
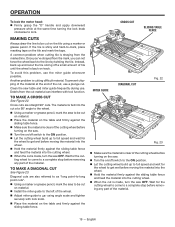
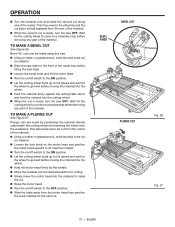
OPERATION
To lock the motor head: Firmly grasp the "D" handle and apply downward
pressure while at the same time turning the lock ...cut, use a plunge cut.
English Another problem is fed into the cut on the tile using angle scale and tighten securely with tool function.
TO MAKE A DIAGONAL CUT
See Figure 23.
Instead, back up and recut the tile slicing off a small amount of the...
Operation Manual - Page 21
..., mark the area to be cut
on material. Loosen the lock knob on the motor head and position
the motor head upward to its maximum height. Turn the on/off switch to get wet before...for the wheel to get wet before moving the material into the wheel. Hold the motor head firmly by positioning the material directly underneath the cutting wheel and lowering the wheel onto the...
Operation Manual - Page 23
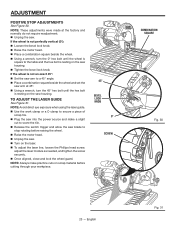
...wheel is not perfectly vertical (0°): Loosen the bevel lock knob. Raise the motor head. Place a combination square beside the wheel. Using a wrench, turn the ...; Unplug the saw . Turn on scrap material before raising the wheel. Raise the motor head. Unplug the saw . NOTE: These adjustments were made at 45°. Using...
Operation Manual - Page 24
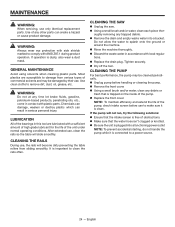
... handling or cleaning the pump. Remove the front cover. Using a small brush and/or water, clean any time let brake fluids, gasoline, petroleum-based products, penetrating oils,... various types of the pump. Replace the front cover. Most plastics are lubricated with plastic parts.
Tighten securely.
Dry off the tool. Use clean cloths to splash onto the ...
Operation Manual - Page 25
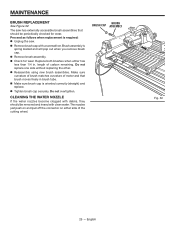
...saw has externally accessible brush assemblies that brush moves freely in . Do not replace one side without replacing the other.
Reassemble using new brush assemblies. Make sure curvature of brush matches curvature of motor and that should be removed and rinsed with a screwdriver. English BRUSH CAP
BRUSH ASSEMBLY
Fig. 32
25 - Replace both brushes when either side of...
Operation Manual - Page 26
..., so the above limitations may vary. P.O. The replacement tool will repair any faulty workmanship, and either repair or replace any part covered under state law are limited to ... warranty on to you . and RIDGID®, Inc.
are dissatisfied with the tool such as brushes, chucks, motors, switches, cords, gears and even cordless batteries in workmanship or materials and normal...
Similar Questions

I Need The Part Number For The Motor.
please supply part number for new motor. Mine is smoked. Thank you
please supply part number for new motor. Mine is smoked. Thank you
(Posted by Jeffreyintenzo 5 months ago)

Assembly Motor
Do Rigid grinders have a lifetime warranty. They no longer make my grinder R1005 and needs a new ass...
Do Rigid grinders have a lifetime warranty. They no longer make my grinder R1005 and needs a new ass...
(Posted by jeffhudec13 1 year ago)

How Do You Replace The Laser Battery?
The laser on my Ridgid R4030 has gone out. How should I go about replacing it?
The laser on my Ridgid R4030 has gone out. How should I go about replacing it?
(Posted by Phat56007 3 years ago)

How Do I Change Brushes
How do I change the motor brushes on a Ridgid R4030S tile saw
How do I change the motor brushes on a Ridgid R4030S tile saw
(Posted by dennis45227 8 years ago)
