Ridgid 1822-I Support Question
Ridgid 1822-I Support Question
Find answers below for this question about Ridgid 1822-I.Need a Ridgid 1822-I manual? We have 1 online manual for this item!
Question posted by Lburchett75 on January 10th, 2023
Oil In Gear Housing
Changing out the bottom section because of a crack by the partition wall. When removing the 4 Allen bolts , oil started running out of the holes. Is there oil in that gear housing or did it get there from the crack in the cutting oil section
Current Answers
Answer #1: Posted by kane1234567 on January 11th, 2023 3:12 AM
kane1234567

Member since:
January 7th, 2023 Points: 700
Member since:
January 7th, 2023 Points: 700
If you find oil in the gear housing of a mechanical device, it could be an indication of a serious problem. Here are a few potential causes and what you can do about them:
- Leaking oil seal: One of the most common causes of oil in the gear housing is a leaking oil seal. This can happen when the seal is damaged or worn out, allowing oil to escape from the housing. To fix this, the seal will need to be replaced.
- Worn or damaged gears: Another potential cause of oil in the gear housing is worn or damaged gears. This can happen when gears are not lubricated properly, are exposed to high loads, or are made of low-quality materials. To fix this, the gears will need to be replaced or repaired.
- Overfilled oil: Sometimes, too much oil can be added to the gear housing, which can cause oil to spill out. To fix this, the excess oil will need to be drained and the proper amount of oil added back.
- Loose or damaged plug/drain port: The gear housing may have a plug/drain port that is loose or damaged. This will cause oil to leak out. To fix this, the plug/drain port will need to be tightened or replaced.
- Inadequate ventilation or contaminated air filter: Sometimes the gear housing may not be ventilated properly or the air filter may be clogged, this can cause condensation inside the housing and lead to oil leakage. To fix this, the ventilation should be improved or the air filter should be cleaned or replaced.
It's important to address the issue promptly to avoid costly repairs or damage to the equipment. In case of any doubt, please consult an expert mechanic or the manufacturer.
Answer #2: Posted by SonuKumar on January 11th, 2023 9:37 AM
SonuKumar

Member since:
May 9th, 2021 Points: 16,622,280

Member since:
May 9th, 2021 Points: 16,622,280
https://www.manualslib.com/manual/1622794/Ridgid-1822-I.html
follow - table of content
Please respond to my effort to provide you with the best possible solution by using the "Acceptable Solution" and/or the "Helpful" buttons when the answer has proven to be helpful.
Regards,
Sonu
Your search handyman for all e-support needs!!
Related Ridgid 1822-I Manual Pages
Owners Manual - Page 1

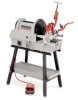
Failure to understand and follow the contents of this tool. 1822-I Pipe and Bolt Threading Machine
OPERATOR'S MANUAL
• Français - 25 • Castellano - Read this Operator's Manual carefully before using this manual may result in electrical shock, fire and/or serious personal injury. pág. 51
WARNING!
Owners Manual - Page 2
... Guide Post For Straight or Tapered Threads ...15 Changing Dies...16 Operating No. 141 Geared Threader ...16 Threading 21/2″ to 4″ Pipe (45 RPM) ...16
No. 821 Blade Cutter and No. 822 Adapter Kit Installing of No. 821 Blade Cutter ...17 Cut Grooving, Beveling and Cut-Off with No. 821 Blade Cutter (45...
Owners Manual - Page 4

... if you to a rotating part of electrical shock.
• Do not abuse cord.
Minimum Wire Gauge for outdoor use tool while tired or under the influence of electrical shock.
1822-I Pipe and Bolt Threading Machine
General Safety Information
WARNING! SAVE THESE INSTRUCTIONS! Check with all electric connections dry and off the ground.
A guard...
Owners Manual - Page 5

... operator's manual carefully before using the 1822-I Pipe and Bolt Threading Machine
ables better control of electrical shock or injury.
Ridge Tool Company
3 If damaged, have any other purposes such as drilling holes or turning winches. If clothing should become hazardous when used for other body parts with covers removed. Do not operate the machine...
Owners Manual - Page 6

... also be used with thread cutting oil during threading operations. Threading dies are for BSPT Die Heads only.
The RIDGID Model 1822-I Threading Machine is provided to flood the work with the threading machine to thread larger diameter pipe. Specifications
Threading Capacity .......Pipe 1/8″ through 2″ Bolt 1/4″ through 2″ Geared Threaders: Pipe 21/2″...
Owners Manual - Page 7
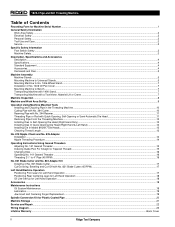
... on three Universal Stands and the No. 1406 Folding Stand. Assemble stand with No. 1460 Oil Pan Cover
Mounting Machine to 2″, Alloy or High Speed. R.H. R.H. NPSM
1/4″...- operation of the legs as
Ridge Tool Company
5
R.H. 1822-I Parts List.
2. R.H. R.H. H.S.... R.H. H.S. Right Hand only in the 1822-I Pipe and Bolt Threading Machine
Die Heads and Dies
Model...
Owners Manual - Page 8

...) (Front)
300 Compact 1233, 1822 (Rear)
535 Automatic
535 Automatic
535 1224 (Rear)
bracket is held in the rails (Figure 3). No. 1406 Folding Wheel Stand
6
Ridge Tool Company The stand stop bracket is not required or supplied with a 1/2″ lock washer and nut.
4.
Stand Assembly
3/8″ - 16 x 21/2″ Bolt 4 Required
NOTE! Use...
Owners Manual - Page 9
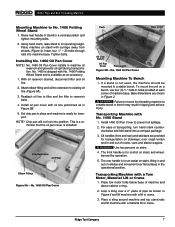
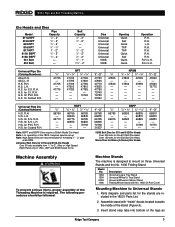
... and top stand rails and lift machine with oil line positioned as in holes provided at each corner of stand to a stable bench. Ridge Tool Company
7 1822-I Pipe and Bolt Threading Machine
Mounting Machine to prevent oil spillage.
2.
No. 1460 Oil Pan Cover installs in tipping and serious injury. Install oil pan cover with a material lift or crane...
Owners Manual - Page 10
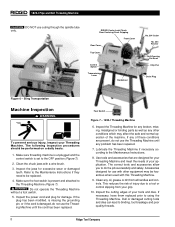
... to the Maintenance Instructions if they need to a tool or control slipping from all handles and controls. WARNING Do not operate the Threading Machine without a foot switch. 5. Foot Switch
Figure 7 - 1822-I Pipe and Bolt Threading Machine
CAUTION DO NOT use the Threading Machine until any oil, grease or dirt from your Threading Machine. If...
Owners Manual - Page 11
...Electrical Safety section.
• The cord is required.
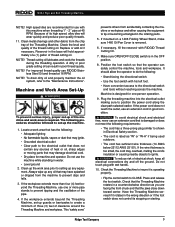
NOTE! A dirty or poor grade cutting oil can safely control the machine, tools and ...starting. WARNING To avoid electrical shock and electrical fires, never use RIDGID Stainless Steel Oil and thread at 45 RPM. If necessary, fill the reservoir with this machine when threading 1″ - 2″ pipe at 16 RPM. 1822-I Pipe and Bolt...
Owners Manual - Page 12

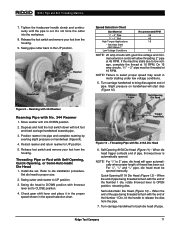
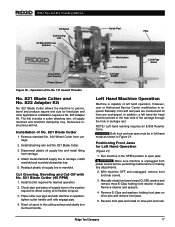
...Cutting Pipe with 364 Cutter
4. View Angle
Cutter
Feedscrew Handle
Handwheel
Figure 8 - Cutting Pipe with No. 364 Cutter
1. Assume the correct operating posture. Grasp the pipe cutter's feedscrew handle with the pipe (Figure 8). 1822-I Pipe and Bolt...cut -off -center chucking can quickly remove...section extends out the rear of the machine and tools..."break off -center, run the machine in the...
Owners Manual - Page 13
... cutter and reamer to UP position. 5. Quick-Opening 811A Die Head (Figure 12) - Ridge Tool Company
11 1822-I Pipe and Bolt Threading Machine
7.
Threading Pipe or Rod with No. 815A Die Head
6. Failure to 2″ pipe, die head will start dies (Figure 10). Threading Pipe with Self-Opening, Quick-Opening, or Semi-Automatic Die...
Owners Manual - Page 14
1822-I Pipe and Bolt...Remove dies from the housing. Numbers 1 through 2″. Make sure roll pin points toward end of slot under size bar. Adjust die head size bar until roll pin on size bar.
NOTE! When left hand universal die heads.
12
Ridge Tool Company No bolt... from the Threading Machine is aligned with numbers up any oil spills or splatter on the die head.
8. Insert new...
Owners Manual - Page 15
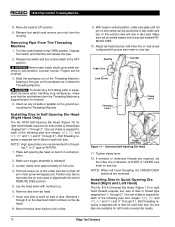
...cut to thread pipe ranging from 1/8″ through 2″. If possible, threads should be checked with numbers face up on the dies - Loosen clamp lever approximately three turns.
4. Remove dies from there. For bolt...clamp lever washer will drop in the change die direction indicated on the die head slots. Select the correct dies for new dies, start with those on cam plate.
5. ...
Owners Manual - Page 16
...Tool Company 1822-I Threading Machine. Checking Threads Within Pipe Gage
Figure 14 -
Ream, thread and cut pipe to 3/4″ pipe, large end toward adapter for 1″ pipe and no insert for pipe 11/4″ and up.
4. WARNING Remove wrench before starting...
standard procedures.
2. Screw nipple into chuck of No. 1822-I Pipe and Bolt Threading Machine
Die
Die
W
Die Flush With End
W
...
Owners Manual - Page 17
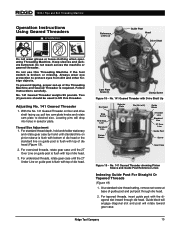
.... Guide block will engage diagonal slot and post will drop into holes in selector plate.
At a standard size thread setting, remove set -up , pull two cam plate knobs and rotate cam plate to protect eyes from dirt and other foreign objects. Ridge Tool Company
15 Keep sleeves and jackets buttoned. Do not reach...
Owners Manual - Page 18

... gear case.
4. Tighten set screw.
7. Support pipe with transmission lever in the direction of the OVER or UNDER size mark on the job.
1822-I
Threading Machine.
2. Replace stop screw.
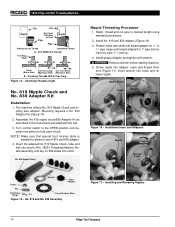
2. The kit includes a carriage saddle, carriage connecting link, reversing drive shaft and oil routing manifold. A counter-clockwise rotation is not made to install or remove...
Owners Manual - Page 19
... Machine Operation
Machine is capable of the carriage through the hole in the position required to direct cutting oil to manifold. Positioning Front Jaws for desired operation.
2. Reverse front jaws and install on drive pins and remove front jaws.
5. Installation of the No. 141 Geared Threader
No. 821 Blade Cutter and No. 822 Adapter Kit...
Owners Manual - Page 20

... Oil Pan Cover No. 100A 4 legs w/tray No. 150A 2 wheels w/tray No. 200A 2 wheels w/enclosed cabinet
18
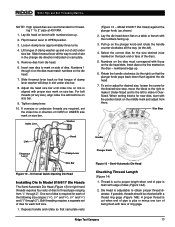
Ridge Tool Company Remove three E-Clips holding the rear retainer in front jaws. For left hand operation.
2. Other accessories designed for L.H. Accessories For Threading Machine
Stands: No. 1406 Folding Wheel Stand with the 1822-I Pipe and Bolt Threading...
Owners Manual - Page 21

...cutting oil and dies. Front Jaw Insert and Centering Finger Replacement 1. Run machine in oil reservoir. This should be in accordance with oil filter in bottom of oil reservoir removed. Ridge Tool Company
19 See Ridge Tool... 141 Geared Threader....for complete list of the spindle housing. Replace cutting oil when it becomes dirty or contaminated.
1.
1822-I Pipe and Bolt Threading ...
Similar Questions

How To Adjuest Air Press On Ridgid R350che
I can't fine in the operators manual for my r350che that part that tells me how to adj. the pres. On...
I can't fine in the operators manual for my r350che that part that tells me how to adj. the pres. On...
(Posted by Rivergod177 9 years ago)

Is Ridgid Kollman K-380 Better Than Brasscraft Bc400 For Outside The House Drain
Is Ridgid kollman k-380 snake drain cleaner better than Brasscraft BC 400 in cleaning the outsdide d...
Is Ridgid kollman k-380 snake drain cleaner better than Brasscraft BC 400 in cleaning the outsdide d...
(Posted by ealimi1 10 years ago)


Ridgid 1822-i Pipe Threader Won't Turn On And Humms When You Try To Turn On Swit
my pipe threader humms when you try to turn it on and won't run the machine. How do I fix ?
my pipe threader humms when you try to turn it on and won't run the machine. How do I fix ?
(Posted by Hmdjustin 11 years ago)
How Do I Change Blades?
I want to change blades on my saw and I can't find my manual.
I want to change blades on my saw and I can't find my manual.
(Posted by gtb53 11 years ago)