
Ricoh SP 4510DN Support Question
Ricoh SP 4510DN Support Question
Find answers below for this question about Ricoh SP 4510DN.Need a Ricoh SP 4510DN manual? We have 1 online manual for this item!
Question posted by nicoleanitram on July 27th, 2023
Replacement Drum Required
We're replacing the drum in our SP 4510DN and it's not registering, the message "Replacement Required; Drum Unit"We used the SP4500HA to replace.
Current Answers
Answer #1: Posted by SonuKumar on July 27th, 2023 9:35 PM
SonuKumar

Member since:
May 9th, 2021 Points: 16,621,300

Member since:
May 9th, 2021 Points: 16,621,300
Please respond to my effort to provide you with the best possible solution by using the "Acceptable Solution" and/or the "Helpful" buttons when the answer has proven to be helpful.
Regards,
Sonu
Your search handyman for all e-support needs!!
Answer #2: Posted by khanjee on July 27th, 2023 12:47 PM
khanjee

Member since:
July 23rd, 2016 Points: 205,300
Member since:
July 23rd, 2016 Points: 205,300
Turn the unit off and follow the illustrated guidance at https://www.manualslib.com/manual/870513/Ricoh-Sp-4510-Dn.html?page=13&term=drum+unit. If the issue persists or if you require further explanation, you'll have to consult Ricoh: use the contact information at https://www.contacthelp.com/ricoh/customer-service.
- 1.Clean the corona wire inside the drum unit.
- a.Open the front cover and remove the drum and toner assembly. Be sure to place the drum and toner assembly on a piece of paper in case of spilled or scattered toner.
- b.Gently slide the green tab from side to side at least 5 to 6 times.
- c.Return the green tab to the home position at the far right.
- d.Make sure the green tab snaps into the home position before putting the drum and toner assembly back into the machine. If the green tab is not securely returned to the home position, print pages will have a vertical stripe down the page.
- e.Reinstall the drum and toner assembly into the machine and close the front cover. The message should no longer appear.
- 2.We recommend using genuine Brother supplies to maximize print quality and performance. The use of non-genuine supplies may adversely affect print quality, functionality, and performance of your Brother machine. Any machine malfunction associated with the use of non-genuine supplies may void your limited warranty.
- 3.If the message continues to appear, the drum unit should be replaced with a new DR360. The drum is a consumable item that requires periodic replacement.
4.If the problem continues after replacing the drum unit, your Brother machine will require service. Your machine has a one-year limited exchange warranty. You may use the link below to find a Brother-authorized service center in your area. You may also contact Customer Support for additional warranty options.
Please Accept my answer by providing you with the best possible solution. Would be more glade.
THANK YOU
Related Ricoh SP 4510DN Manual Pages
User Guide - Page 13

... to Components
• Do not obstruct the machine's vents.
Exterior: Front view
1
2
3
4 15 14 13
12
11 10 9
1. Front cover Open to replace the print cartridge and the drum unit.
5 6 7 8
CYN001
11 Doing so risks fire caused by overheated internal components. Guide to Names and Functions of Components
Guide to Names and Functions...
User Guide - Page 16

...
7. Optional interface board slot Optional interface boards can be replaced, see "Replenishing and Replacing Consumables", Operating Instructions.
14
1. USB port H (Port for use by customer engineer) Do not use this port.
8. Insert an optional wireless LAN interface board or IEEE 1284 interface board.
9. Drum unit Messages appear on the screen when the print cartridge needs to...
User Guide - Page 18

.... • XPS card
Allows you to print XPS files. • Browser unit (for SP 4520DN)
Allows you to store documents to use two or more SD cards that can add the SDRAM up to display Web pages on the screen of the printer.
16 SDRAM module
You can be printed.
1.
Hard disk Allows you...
User Guide - Page 20

...previous display.
12. [OK] key Use this key to confirm settings or setting values, or move the cursor.
18 Data in indicator Flashes when the printer is in each direction. Getting Started
...
8. Flashes when the printer is data to the next menu level.
13. Alert indicator Lights up or receiving data. The suspended job will soon require maintenance or a replacement consumable such as the...
User Guide - Page 21

... lit when the power is off or when the printer is receiving print jobs from a computer. For details, see page 22 "Using the [Home] screen".
4. [Suspend] key Press...cannot be printed.
7. Flashing yellow: The printer will soon require maintenance or a replacement consumable such as a print cartridge. Follow the...messages. See page 20 "Guide to be ensured. Check Status indicator Lights...
User Guide - Page 29

... jobs • Display the [Maintenance] screen on the control panel (for SP 4510DN) • Display the [Maintenance: Print] or [Maintenance: Image] screen on the control panel. However, the printer must exit this mode, you do not use the printer for SP 4520DN) To exit Fusing Unit Off mode, do one of time displayed on but the fusing...
User Guide - Page 30

...Unit Off mode, it is [Auto Power Off Only]. For details about setting [Sleep Mode Timer] and [Weekly Timer], see : • "System", Operating Instructions. (for SP 4510DN) • "Administrator Tools", Operating Instructions. (for SP... Instructions. (for SP 4510DN) • "Timer Settings", Operating Instructions. (for SP 4520DN) The printer can configure the printer to automatically turn ...
User Guide - Page 32

... settings you make with configuration screens remain in effect even if the main power switch is specified, contact your administrator. 1. If you are using SP 4510DN, see page 30 "Configuring Printer Settings from the [Menu] key". If you to change or set the default settings.
30
CYN042
2.
This section explains the setting items available...
User Guide - Page 36
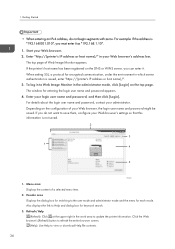
If the printer's host name has been registered on the DNS or WINS server, you must enter it . To log in to view or ... not saved.
2
3
1 4
5
CYN910
1. Click the Web
browser's [Refresh] button to refresh the entire browser screen. (Help): Use Help to Web Image Monitor in the work area to save them, configure your Web browser, the login user name and password might be saved...
User Guide - Page 46

...edges in plastic bags. 2. For details, see: • "Print Settings", Operating Instructions. (for SP 4510DN) • "Printer Features", Operating Instructions. (for paper printed with this printer:
2
4
4
3
1
3
CEC244
1. Print area 2. Print Area The following shows the recommended print area for SP 4520DN)
44 Loading Paper
• Do not store paper vertically. • Once opened...
User Guide - Page 62
...SP 4510DN) • "System", Operating Instructions. (for SP 4520DN)
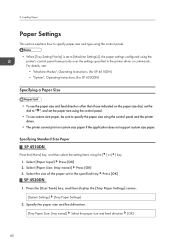
Specifying a Paper Size
• To use the paper size and feed direction other than those indicated on the paper size dial, set the dial to " ", and set the paper size using the control panel.
• To use... the paper settings configured using the control panel and the printer driver.
• The printer cannot print on custom ...
User Guide - Page 67

... that the printer produces to correct unwanted print results.
Soft alert
Five short beeps repeated five times. An error message appears on or the printer exits Sleep mode, the printer has fully ...Printer has warmed up and is no tray for SP 4520DN)
65
Five long beeps repeated four times. When the power is turned on the control panel if there is ready for use.
The printer requires...
User Guide - Page 68

... occurs. For details about adding toner, see "Replacing the Print Cartridge", Operating Instructions. Appears when the printer is available for SP 4520DN only. Appears when one or more covers of...Checking the Indicator Lamps, Status Icons, and Messages on the Control Panel
Indicators
This section describes the indicators displayed when the printer requires the user to remove misfed paper, to ...
User Guide - Page 70
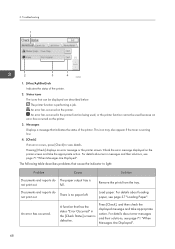
... icons that cause the indicator to view details. The following table describes problems that can be used , or the printer function cannot be displayed are described below: : The printer function is defective.
For details about loading paper, see page 71 "When Messages Are Displayed". 3. Troubleshooting 1
2
3
4
CQT666
1. [Mac/ApliStat] tab
Indicates the status of the...
User Guide - Page 74

.... To resume printing via the Web Image Monitor. Alert Messages (Displayed on the display panel.
This message might appear for a second or two while the printer is ready for use the control panel while this message is the default ready message. The printer is required. No action is printing. The printer is changing settings. You can resume printing via...
User Guide - Page 79

... the problem persists, contact your sales or service representative to replace the drum unit.
"Set the Maintenance Kit correctly."
Turn the printer off , and then install the fusing unit again.
For details, see "Replacing Other Consumables", Operating Instructions.
You need to appear after the unit is installed again, contact your sales or service representative...
User Guide - Page 83

... to replace the maintenance kit soon.
When Messages Are Displayed
Message
Cause
Solution
"No toner.
If the message appears again, contact your sales or service representative to obtain a new unit. The standard tray is now necessary. "n ppr siz msmtch Select new tray or use ppr size below."
("n" is a tray name.)
The size of Drum Unit is full.
Replace Toner...
User Guide - Page 101

... mode. For details about SSID Setting, see :
• "Host Interface", Operating Instructions (for SP 4510DN)
• "Interface Settings", Operating Instructions (for SP 4520DN)
If the printer is a microwave oven, mobile phone, industrial machine, scientific instrument, or medical instrument which uses the same frequency range and then try printing again. Check that might result from a weak...
User Guide - Page 103

... Mode. Network connection
For details about displaying the printer properties dialog box, see :
• "Host Interface", Operating Instructions (for SP 4510DN)
• "Interface Settings", Operating Instructions (for...when using the interface cable
Check that the correct port is selected.
When connecting the printer to the printer.
For details about how to the computer using the...
User Guide - Page 118

...not printed).
The paper size appears on the When PDF Direct Print is used, printout requires paper set the value of [RAM
(PDF file is not PDF file....driver settings override those set the password of printing using PDF Direct Printing, characters are using a Windows operating system, the printer
selected tray.
When a message indicating a paper size appears, either performed with PDF...
Similar Questions


I Have Richo Lazer Printer Sp 3410dn All Lights Glow Continued Help Me
(Posted by pradiproy176 9 years ago)

I Neaded Driver Aficio Sp 3400n Laser Printer - Ricoh Aficio Sp 3400n Laser Pri
(Posted by leadertech2013 10 years ago)

I Have A Aficio Sp C311n Laser Printer With A Memory Overflow Error. Please Hel
(Posted by housewrightm 11 years ago)

My Ricoh Ap2610 Laser Printer Will Not Support My New Pc Using Windows 7.
does ricoh have any driver or other means to make my ap-2610 laser printer work with my Windows 7 ne...
does ricoh have any driver or other means to make my ap-2610 laser printer work with my Windows 7 ne...
(Posted by jclcpallc 12 years ago)