Get support for Ricoh Aficio MP C5502

Ricoh Aficio MP C5502 Support Question

Ricoh Aficio MP C5502 Support Question

Find answers below for this question about Ricoh Aficio MP C5502.
Need a Ricoh Aficio MP C5502 manual? We have 3 online manuals for this item!
Question posted by Anonymous-168442 on June 2nd, 2021

What Is The Configuration Password For This Aficio Mp C5502 Printer

The person who posted this question about this Ricoh product did not include a detailed explanation. Please use the "Request More Information" button to the right if more details would help you to answer this question.

Current Answers

Answer #1: Posted by freginold on June 2nd, 2021 9:11 AM
This answer was accepted by the poster of the original question.
freginold

Member since:
December 20th, 2011

Points: 23,253,885
1,100
points
Per the link below, the default username for your C5502 is "admin" and there is no default password (blank).

https://default-password.info/ricoh/aficio-mp-c5502

Answer #2: Posted by Troubleshooter101 on June 2nd, 2021 5:06 AM
Troubleshooter101

Member since:
September 30th, 2015

Points: 2,927,030
100
points
The default username for your Ricoh Aficio MP C2050 is admin. The default password is (blank).


http://support.ricoh.com/bb_v1oi/pub_e/oi_view/0001062/0001062886/view/security/int/0017.htm?&seek=admin


Thanks


Please respond to my effort to provide you with the best possible solution by using the "Acceptable Solution" and/or the "Helpful" buttons when the answer has proven to be helpful. Please feel free to submit further info for your question, if a solution was not provided. I appreciate the opportunity to serve you!
Troublshooter101
Answer #3: Posted by Impactortony on June 2nd, 2021 5:20 AM
Impactortony

Member since:
May 26th, 2021

Points: 190
90
points
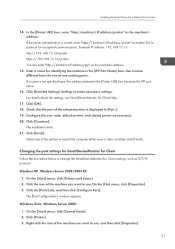
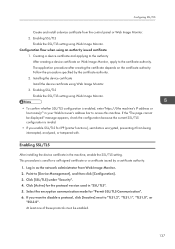
  1. Follow the procedure below to set a password.

1. Start SmartDeviceMonitor for Admin.

2. On the [Group] menu, point to [Search Device], and then click

[IPv4], [IPX/SPX] or [IPv4 SNMPv3].

A list of machines using the selected protocol appears.

Select the protocol of the machine whose configuration you

want to change.

If you are using IPv4 SNMPv3, enter the user authentication.

3. In the list, select a machine whose configuration you want to

change.

4. On the [Tools] menu, click [NIB Setup Tool].

A Web browser opens and the dialog box for entering the login

user name and password for the Web Image Monitor

administrator appears.

NIB Setup Tool starts when the network interface board is

default. Follow the instructions on the screen.

5. Enter the login user name and password, and then click

[Login].

For details about the user name and password, consult your

network administrator.

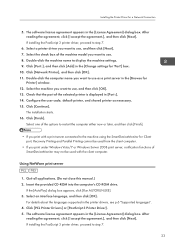
6. Click [Configuration].

7. Click [Program/Change Administrator] on the [Device

Settings] area, and then change the settings.

8. Click [OK].

9. Click [Logout].

10. Quit Web Image Monitor.

11. Quit SmartDeviceMonitor for Admin.

Answer #4: Posted by SonuKumar on June 2nd, 2021 8:24 AM
SonuKumar

Member since:
May 9th, 2021

Points: 16,618,310
90
points


Please respond to my effort to provide you with the best possible solution by using the "Acceptable Solution" and/or the "Helpful" buttons when the answer has proven to be helpful.

Regards,
Sonu
Your search handyman for all e-support needs!!

Related Ricoh Aficio MP C5502 Manual Pages

User Guide - Page 6

...machine before reading the manuals. • Type 1: MP C3002/Aficio MP C3002/MP C3002G/Aficio MP C3002G • Type 2: MP C3502/Aficio MP C3502/MP C3502G/Aficio MP C3502G • Type 3: MP C4502/MP C4502A/Aficio MP C4502/Aficio MP C4502A/MP C4502G/Aficio MP C4502G • Type 4: MP C5502/MP C5502A/Aficio MP C5502/Aficio MP C5502A/MP C5502G/Aficio MP C5502G Certain types might not be available...
User Guide - Page 42

.../Aficio MP C4502 • MP C4502A/Aficio MP C4502A • MP C5502/Aficio MP C5502MP C5502A/Aficio MP C5502A • MP C4502G/Aficio MP C4502G • MP C5502G/Aficio MP C5502G Note: This equipment has been tested and found to comply with Part 15 of the FCC Rules. This equipment generates, uses and can be determined by one or more of the following two conditions: (1) This device...
User Guide - Page 161

... then click [Yes] or [Continue]. 10. Print This chapter describes frequently used printer functions and operations. Log on the supplied CD-ROM. Insert the provided CD-ROM into the computer's CD-ROM drive. Configure the user code, default printer, and shared printer as an Administrators group member. 1. When the machine is connected to a client...
User Guide - Page 321

...-Fax Driver...41 Specifying the Same Port as a Network Printer...22 Installing the Printer Driver for a Local Connection 27 USB Connection...27 Parallel Connection...31 Bluetooth Connection...31 Configuring Option Settings for the Printer...35 Conditions for the Selected Port 14 Using as the Printer Driver 41 Specifying the Port When Installing the LAN-FAX...
User Guide - Page 322

... the Driver...59 Updating the Driver...59 Deleting the Driver...60 Trademarks...63 INDEX...65 2 Troubleshooting Messages Displayed When Installing the Printer Driver 49 If USB Connection Fails...51 6. Editing the Configuration File...44 Installing the LAN-FAX driver in "Add Printer 45 Setting LAN-Fax Driver Properties...47 Setting Print Properties...47...
User Guide - Page 333

...-ROM into the computer's CD-ROM drive. For details about meeting the bidirectional communication conditions, see p.6 "Supported languages". 4. The software license agreement appears in the printer drivers, see p.35 " Configuring Option Settings for the Printer". 13 For parallel connection, select the machine whose IP address is enabled via parallel connection, the...
User Guide - Page 335

... Enter the machine name or IP address, and then click [Next]. Configure the user code, default printer, and shared printer as necessary. 16. For details about the languages supported in [Port ... and then click [Add] in the [License Agreement] dialog box. When the device type selection appears, select "RICOH Network Printer C model". 13. Click [Continue]. Using the IPP port • To print...
User Guide - Page 337

... address in the [Name of the machine you want to display the printer settings. 9. Select the manufacturer and model name of printer or print queue on that server:] box, and then click [OK]. 13. Modify settings such as printer name and default printer configuration, as necessary. 15. Select an interface language, and then click [OK...
User Guide - Page 341

... server authentication is displayed in [Port :]. 19. Click [Detailed Settings] Settings to use . Click the [Ports] tab, and then click [Configure Port]. Click [Printer]. 3. Enter a name for identifying the machine in the [Printer URL] box becomes the IPP port name. 16. Select one of the options to use , and then click [Properties]. 21...
User Guide - Page 343

... Click [Finish]. Using NetWare print server 1. If installing the PostScript 3 printer driver, proceed to display the machine settings. 9. Select a printer driver you want to use , and then click [Next]. 7. Click [Network Printer], and then click [OK]. 11. Configure the user code, default printer, and shared printer as a print server in [Port :]. 14. If the [AutoPlay] dialog...
User Guide - Page 351

...unit and the optional wireless LAN unit cannot be used simultaneously. Click [PCL Printer Drivers] or [PostScript 3 Printer Driver]. 5. After reading the agreement, click [I accept the agreement.], and ...into the computer's CD-ROM drive. Click [Port :]. 10. Configure the user code, default printer, and shared printer as necessary. 12. For details about the languages supported in the...
User Guide - Page 355

...used. • In addition to the above, one of the PCL 6 or PostScript 3 printer driver, you to monitor machine status. Conditions for the Printer When bidirectional communication works correctly, your computer manually. Configuring Option Settings for the Printer Configuring Option Settings for Bidirectional Communication To support bidirectional communication, the following conditions must...
User Guide - Page 356

...[Start] menu, select [Devices and Printers]. 2. Open the printer window. • Windows XP, Windows Server 2003: On the [Start] menu, select [Printers and Faxes]. • ...printer properties window. • For details about making option settings for the machine using a Mac OS X, see p.57 "Configuring Option Settings for the Printer Under Mac OS X". 36 In this case, no change the printer...
User Guide - Page 375

... Browser] or [Default]. 5. Click [Add]. Depending on the pop-up menu, and then select the PPD file of the PPD files, see p.57 "Configuring Option Settings for the Printer Under Mac OS X". 9. Click the [ ] button. 4. Select [Directory Services] on your network environment (TCP/IP, etc.). 55 Select the machine you are using...
User Guide - Page 376

... to your network environment (TCP/IP, etc.). 6. If the machine you are using is not displayed, select the icon that appears, and then configure the option settings. 8. Click [Add]. Installing the Printer Driver Under Mac OS X 6. Click [Choose]. 8. Mac OS X 10.4 - 10.6 1. Click [Add]. Click [Print & Fax]. 3. Click [Default Browser] or [Default...
User Guide - Page 377

... , and then click [Show Info] on your computer's operating system, [Set Up Printers...] may not be set up menu, and then configure settings needed. 5. Mac OS X 10.2 - 10.3 1. Configuring Option Settings for the Printer Under Mac OS X Configuring Option Settings for the Printer Under Mac OS X This section explains how to select is not displayed, PPD...
User Guide - Page 439

...Binding 34 BSD UNIX workstation 17, 20 C Collating 33 Configuring the device option 22 Copies 32 Copying information 21 D Deleting the printer 11 Device option 22 Duplex printing 33 F Fold 37 ftp 17, ... 34 Output tray 31 P Paper size 28 Paper type 30 Print job status 20 Printer language 26 Printer status 20 Printing method 17 Punch 39 Punchhole 39 R rcp 17 rcp commands 7 ...
User Guide - Page 509

...] check boxes are not encrypted. This also applies to recovery/parallel printing using the PostScript 3 printer driver or PS3 universal driver. However, the user ID and password are selected in via ftp. Printer Job Authentication Printer job types: A printer job is printed via ftp. For details about Mail to Print, see "Receiving Email by Internet...
User Guide - Page 581

... specified by a certificate authority. 1. Installing the device certificate Install the device certificate using Web Image Monitor. Select the encryption communication mode for IPP (printer functions), sent data is enabled, enter "https://(the machine's IP address or host name)/" in the machine, enable the SSL/TLS setting. Configuration flow when using Web Image Monitor. •...
User Guide - Page 619

... enter the password set in the RADIUS server. • Click [Change] in "Phase 2 User Name", and then enter the user name set in the RADIUS server. 175 Log out. Log in as the network administrator from Web Image Monitor. 2. Click [Device Certificate] under "Security". 4. Configurations differ according to [Device Management], and then click [Configuration]. 3. Point...

Similar Questions

Ask a New Question
Use the box below to post a new question about this Ricoh product .
Points & Prizes
  • You can earn points for nearly everything you do on HelpOwl.com
  • You can trade in those points for gift cards at leading retailers such as Amazon.com and Walmart
  • It's that simple!
See How it Works
Create a Free Account

Ricoh Manuals

Find free Ricoh Aficio MP C5502 manuals and user guides available at ManualOwl.com. Try out our unique manual viewer allowing you to interact with manuals from directly within your browser!

Ricoh Reviews

View thousands of Ricoh user reviews and customer ratings available at ReviewOwl.com.

Contact Information

Complete Ricoh customer service contact information including steps to reach representatives, hours of operation, customer support links and more from ContactHelp.com.

Scoreboard Ratings

See detailed Ricoh customer service rankings, employee comments and much more from our sister site.