Ricoh Aficio MP C5000 Support Question
Ricoh Aficio MP C5000 Support Question
Find answers below for this question about Ricoh Aficio MP C5000.Need a Ricoh Aficio MP C5000 manual? We have 3 online manuals for this item!
Question posted by skydakikoa on October 23rd, 2013
How To Clear History On Ricoh Aficio Mp C3501
The person who posted this question about this Ricoh product did not include a detailed explanation. Please use the "Request More Information" button to the right if more details would help you to answer this question.
Current Answers
Answer #1: Posted by freginold on October 23rd, 2013 4:14 PM
freginold

Member since:
December 20th, 2011 Points: 23,253,885

Member since:
December 20th, 2011 Points: 23,253,885
Hi, the history can be cleared through user tools. To clear the scanner history, go into Scanner Features and look for the Delete Recent Destinations setting. For fax history, go into Facsimile Features and look for the same setting. For the printer, there isn't much of a history stored, but in Printer Features you can delete temporary print jobs (as well as stored print jobs).
To delete actual image data stored on the hard drive, you'll need to format the hard drive, which can only be done by a technician going into service mode.
To delete actual image data stored on the hard drive, you'll need to format the hard drive, which can only be done by a technician going into service mode.
Related Ricoh Aficio MP C5000 Manual Pages
Quick Start Guide - Page 1
www.ricoh-usa.com
Ricoh Product Line Segment 2 thru 6
MP/5000/5001, MP C5000/C6000/C6501, MP7000/8000, MP6001/7001, MP8001/9001, MP907EX
This guide is not intended to replace your users manual, features and options will vary by machine type, model and finisher type installed.
Quick Start Guide - Page 3
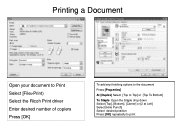
Printing a Document
Open your document to Print Select [File>Print) Select the Ricoh Print driver Enter desired number of copiers Press [OK]
To add any finishing options to the document
Press [Properties]
At [Duplex] Select [Top to Top] ...
Quick Start Guide - Page 6

Printing To Document Server
Open your document to Print
Select [File>Print]
Select the Ricoh Print driver Press [Properties] At [Job Type] open the drop down window
and choose [Document Server] Press [OK] Press [Details] Enter user Information:
User ID (if applicable) or leave blank File Name Password (if applicable) User Name Press [OK] repeatedly to print
Quick Start Guide - Page 9
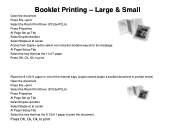
... to print the document. Large & Small
Open the document Press File >print Select the Ricoh Print Driver (PCL5e/PCL6) Press Properties At Page Set up Tab Select Duplex>booklet Select ... (copier cannot staple a booklet document in portrait mode) Open the document Press File >print Select the Ricoh Print Driver (PCL5e/PCL6) Press Properties At Page Set up Tab Select Duplex>booklet Select Staple>2 at ...
Quick Start Guide - Page 12

At copier Screen Press [Scanner]
2. Press [Start]
(Note: Screenshots are provided for reference purposes only. Select destination [email address or folder location
4. Select [E-mail] or [Folder] Tab 3. Place Originals in Feeder or on your operating system and device.) Your display may vary depending on Glass 5. Basic Scanning
1.
Quick Start Guide - Page 13
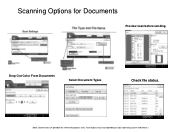
Scanning Options for reference purposes only. Your display may vary depending on your operating system and device.) Drop Out Color From Documents
Select Document Types
Check file status.
(Note: Screenshots are provided for Documents
Preview scan before sending.
Troubleshooting Guide - Page 2
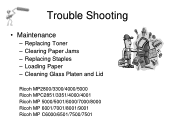
Loading Paper - Cleaning Glass Platen and Lid
Ricoh MP2800/3300/4000/5000 Ricoh MPC2851/3351/4000/4001 Ricoh MP 5000/5001/6000/7000/8000 Ricoh MP 6001/7001/8001/9001 Ricoh MP C6000/6501/7500/7501 Trouble Shooting
• Maintenance
- Clearing Paper Jams - Replacing Staples - Replacing Toner -
Troubleshooting Guide - Page 13
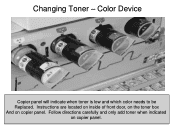
Color Device
Copier panel will indicate when toner is low and which color needs to be Replaced. Instructions are located on inside of front door, on the toner box And on copier panel. Follow directions carefully and only add toner when indicated
on copier panel. Changing Toner -
Troubleshooting Guide - Page 16
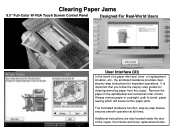
Additional instructions are also located inside the door of a paper mis-feed, toner or replacement situation, etc., the animated Guidance provides clear, step-by -step feature ensures smooth operation at all times.
Remove the paper in a straight path to avoid paper tearing which will cause further paper ...
Troubleshooting Guide - Page 17
Clearing Jams MP 3300, 2800, 2500, 2851, 3351, 3500 4000, 4001, 4500, 5000, 5001
User Guide - Page 2
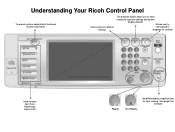
See page 2 for easy viewing. Understanding Your Ricoh Control Panel
To access system administrator tools and counter information
Clears screen to default settings
The program button allows you to store
frequently used job settings and screen
display defaults
Allows user to
interrupt job in
...
User Guide - Page 5
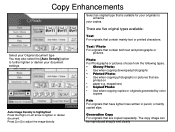
... generated by color
copiers
Auto Image Density is suitable for your originals to enhance
your document settings. The copy image can be reproduced sharply and clearly
User Guide - Page 6
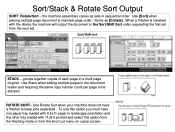
Sort/Stack & Rotate Sort Output
SORT Rotate/Sort - the machine assembles copies as [Collate].
When a finisher is installed with the device the machine will output the document in sequential order. STACK - ROTATE SORT- To use this option from the finishing mode or from the next set ...
User Guide - Page 10
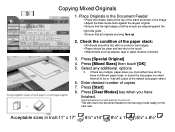
... the Document Feeder
Place the smaller sizes at the top of all the sheets are lying face up.
2. Check the condition of copies 7. Press [Clear Modes] key when you have all originals are aligned against the
right side guide .
Ensure that all the sizes in different paper trays, or...
User Guide - Page 32
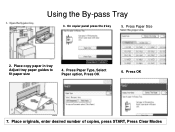
On copier panel press the # key
5. Place copy paper in tray Adjust tray paper guides to fit paper size
4. Press Paper Type, Select Paper option, Press OK
6. Place originals, enter desired number of copies, press START, Press Clear Modes Press OK
7. Press Paper Size
2. Using the By-pass Tray
3.
User Guide - Page 46
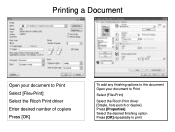
Printing a Document
Open your document to Print Select [File>Print] Select the Ricoh Print driver Enter desired number of copiers Press [OK]
To add any finishing options to the document Open your document to Print
Select [File>Print)
Select the Ricoh Print driver [Staple, hole punch or duplex] Press [Properties] Select the desired finishing option Press [OK] repeatedly to print
User Guide - Page 47

Printing To Document Server
Open your document to Print
Select [File>Print]
Select the Ricoh Print driver Press [Properties] At [Job Type] open the drop down window
and choose [Document Server] Press [OK] Press [Details] Enter user Information:
User ID (if applicable) or leave blank File Name Password (if applicable) User Name Press [OK] repeatedly to print
User Guide - Page 60
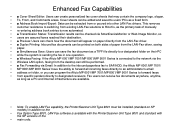
... on SP models) in one operation. • ■ Wireless Faxing: If the Aficio MP 6001/MP 7001/MP 8001/MP 9001 Series is connected to the network via the • Wireless LAN option, faxing ...from the desktop can still be extracted from existing LAN-Fax solutions to Ricoh's, as a TIFF file...
Similar Questions

Ricoh Aficio Mp C6501 Not Receiving Faxes But Can't Send.
We have a Ricoh Aficio MP C6501. We can receive faxes but can't send. Is this an issue with the fax/...
We have a Ricoh Aficio MP C6501. We can receive faxes but can't send. Is this an issue with the fax/...
(Posted by conniemoncrief 8 years ago)


Aficio Mp C3501 How To Set Default Scan Resolution
(Posted by ralphKal 10 years ago)

How To Set A New Fax Number On A Ricoh Aficio Mp C3501
(Posted by petarregin 10 years ago)