
ProForm Crosswalk 345s Treadmill Support Question
ProForm Crosswalk 345s Treadmill Support Question
Find answers below for this question about ProForm Crosswalk 345s Treadmill.Need a ProForm Crosswalk 345s Treadmill manual? We have 1 online manual for this item!
Question posted by jrjerrell on November 3rd, 2013
345s Crosswalk Diode D3 Has Been Removed From Control Board Is This Intentional
I have a 345s crosswalk after 20 minitus it shuts down the motor apears to be in good working order after it shuts down the moter is hot to the touch Also the speed indacater cheanges by more then 1.0 when I pressed on the right lower corner of the control panal it became worse I removed the control board and found a diode(D3) missing it apeers to be cut out of the circuit. I found the diode loged inbetween the board and the panal Can you help me Ray
Current Answers
Related ProForm Crosswalk 345s Treadmill Manual Pages
English Manual - Page 1
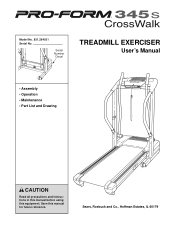
Model No. 831.294031 Serial No. Sears, Roebuck and Co., Hoffman Estates, IL 60179
Save this equipment. Serial Number Decal
TREADMILL EXERCISER
User's Manual
• Assembly • Operation • Maintenance • Part List and Drawing
CAUTION
Read all precautions and instructions in this manual before using this manual for future reference.
English Manual - Page 2
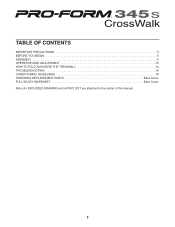
TABLE OF CONTENTS
IMPORTANT PRECAUTIONS 3 BEFORE YOU BEGIN 5 ASSEMBLY 6 OPERATION AND ADJUSTMENT 10 HOW TO FOLD AND MOVE THE TREADMILL 14 TROUBLESHOOTING 16 CONDITIONING GUIDELINES 18 ORDERING REPLACEMENT PARTS Back Cover FULL 90 DAY WARRANTY Back Cover Note: An EXPLODED DRAWING and a PART LIST are attached in the center of this manual.
2
English Manual - Page 3
... local Sears or call 1-800-366-7278 and order part number 146148.
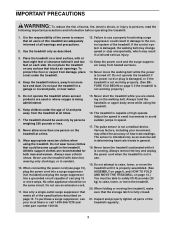
15. IMPORTANT PRECAUTIONS
WARNING: To reduce the risk of high speeds. When connecting the power cord (see your movement, may result in sandals.
10. Do not attempt to the control system of the treadmill regularly.
3 Failure to persons, read the
following important...
English Manual - Page 4
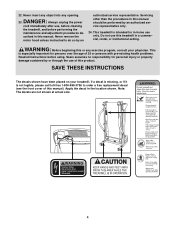
... this manual. Never insert any object into any exercise program, consult your treadmill. DANGER: 23.
scribed in a commercial, rental, or institutional setting. Do not use of this or any opening. Note: The decals are not shown at actual size.
4 Never remove the
motor hood unless instructed to order a free replacement decal (see the front cover...
English Manual - Page 5
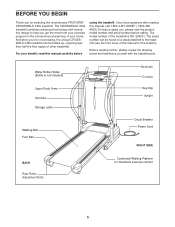
....294031. For your home.
The model number of your benefit, read this manual, call 1-800-4-MY-HOME® (1-800-4694663).To help you 're not exercising, the unique CROSSWALK 345s treadmill can be folded up, requiring less than half the floor space of this manual for the location).
English Manual - Page 6
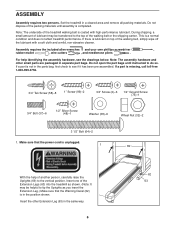
...see if it has been pre-assembled.
Insert the other small parts are packaged in the same way.
6
62 63 Set the treadmill in the position shown. During shipping, a small amount of lubricant may be transferred to the vertical position.
This is missing, call... on top of the walking belt or the shipping carton. If there is in a cleared area and remove all packing materials.
English Manual - Page 7

... vertical position.
3.
Attach the Left Handrail (not shown) as shown. Do not overtighten the Screws.
3
29
69
58 57
58
69
57
63
58
99
4. Remove any ties from the Wire Harness (42). Firmly tighten the indicated Bolt, but do not tighten the other Bolts yet.
Feed the
Wire Harness up...
English Manual - Page 8
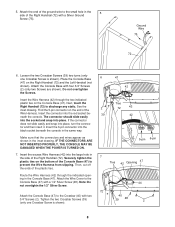
... 1/2" Silver Screw. Attach the end of the ground wire to the Console Base (47) with a Silver Ground
Screw (75). Do not overtighten the Screws. Next, touch the Right Handrail (72) to the Crossbar (40) with four 3/4" Screws (2) (only two Screws are shown). Insert the connector into place. Insert the 6-pin connector...
English Manual - Page 9
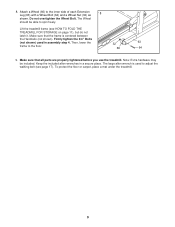
...32) as
8
shown. Make sure that all parts are properly tightened before you use the treadmill. The large allen wrench is centered between the Handrails (not shown). To protect the floor or carpet, place ...a mat under the treadmill.
9
Attach a Wheel (66) to the floor.
63 32
66
64
9. Keep the included...
English Manual - Page 10

...Contact a qualified electrician to the control system of the treadmill. Check with all local codes and...surge suppressor (TVSS).
Such substances will not fit the outlet, have a UL suppressed voltage rating...shock. If the control system is damaged, the walking belt may change speed or stop unexpectedly...local Sears or call 1-800-366-7278 and order
part number 146148. Voltage surges, spikes, and...
English Manual - Page 11
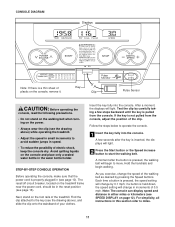
...clip attached to the key (see the drawing above ) while operating the treadmill.
• Adjust the speed in small increments to avoid sudden jumps in (see the drawing above ...remove it.
A few steps backward until the key is held down, the speed setting will change the speed of 0.5 mph. Insert the key fully into the console. As you exercise, change in the reset position (see SPEED...
English Manual - Page 12

...change the unit of fat calories and calories you are finished exercising, remove the key. The elapsed time will be too high or...Speed display-This display shows the speed of the walking belt, and align it .
Time/Distance display-This display
Mode Indicator
shows the elapsed time
and the distance that the treadmill is reached.
4 Follow your heart rate is selected, remove...
English Manual - Page 13

... resistance of the upper body arms can either hold the handrails or use the upper body arms. To exercise your arms, shoulders, and back for a total body workout, move the upper body arms forward and back as you can be adjusted. HOW TO USE ...
English Manual - Page 14
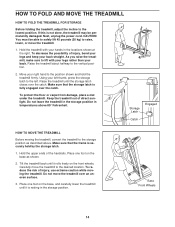
... or carpet from damage, place a mat under the treadmill. Make sure that the storage latch is not done, the treadmill may be able to safely lift 45 pounds (20 kg) to raise, lower, or move the treadmill to the storage position as shown.
2. Carefully move the treadmill.
1. Storage Latch
Engaged
Catch
HOW TO MOVE THE...
English Manual - Page 15
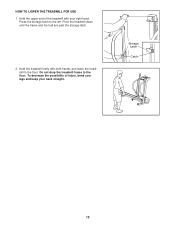
... rail are past the storage latch.
2.
Do not drop the treadmill frame to the left. Hold the treadmill firmly with your back straight. Hold the upper end of injury, bend your legs and keep your right hand. HOW TO LOWER THE TREADMILL FOR USE 1. Storage Latch
Catch
15 To decrease the possibility of...
English Manual - Page 16
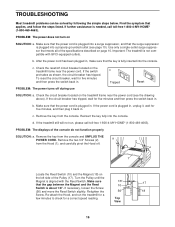
...page 10. If the circuit breaker has tripped, wait for a correct speed reading. If the treadmill still will not run the treadmill for a
few minutes to check for five minutes and then press the...circuit breaker located on
SOLUTION: a. Make sure that the key is aligned with GFCI-equipped outlets. Remove the two 3/4" Screws (2)
a
2
from the Hood (1), and carefully pivot the Hood off ...
English Manual - Page 17
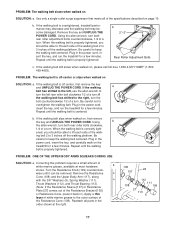
... the walking platform. Using the allen wrench, turn . Plug in the power cord, insert the key, and run the treadmill for a few minutes.
Plug in the
order shown at most hardware
a 105
stores.
Remove the key and UNPLUG THE POWER CORD. PROBLEM: The walking belt is properly tightened. Be careful not to 3 inches...
English Manual - Page 18
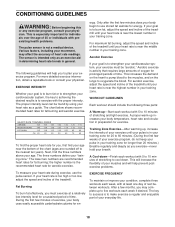
... few months, you to success is too high or too low, adjust the speed and incline of the treadmill.
Aerobic Exercise
If your goal is near the highest number in preparation for longer than 20 minutes.) Breathe regularly and deeply as you exercise-never hold your training zone. The three numbers define your physician.
A Cool...
English Manual - Page 19
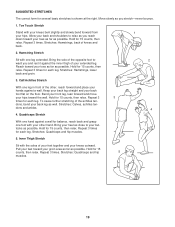
.... To cause further stretching of knees and
back.
2. Repeat 3
3
times for 15 counts, then relax. dons, bend your knees outward. Move slowly as possible. Toe Touch Stretch
Stand with the soles of the other hand. Hold for balance, reach back and grasp one foot with one leg in front of your...
English Manual - Page 20
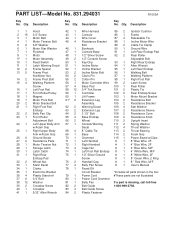
...20 2 21 1
22 2 23 1
24 1
25 1
26 6 27 2 28 1 29 1 30 1 31 1
32 2 33 1 34 1 35 1 36 4 37 6 38 12 39 2 40 1 41 1
Hood 3/4" Screw Motor Belt Motor Tension Bolt 3/8" Washer Motor Star Washer Flywheel Motor Motor...Motor Incline Bracket Incline Motor Bolt Clevis Pin Cotter Pin Motor Controller Wire Base Pad 3/4" Tek Screw Controller... Washer Thrust Bearing Foam Grip Power Board w/Clips 8" Blue Wire, 2F ...
Similar Questions


Not Working
The status LED on the motor driver board blinks 5 times when start is pressed. Motor is not working
The status LED on the motor driver board blinks 5 times when start is pressed. Motor is not working
(Posted by gopakumarcpy 2 years ago)

My Pro-form 345 S Has Power To The Incline,but My Display Will Not Light Up And
(Posted by cindysissom 9 years ago)

Unit Working Fine Except The Platform And Speed Down Lower Buttons Don't Work
The upper speed and inclination buttons work fine its the lower two buttons, raise platform or speed...
The upper speed and inclination buttons work fine its the lower two buttons, raise platform or speed...
(Posted by bewebbnz 10 years ago)

How To Test A 24723 Proform Crosswalk 415's Incline Motor Salvaged From Old Unit
Hi! I salvaged the Incline Motor of this 415 proform before it was discarde. I want to use just the ...
Hi! I salvaged the Incline Motor of this 415 proform before it was discarde. I want to use just the ...
(Posted by joserrodriguez2003 10 years ago)