Pioneer VSX-1131 Support Question
Pioneer VSX-1131 Support Question
Find answers below for this question about Pioneer VSX-1131.Need a Pioneer VSX-1131 manual? We have 1 online manual for this item!
Question posted by anujchawla on November 27th, 2020
How To Reset To Factory Setting Vsx1131
The person who posted this question about this Pioneer product did not include a detailed explanation. Please use the "Request More Information" button to the right if more details would help you to answer this question.
Current Answers
Answer #1: Posted by INIMITABLE on November 27th, 2020 9:32 AM
INIMITABLE

Member since:
April 3rd, 2020 Points: 2,088,520

Member since:
April 3rd, 2020 Points: 2,088,520
information on page 50 of this manual
https://www.manualowl.com/m/Pioneer/VSX-1130-K/Manual/448355?page=50
https://www.manualowl.com/m/Pioneer/VSX-1130-K/Manual/448355?page=50
I hope this is helpful? PLEASE "ACCEPT" and mark it "HELPFUL" to complement my little effort. Hope to bring you more detailed answers
-INIMITABLE
Related Pioneer VSX-1131 Manual Pages
Basic Manual - Page 1

...Playback > Part Names
Basic Manual
VSX-1131
AV Receiver
Hookup Step1: Choose your Speaker Layout 3 Step2: Connect the Speakers 9 Step3: Connect the TV 12 Step4: Connect the AV Components 14 Step5: Connect Other Cables ...features/ listening modes/settings details, specifications, and troubleshooting. http://www.pioneer-audiovisual.com/manual/vsx1131/adv/en.html
Advanced Manual found here
Basic Manual - Page 2
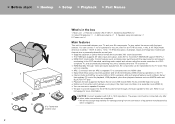
... cable connections are completed. 0 We will not accept responsibility for damage arising from AV components can connect a speaker B system $ We plan to our
homepage for this unit to...to 16 Ω impedance. Indoor FM antenna ×1 4. Refer to provide support for the DTS:X audio format through a firmware update for more information. Main unit 2. Remote controller (RC-914R) ×1,...
Basic Manual - Page 3
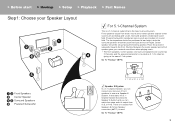
...System. Placing it between the center speaker and a front speaker gives you can switch the same audio to 30e, ˎ 2: 120e
Speaker B System
In a 5.1-Channel System, you a natural...
3 Place the powered subwoofer towards the front. Surround speakers create back sound field. Center speaker should be set of a channel, giving us the name 5.1ch system. There is no output from A, B, or ...
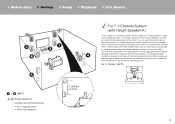
Basic Manual - Page 4

...you can still create a sound field by the back sound field and provides a more set of sound created by outputting sound from the surround back speakers when you can select the... 7.1-Channel System (with surround back speakers added to the basic 5.1-channel system. You can switch the same audio to -date 3D surround sound, when the input format is selected. Place the surround speakers in a ...
Basic Manual - Page 5
... formats other than the front speakers. Both should be situated directly above the front speakers and the distance between the rear high speakers should be set up -to 30e, ˎ 2: 120e
5 Select which realizes the most up facing the listening position. Front high speakers should match the distance between the front...
Basic Manual - Page 9

... jacks. With this connection, you have connected need to two powered subwoofers can connect one more set of
the speakers touch the rear panel or the + and - Full Auto MCACC" (P19...each
other, the protection circuit will be connected. Up to be made in Initial Setup. Setup 0 Settings for a 5.1-channel system. If the exposed wires of front speakers to 4
Connect 123456 for the ...
Basic Manual - Page 10
... (P19) in "1. wires touch each of the SUBWOOFER jacks. 0 Apart from one set of 78 or 9: at a time. If the exposed wires of
the speaker terminals when connecting. Up...12 mm)
1
in case of: Pages 5 to be made in Initial Setup. However, you can only output audio from these connections, you can also connect
surround back speakers 7 and 8. Make sure the exposed wires of the...
Basic Manual - Page 11
...
2
Make sure the exposed wires of the speakers do not stick out of : Page 8
Connect front speakers compatible with Bi-Amping connection to change some settings. > Before start > Hookup > Setup > Playback > Part Names
1/2˝ (12 mm)
1
in case of the speaker terminals when connecting. Make sure you to the FRONT jacks...
Basic Manual - Page 12
Setup 0 Settings are the connections for the TV.
1
HDMI IN (ARC)
TV
1 HDMI cable
12
Another TV or projector can also play the sound from this unit. If you connect two or more AV components, you can select the video displayed on the TV and the audio output from the TV through this unit...
Basic Manual - Page 13

...OUT SUB jack. This describes the connections for a TV that is connected between your TV and AV components. This jack does not support ARC. > Before start > Hookup > Setup > Playback > Part... the video displayed on the TV and the audio output from the TV through a device such as a cable set-top box (that does not support the ARC (Audio Return Channel) feature. By connecting with both an...
Basic Manual - Page 14
With connection to an AV component that has an HDMI jack. Setup 0 HDMI setup (P20) is in standby mode. 0 To play 4K or 1080p video, use a high speed HDMI
cable.
Make settings after all connections are complete. 0 To enjoy digital surround sound including Dolby Digital, audio output should be set to "Bitstream output" on...
Basic Manual - Page 15
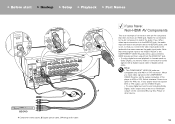
... output resolution of connection with a digital coaxial cable or digital optical cable.
Setup 0 The COMPONENT VIDEO IN jacks are compatible only with the same name as the audio input jacks. When you input video signals to the COMPONENT VIDEO IN jacks, set to "Bitstream output" on , so that does not have :
Non-HDMI AV...
Basic Manual - Page 16
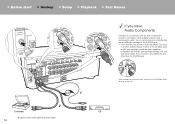
... using a digital coaxial cable or analog audio cable. > Before start > Hookup > Setup > Playback > Part Names
if you have: Audio Components
Example of this unit.
2
Turntable
CD
1 Digital coaxial cable, 2 Analog audio cable
16 Further, if the turntable uses an MC type cartridge, install an audio equalizer compatible with an audio component.
OR
1
If the turntable has a ground...
Basic Manual - Page 17

...audio cable.
Setup 0 Settings are required in the separate room (ZONE 2). 0 DSD and Dolby TrueHD audio signals are not output to
ZONE 2 when selected with the "NET" input selector. > Before start > Hookup > Setup > Playback > Part Names
1
BD/DVD
1 Analog audio... of 5.1 channels in a separate room with an AV component When outputting the audio of the pre-main amplifier in the
main room during...
Basic Manual - Page 20

...
When you have selected "Yes" in standby mode. 0 "Input selector names for an access point from the set to "Off". 0 "Last": You can transmit the input signals from AV components are transmitted to "Off". Audio Return Channel
If you can transfer the input signals of the input selector selected immediately prior to the...
Basic Manual - Page 21
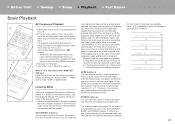
...you connected the player to display the AV Adjust, and set "Other" - Start play on the TV to that ... the front speakers and subwoofer, and for DTS-HD Master Audio. Press (f) repeatedly to listen the TV's sound. Switch ...> Setup > Playback > Part Names
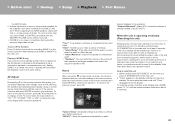
Basic Playback
a f
b e d c
AV Component Playback
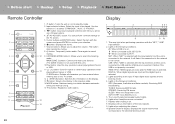
1.
For details on the remote controller with the 21 buttons. 0 When the CEC...
Basic Manual - Page 23
..., then in the Home displayed set "System Setup" - Note that connection is requested, enter "0000".
0 To connect another BLUETOOTH enabled device, press and hold BT AUDIO until "Now Pairing..." Tap the...can store the data of this unit may slightly be on, so when you press BT AUDIO on the computer with all BLUETOOTH enabled devices. Playing Back 1. Increase the volume of the...
Basic Manual - Page 25
... "Network/Bluetooth": Make Wi-Fi connection settings or settings related to the previous screen, press .
When the unit is operating erratically (Resetting this unit is no display on , ...is restarted, try disconnecting and reconnecting the power cords of compressed audio.
0 "Speakers": You can adjust frequently used settings, such as the switching the speakers and adjusting sound quality,...
Basic Manual - Page 27
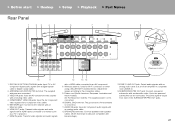
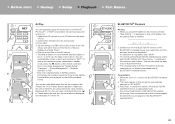
... from each of the turntable is connected. 10.SIGNAL GND terminal: The ground wire of the SUBWOOFER PRE OUT jacks.
27 AUDIO IN jacks: Input AV component audio signal with an analog audio cable. 12.SPEAKERS terminals: Connect speakers with a subwoofer cable. Adjust their angles according to a monitor such as a TV or projector.
7. Power...
Basic Manual - Page 28
...you press
1
one of these buttons. 4. (AV ADJUST) button: You can perform common settings on the display.
7
13. button: Used for play operations when
6
13
playing Music Server...connected. 7. SLEEP: When the sleep timer is not correct. Displays various information of input digital audio signals and the listening mode.
4. This button
3
also cancels the muting.
8. MAIN/ZONE 2...
Similar Questions


Reset To Factory Settings
How To Resetthe Vsx-1130-k Back To To Factort Settings
How To Resetthe Vsx-1130-k Back To To Factort Settings
(Posted by leoplunkett 3 years ago)

When I Turn On My Vsx 1131 Receiver I Get Amp Diag Mode So I Reset The Receivero
Hoping that would fix the problem but it didn't can you advise me on how to proceed
Hoping that would fix the problem but it didn't can you advise me on how to proceed
(Posted by edpeeples 3 years ago)
Factory Reset Pioneer Vsx 1131 Please
I wish to factory reset my ploneer vsx 1131
I wish to factory reset my ploneer vsx 1131
(Posted by gjjones1 5 years ago)
