Pioneer AVIC-X920BT Support Question
Pioneer AVIC-X920BT Support Question
Find answers below for this question about Pioneer AVIC-X920BT.Need a Pioneer AVIC-X920BT manual? We have 2 online manuals for this item!
Question posted by joethwe on November 25th, 2013
Avic X920bt Bluetooth Setting Won't Work
The person who posted this question about this Pioneer product did not include a detailed explanation. Please use the "Request More Information" button to the right if more details would help you to answer this question.
Current Answers
Related Pioneer AVIC-X920BT Manual Pages
Owner's Manual - Page 1
For more information, please contact your vehicle, additional installation may be required.
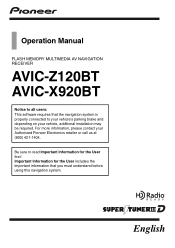
Operation Manual
FLASH MEMORY MULTIMEDIA AV NAVIGATION RECEIVER
AVIC-Z120BT AVIC-X920BT
Notice to all users: This software requires that you must understand before using this navigation system. Important Information for the User includes the important information ...
Owner's Manual - Page 2
...for AVIC-Z120BT) 14 - POI list) 24 Operating the on-screen keyboard 24
How to operate your iPod 19
Flow from actual screens.
Before removing the vehicle
battery 11 - Z120BT) 15 - Setting the...panel and screen 11 Notes on internal memory 11 -
Inserting an SD memory card (for AVIC-X920BT) 15 Inserting and ejecting an SD memory card 15 - Connecting your route 33 Searching for ...
Owner's Manual - Page 13
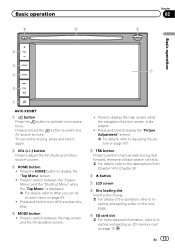
... Menu" screen. ! Press to switch between the "Classic Menu" and the "Shortcut Menu" while the "Top Menu" is displayed.
! Basic operation
6
8
Chapter
02
9
Basic operation
2
3
7 4
5
1
AVIC-X920BT
1 button Press the button to turn off the screen display.
4 MODE button ! Press to mute. En 13 Press and hold to activate voice operations.
To...
Owner's Manual - Page 15
...for AVICX920BT.
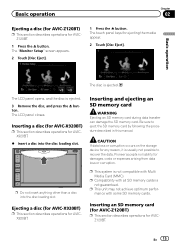
% Insert a disc into the disc loading slot. Inserting a disc (for AVIC-X920BT)
p This section describes operations for damages, costs or expenses arising from data loss or... insert anything other than a disc into the disc loading slot. Ejecting a disc (for AVIC-X920BT)
p This section describes operations for AVICX920BT. Inserting and ejecting an SD memory card
WARNING ...
Owner's Manual - Page 17
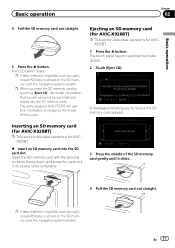
... remove the SD memory card appears. The utility program AVIC FEEDS will be automatically stored into the SD card slot. Ejecting an SD memory card (for AVIC-X920BT)
p This section describes operations for ejecting the media ... using will use . Inserting an SD memory card (for AVIC-X920BT)
p This section describes operations for AVICX920BT.
% Insert an SD memory card into the SD memory card....
Owner's Manual - Page 63
... system can be connected to reconnect the previously-connected device.
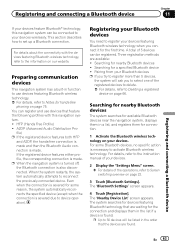
The "Nearby Device List" screen appears. Registering your Bluetooth devices
You need to Deleting a registered
device on page 22.
3 Touch [Bluetooth Settings]. The "Bluetooth Settings" screen appears.
4 Touch [Registration]. If the registered device features either profile, the corresponding connection is severed due...
Owner's Manual - Page 64

... wireless technology. appears. The device is registered in the list. After the device is successfully registered, the Bluetooth connection is necessary to Screen switching overview on page 22.
3 Touch [Bluetooth Settings].
For some Bluetooth devices, no specific action is established from mobile phone]. The "Nearby Device List" screen appears.
5 Touch [Register from the...
Owner's Manual - Page 65

... to be connected.
En 65 p If registration fails, repeat the procedure from the device.
Registering and connecting a Bluetooth device
6 Register the navigation system on page 22.
3 Touch [Bluetooth Settings]. The "Bluetooth Settings" screen appears.
4 Touch [Registration]. The "Nearby Device List" screen appears.
5 Touch [Select specific devices].
Registering and connecting...
Owner's Manual - Page 66
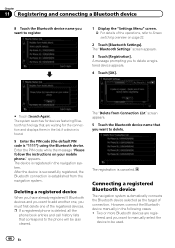
.... The registration is established from Connection List" screen appears. 5 Touch the Bluetooth device name that you to the phone will be used.
66 En
The "Bluetooth Settings" screen appears.
3 Touch [Registration].
Connecting a registered Bluetooth device
The navigation system automatically connects the Bluetooth device selected as the target of connection. tered, and you must first...
Owner's Manual - Page 67
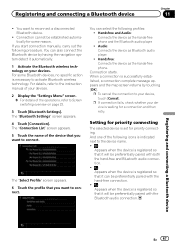
... is registered so that it will be preferentially paired with the Bluetooth audio connection. Audio: Connects the device as the hands-free phone and the Bluetooth audio player. !
The "Bluetooth Settings" screen appears.
4 Touch [Connection].
p To cancel the connection to your devices. Setting for priority connecting
The selected device is necessary to connect.
Registering...
Owner's Manual - Page 73
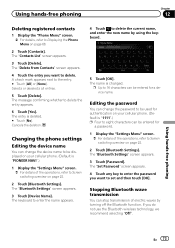
... the password to be used for a device name. The name is deleted. # Touch [No]. Using hands-free phoning
En 73 The entry is changed. The "Bluetooth Settings" screen appears.
3 Touch [Device Name].
The message confirming whether to the entry. # Touch [All] or [None]. The "Delete from Contacts" screen appears.
4 Touch the entry...
Owner's Manual - Page 74
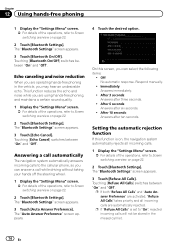
...] switches between "On" and "Off". After 3 seconds: Answers after six seconds.
! The "Bluetooth Settings" screen appears.
3 Touch [Refuse All Calls]. Touching [Bluetooth On/Off] switches between "On" and "Off".
On this function is set to Screen switching overview on page 22.
2 Touch [Bluetooth Settings]. p If "Refuse All Calls" is on, the navigation system automatically rejects all...
Owner's Manual - Page 75
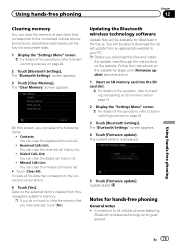
... memory card into the SD card slot.
= For details of the operation, refer to Inserting and ejecting an SD memory card on page 22.
2 Touch [Bluetooth Settings].
The "Clear Memory" screen appears. Dialed Calls List: You can clear the received call history list.
!
p Before you can select the following items:
! Data on...
Owner's Manual - Page 188
... you perform this operation.
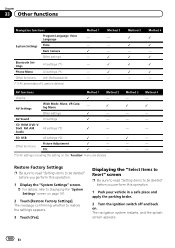
1 Display the "System Settings" screen. = For details, refer to Displaying the "System Settings" screen on . Chapter
33 Other functions
Navigation functions
Program Language, Voice Language
System Settings
Time Back Camera
Other settings
Bluetooth Settings
All settings (*1)
Phone Menu
All settings (*1)
Other functions Anti-theft password
(*1) All stored...
Owner's Manual - Page 217
Appendix
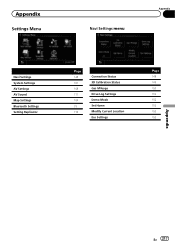
Settings Menu
Navi Settings menu
Appendix
Navi Settings System Settings AV Settings AV Sound Map Settings Bluetooth Settings Setting Replicator
Page 148 161 168 171 154 73 176
Connection Status 3D Calibration Status Gas Mileage Drive Log Settings Demo Mode Set Home Modify Current Location Eco Settings
Page 148 149 150 152 152 152 153 153
Appendix
En 217
Owner's Manual - Page 220

Appendix
Appendix
Bluetooth Settings menu
Connection Registration Device Name Password Bluetooth On/Off Echo Cancel Auto Answer Preference Refuse All Calls Clear Memory Firmware update
Page 66 63 73 73 73 74 74 74 75 75
220 En
Owner's Manual - Page 225
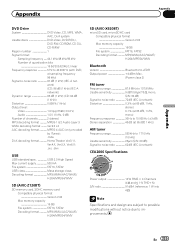
..., FAT32 Decoding format MP3/WMA/AAC/WAVE/ H.264/MPEG4/WMV
SD (AVIC-X920BT)
microSD card, microSDHC card Compatible physical format Version 2.00 Max memory capacity 16 GB File system FAT16, FAT32 Decoding format MP3/WMA/AAC/WAVE/ H.264/MPEG4/WMV
Bluetooth
Version Bluetooth 2.0+EDR Output power 4 dBm Max.
(Power class 2)
FM tuner
Frequency range...
Installation Manual - Page 16
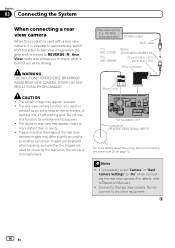
..., or backing into a tight parking spot. ND-BC4) (sold separately) To video output
RCA cable
(*1) AVIC-Z120BT
(*2) AVIC-X920BT
Brown (REAR VIEW CAMERA IN)
20 cm (7-7/8 in.) (*1) 23 cm (9 in.) (*2)
RCA connector
Power... image when the gear shift is moving forward.
CAUTION ! The object in "Back
Camera Settings" to "On" when connecting the rear view camera. (For details, refer to whether full...
Installation Manual - Page 18

...the rear seats to watch the video source.
18 En It is necessary to set "AV2 Input" in "AV Settings" to "Video" when connecting the external video component. (For details, refer ... rear display connected to rear video output
WARNING NEVER install the rear display in .) (*2)
(*2)
AVIC-X920BT
RCA connector
Yellow (VIDEO INPUT)
Red, white (AUDIO INPUT)
RCA cables (sold separately)
To video ...
Installation Manual - Page 19

... "EXT" when connecting the external unit. (For details, refer to Operation Manual.)
English
Section
03
En 19 It is necessary to set "AV2 Input" in .) (*2)
Yellow (VIDEO INPUT)
IP-BUS cable (sold separately)
Black
RCA cable (sold separately)
To IP-BUS output
To video output
Pioneer external unit (sold separately)
(*1)
(*2)
AVIC-Z120BT AVIC-X920BT
!
Similar Questions


Settings Don't Work?
I've installed a pioneer 940bt navigation system everything's seem fine until I went to settings. Th...
I've installed a pioneer 940bt navigation system everything's seem fine until I went to settings. Th...
(Posted by luckylong86 11 years ago)