Pioneer AVIC-7200NEX Support Question
Pioneer AVIC-7200NEX Support Question
Find answers below for this question about Pioneer AVIC-7200NEX.Need a Pioneer AVIC-7200NEX manual? We have 3 online manuals for this item!
Question posted by matthewalancline on September 15th, 2016
The Unit Comes On But Is Locked Up, It Does Nothing.
How Do You Do A Factory Reset On A Pioneer Avic-7200nex?
Current Answers


Related Pioneer AVIC-7200NEX Manual Pages
Owner s Manual - Page 1
AVIC-8200NEX AVIC-7200NEX AVIC-6200NEX AVIC-5200NEX
MULTIMEDIA NAVIGATION RECEIVER
Notice to your vehicle' s parking brake and depending on your Authorized Pioneer Electronics retailer or call us at (800) 421-1404. Important Information for the User first! For more information, please contact your vehicle, additional installation may ...
Owner s Manual - Page 3
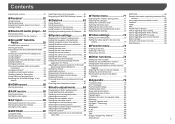
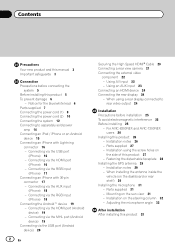
... 56 Selecting a channel from the category list.......56 Using TuneScan 56 Using TuneMix 56 Displaying the "SiriusXM Settings" screen.......56 Setting TuneStart 56 Setting parental lock 56 Checking the update traffic and weather
information 57 Using SportsFlash 57 Using the content alerts function 57 Selecting teams for Game Alert 58 Using...
Owner s Manual - Page 7
... using the navigation system.
1 2
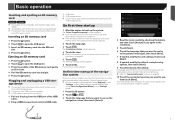
7 Basic operation
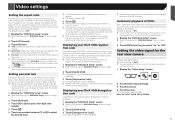
Inserting and ejecting an SD memory card
8200NEX 7200NEX p This system is not possible. Ejecting an SD memory card
1 Press the button. 2 Touch...for voice guidance messages, then touch [Next].
7 If needed, modify the unit settings, then touch [Next].
8 If needed, modify the default route planning options, then touch [Next].
9 ...
Owner s Manual - Page 21
... the cursor over the
stored alert point, and then touch . 3 Touch [Edit Alert Points]. 4 Set the necessary parameters. If you expect the alert to come from your current position.
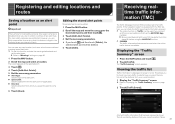
1 Display the "Traffic Summary" screen. Refer to "Warnings" settings on page
21
2 Touch [Traffic Events].
p The online function in a list...
Owner s Manual - Page 57
...on page 57 p Touch [Play] to listen to hear the play. SiriusXM® Satellite Radio
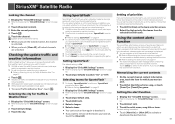
Locking the channel
1 Display the "SiriusXM Settings" screen. Refer to cancel notifications regarding the...61477; Grayed out: traffic and weather broadcast for game.
rately) is required to remove all locked channels are listening can be set to "On". Refer to Setting SportsFlash™ on...
Owner s Manual - Page 62
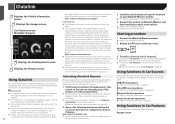
...of the operations, refer to first flash the Maestro RR module with the appropriate vehicle and head unit firmware.
1 Find the device number (12 alphanumeric characters) on the label on page 54.
.... Please note that are very similar to this product.
3 Install the vehicle/head unit specific firmware on page 32.
http://maestro.idatalink.com/
The data are required to ...
Owner s Manual - Page 69
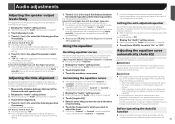
... the time alignment
By adjusting the distance from the speakers when measuring the vehicle's acoustics.
WARNING A loud tone (noise) may be emitted from each speaker unit.
2 Display the "Audio" setting screen. Refer to Displaying the "Audio" setting screen on page 68
2 Touch [Graphic EQ].
3 Touch the equalizer curve name.
When...
Owner s Manual - Page 73
..." even if you deregister from a DivX VOD provider.
Displaying your provider. If you use parental lock to Displaying the "DVD/DivX Setup" screen on page
72
2 Touch [DivX® VOD].
...Display the "DVD/DivX Setup" screen Refer to select the desired level. turing parental lock, code number input indications may not operate properly. p The default setting is applied.
If this...
Owner s Manual - Page 76
... type of the settings and recorded contents will not be reset. Park your dealer or the nearest authorized Pioneer service facility. Secure this product cannot play.
- No ...61540; The disc is activated.
- The screen is impossible during disc playback.
-
Turn the parental lock off or change the camera polarity setting to "Battery".
Restoring the default settings
CAUTION Do not turn ...
Owner s Manual - Page 78
.... - Move the SiriusXM antenna away from outside of the
southern sky. - Release the channel lock.
Perform the operation with one that the disc is loaded correctly. There is not..., reconnect the iPod and reset it . If the message fails to disappear even after the engine is switched off /on , contact your dealer or the nearest authorized Pioneer service center for assistance.
...
Owner s Manual - Page 79
...Error The connected USB hub is not supported by this product are skipped.
Press reset to the USB
storage device. Disconnect the USB storage device and do not use SD ... - Select a file that you use it with another USB
storage device.
Press reset to play this USB memory into the unit. Confirm that can be played.
The flash memory
of file is not caught in...
Owner s Manual - Page 90
...3/8in.) 8200NEX/7200NEX Weight 2.1 kg (4.6 lbs) 6200NEX/5200NEX Weight 1.8 kg (4 lbs) 8200NEX NAND flash memory 16 GB 7200NEX/6200NEX/5200NEX NAND flash memory 8 GB
Navigation
GPS receiver: System L1, C/Acode GPS
SPS (Standard ... wipe the screen with anything besides your dealer or the nearest authorized Pioneer Service Station.
Notice regarding MP3 file usage
Supply of this product only...
Installation Manual - Page 2
...24 - Installation notes 26 - Parts supplied 27 - Connecting via the HDMI port (Android device) 19
- For AVIC-8200NEX and AVIC-7200NEX users 26
Installing this product 33 Contents
Precautions
Your new product and this manual 3 Important safeguards 3
Connection Precautions before... supplied 31 - Using AV input 22 - Fastening the detachable faceplate 28
Installing the GPS antenna 29 -
Installation Manual - Page 6
...'s manual for this product is in "Power OFF" mode, the control signal is extended with any other units, then make sure to 8 W (impedance value). When disconnecting a connector, pull the connector itself. ...Section
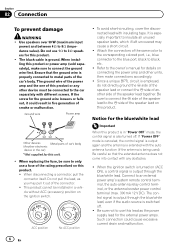
02 Connection
To prevent damage
WARNING ! Ensure that the extended antenna does not come into contact with the auto antenna function (if the antenna is especially important to...
Installation Manual - Page 7
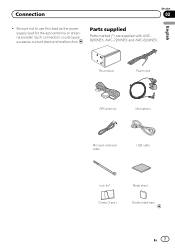
Parts supplied
Parts marked (*) are supplied with AVIC8200NEX, AVIC-7200NEX and AVIC-6200NEX. Connection
Section
02
English
! Be sure not to use this lead as the power supply lead for the auto-antenna or antenna booster.
This product
Power cord
GPS antenna
Microphone
Mini-jack extension cable
USB cable
Lock tie*
Metal sheet
Clamp (3 pcs.)
Double...
Installation Manual - Page 19
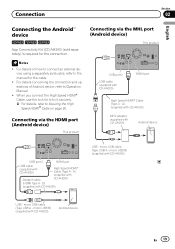
...-AH200)
High Speed HDMI® Cable (Type A - D)
(supplied with
Adapter cable
CD-AH200)
(HDMI Type A - Connection
Section
02
English
Connecting the Android™ device
8200NEX 7200NEX 6200NEX
App Connectivity Kit (CD-AH200) (sold cable, refer to the manual for the connection.
When you connect the High Speed HDMI® Cable, use...
Installation Manual - Page 20
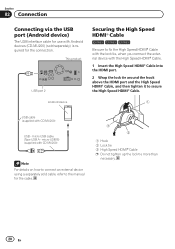
... port 2 Android device
Securing the High Speed HDMI® Cable
8200NEX 7200NEX 6200NEX
Be sure to fix the High Speed HDMI® Cable with the lock tie, when you connect the external device with the High Speed HDMI&#...174; Cable.
1 Insert the High Speed HDMI® Cable into the HDMI port.
2 Wrap the lock tie around the hook above the HDMI port and the High Speed HDMI® Cable, and then tighten...
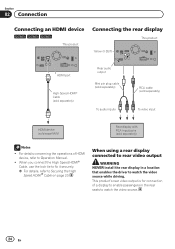
Installation Manual - Page 24
Section
02 Connection
Connecting an HDMI device
8200NEX 7200NEX 6200NEX This product
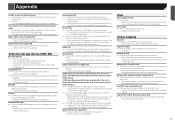
Connecting the rear display
This product
Yellow (V OUT)
HDMI port
High Speed...rear display in the rear seats to Operation Manual.
! When you connect the High Speed HDMI® Cable, use the lock tie to fix it securely. = For details, refer to watch the video source.
24 En For details concerning the ...
Installation Manual - Page 25
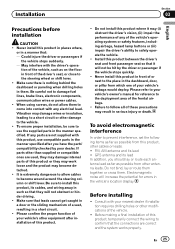
... have the parts' compatibility checked by the driver or passenger if the vehicle stops quickly.
! GPS antenna and its lead !
Before installing
! Could injure the driver or passengers if
the vehicle ... features, including airbags, hazard lamp buttons or (iii) impair the driver's ability to come into contact with this product, its cables, and wiring away in the manner specified after...
Installation Manual - Page 33

... vehicle is installed correctly. En 33 Then reconnect the negative (-) cable to the negative (-) terminal of a pen.
8200NEX 7200NEX
5 Drive down an unobstructed road until the GPS starts receiving the signal normally. Press the RESET button on this product with a pointed object such as desired. = For details concerning operations, refer to Operation Manual...
Similar Questions


Can I Get A Remote For A Avic-7200nex And If So What Is The Model Number?
can i get a remote for a avic-7200nex and if so what is the model number?
can i get a remote for a avic-7200nex and if so what is the model number?
(Posted by rhughes6 4 years ago)

How To Do A Factory Reset On A Pioneeer Avic-x930bt
(Posted by thastvla 10 years ago)

