
Pfaff hobbylock 796 Support Question
Pfaff hobbylock 796 Support Question
Find answers below for this question about Pfaff hobbylock 796.Need a Pfaff hobbylock 796 manual? We have 1 online manual for this item!
Question posted by lindabradyhelton on October 15th, 2014
Needle Change
How do I change a double needle on the pfaff 796? I do not have a "hex" attachment. Do I need to buy one? What is the correct number to buy the needle and do they come double attached or do you install them singular? One at a time?
Current Answers
Answer #1: Posted by TechSupport101 on October 15th, 2014 11:20 AM
TechSupport101

Member since:
May 24th, 2013 Points: 12,171,305

Member since:
May 24th, 2013 Points: 12,171,305
Related Pfaff hobbylock 796 Manual Pages
Owner's Manual - Page 2
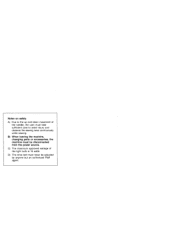
... the needle, the user must be adjusted by anyone but an authorized Pfaff agent. B) When leaving the machine, changing parts or accessories, the machine must take sufficient care to the up and down movement of
the light bulb is 15 watts.
Notes on safety
A) Due to avoid injury and observe the sewing area continuously while sewing.
D) The...
Owner's Manual - Page 3
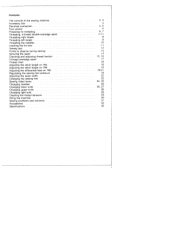
... on 794 Adjusting the stitch length on 796 Adjusting the differential feed on 796 Regulating the sewing foot pressure Adjusting the seam width Changing the sewing feet Sewing rolled hems Changing needles Changing lower knife Changing upper knife Changing light bulb Cleaning the thread tensions Oiling the machine Sewing problems and solutions Accessories Specifications
2, 3 4
4, 5 5
6, 7 7-11...
Owner's Manual - Page 5
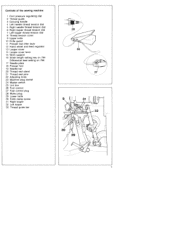
Controls of the sewing machine
1 Foot pressure regulating dial 2 Thread guide 3 Carrying handle 4 Left needle thread tension dial 5 Right needle thread tension dial 6 Right looper thread tension dial 7...key on 794
Differential feed setting on 796 17 Needle plate 18 Presser foot 19 Needle bar 20 Thread reel stand 21 Thread reel pins 22 Adjusting knob 23 Machine plug socket
24
Master
switch
25 ...
Owner's Manual - Page 6
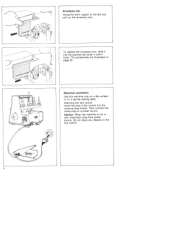
Accessory box Swing the work support to a power source. Attaching the toot control: Insert the plug of the control into the grooves and push it until it into the machine plug socket. Do not place any objects on a special sewing table.
Electrical connection Use this machine only on a flat surface or on the foot control...
Owner's Manual - Page 7
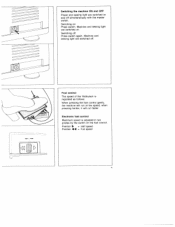
... switch on the foot control
Pos,ho,,
= Half Speed
Posillon 4 = Full speed Switching the machine ON and OFF Power and sewing light are switched on and off simultaneously with the master Switch
S Witching on . Switching off .
Machine and sewing light are switched off : Press switch again. Electronic foot control
Maximum speed is regula as...
Owner's Manual - Page 9
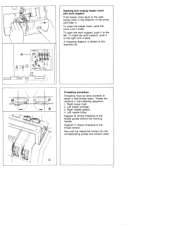
... affixed to obtain a well-formed seam. Right looper (red) 2. Left needle (blue) Diagram B shows threading of the thread tension. Now pull the ... Threading procedure Threading must be done correctly to the machine (A). Left looper (orange) 3. Right needle (green) 4. To close the looper cover, push the cover until it locks. Thread the machine in the direction of the arrow and...
Owner's Manual - Page 12
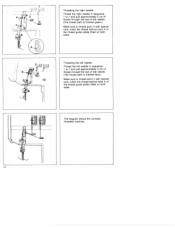
... sequence 1 to 7 and pull approximately 5 cm of thread through the eye of the needle. (The thread path is marked green.) Make sure to thread point 4 with special care; The diagram shows the correctly threaded machine. insert the thread behind hook A of the thread guide plates fitted on both sides.
insert the thread behind...
Owner's Manual - Page 15
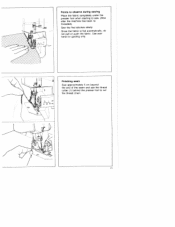
... to cut the thread chain. Sew the first stitches slowly. Since the fabric is fed automatically, do not pull or push the fabric. Finishing seam Sew approximately 5 cm beyond the end of the seam and use the thread cutter (1) behind the presser foot to sew. (Also after the machine has been re threaded). Use...
Owner's Manual - Page 16
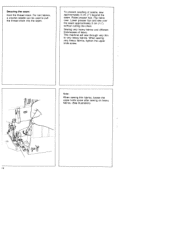
... approximately 2 cm (1/2') without cutting the chain. Raise presser foot.
Sewing very heavy fabrics and different thicknesses of seams, sew approximately 3 cm (1") beyond the seam. Note:
When sewing thin fabrics, loosen the upper knife screw after sewing on heavy fabrics. (See illustration). For knit fabrics, a crochet needle can be used to very heavy fabrics. Securing the...
Owner's Manual - Page 17
...
needle thread
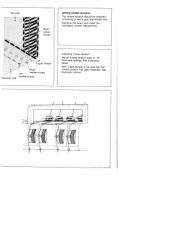
Adjusting thread tension:
Set all thread tension dials to be adjusted according to fabric type and thread size. Sew a test sample to "N" (standard setting).
See illustration above.
1
Left looper thread
- Top side
Right looper thread
Setting thread tensions:
The thread tension should be sure that the correct tension has been obtained...
Owner's Manual - Page 19
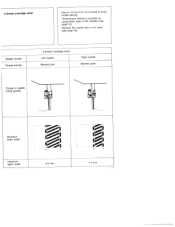
... either right or left needles (see page 26). Needle thread Thread tension
3-thread overedge seam Left needle Marked blue
Rht needle Marked green
Thread in needle
clamp guides
0
0
Standard seam width
maxim urn seam width
6.5 mm
4.5 mm 3-thread overedge seam
_____
How to convert from four-thread to threethread sewing: Three-thread sewing is riot used (see...
Owner's Manual - Page 21

... is set firmly as soon
as may be required (point of arrow).
/
The numbers indicate the stitch length
in the direction indicated by continuing to turn handwheel 12 forwards ... mark A by the arrow until it there. The stitch length is N = 3 mm. Setting the stitch length on 796
Open lateral swivel table 15. If
I
IIIi
II
I
I ! Press stop of main feed dog (see arrow) fully downwards ...
Owner's Manual - Page 24

... according to 6.5 mm. Push upper knife holder (1) to the lower (cutting) position and close the looper cover. Sew a test sample. Adjusting seam width: Standard setting is "N". Turn knurled knob (2) clockwise until it may be changed from 2.5 to fabric type and seam requirements. Reset the upper knife to the far right. Note: Before...
Owner's Manual - Page 25
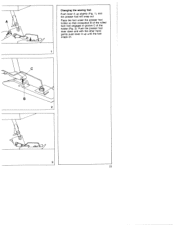
Place the foot under the presser foot holder so that crosspiece B of the rolled hem foot engages in groove C of the holder (Fig. 2). Push the presser foot lever down and with the other hand gently push lever A up slightly (Fig. 1), and the presser foot will snap out. Changing the sewing feet Push lever A up until the foot snaps on.
23
Owner's Manual - Page 27
...accessory box.
3. Or use regular sewing thread, woolly nylon or
rayon thread for a rolled hem with good quality thread.
5. The Pfaff Hobbylock 794 is also perfect for a ...9. Snap on rolled hem foot, marked with a any other good quality thread.
5. 6. Set green threading path (needle tension) at + 3, + 4, or + 5, depending on the weight
of hem.
1.
Set stitch width at ...
Owner's Manual - Page 28
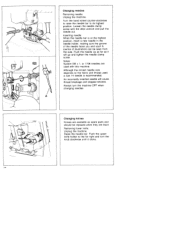
...cause thread breakage and skipped stitches. Changing needles Removing needle: Unplug the machine. Loosen the needle clamp screw with this machine. Turn the hand wheel counter-clockwise to raise the needle bar to the far right and turn the machine OFF when changing needles.
Inserting needle: When the needle bar is recommended. Although the correct needle size depends on the fabric and thread...
Owner's Manual - Page 30
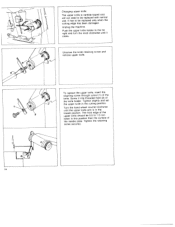
... position. The front edge of the needle plate.
It has to be replaced with normal use. Tighten the retaining screw securely. Unplug the machine. Unscrew the knife retaining screw and remove upper knife. Changing upper knife: The upper knife is ... the upper knife arm is carbide tipped and will not need to be replaced only when the cutting edge has been damaged. Screw it clicks.
Owner's Manual - Page 31
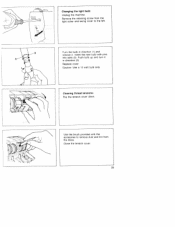
... left. Close the tension cover.
29 Use the brush provided with pins into slots (3). Turn the bulb in direction (2). Caution: Use a 15 watt bulb only. Changing the light bulb: Unplug the machine.
Cleaning thread tensions: Flip the tension cover down.
Owner's Manual - Page 33
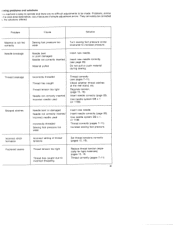
... to operate and there are no difficult adjustments to be corrected
the solutions offered. Needle not correctly inserted.
ewing problems and solutions hs machine is not fed correctly Needle breakage
Thread breakage
Skipped stitches
Incorrect stitch formation Puckered seams
Sewing foot pressure too weak
Turn sewing foot pressure screw clockwise to incorrect threading
Reduce thread tension...
Owner's Manual - Page 34
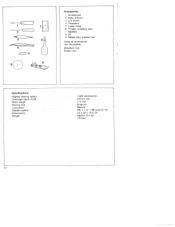
... disc 7 Needles 8 Oil 9 Rolled hem presser foot
Optional accessories (not illustrated):
Blindhem foot Elastic foot
stitches/mm,
30-6.5 mm
1-5mm
Snap-on
• Manual
•
DB x 1 or 1738 (size 9-14)
• . . 24x22x18.5cm
8.5 kg
(19 lbs.) 3
4 5 /__•
60
Specifications Highest sewing speed Overedge seam width Stitch length Sewing foot Lubrication Needle system Dimensions...
Similar Questions

Upper Blade Position
I have replaced the upper blade in the serger hobby lock 796 I can't return the blade to the proper ...
I have replaced the upper blade in the serger hobby lock 796 I can't return the blade to the proper ...
(Posted by debpicco 2 years ago)

Where Can I Obtain Accessory Kit For Hobbylock 796
how can I obtain an accessory kit or Hobbylock 796
how can I obtain an accessory kit or Hobbylock 796
(Posted by selbyag 3 years ago)


Pfaff 259 Sewing Machine Won't Run With Foot Petal
I have a pfaff 259. When I push on the foot petal the motor runs but the machine itself doesn't run....
I have a pfaff 259. When I push on the foot petal the motor runs but the machine itself doesn't run....
(Posted by Aemazing 8 years ago)

Pfaff 1245 Sewing Machine
How can I change the oil wick on my Pfaff 1245 walking foot industrial sewing machine please?
How can I change the oil wick on my Pfaff 1245 walking foot industrial sewing machine please?
(Posted by janeellenjones 11 years ago)