
Pfaff hobbylock 4860 Support Question
Pfaff hobbylock 4860 Support Question
Find answers below for this question about Pfaff hobbylock 4860.Need a Pfaff hobbylock 4860 manual? We have 1 online manual for this item!
Question posted by barbarapartridgeBP on July 27th, 2016
Ragged Cutting
What can I do to solve the problem of my pfaff hobbylock 4860 cutting ragged?
Current Answers


Related Pfaff hobbylock 4860 Manual Pages
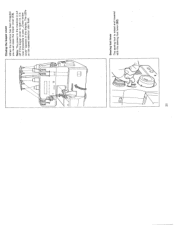
Owner's Manual - Page 1

j
3
C,
I
46O
PFRFF
*
Instruction manual PFAFF
hobbylock 4860
j
-
-
Owner's Manual - Page 4

...Detachable work support (1 8) Window for the seam width (1 9) Accessories box (20) Needle holder (21) Lever for the sewing foot pressure
(36) Right overedge looper (37) Converter (38) Left overedge looper (39) Automatic looper threader for speed selection ... (4) Looper thread tension - Parts of the hobbylock 4860
(1) Upper thread tension - right (5) Looper thread tension - left
Cursor key -
Owner's Manual - Page 5

...as described in this appliance from the electric outlet immediately after using this sewing machine is required around the sewing machine needle.
12. Do not use an electric appliance, the following basic...Replace bulb with any opening.
6. Important safety instructions
For the United States only
This sewing machine is not working pro perly, if it can cause the needle to break.
13. ...
Owner's Manual - Page 6

... DIN 57 700, Section 28 or EC 335, Section 28.
1 The user must be adjusted by a Pfaff mechanic.
5. Do not use insecticides or che mical products such as indicated on the specification plate.
6. Never use the sewing machine if: - there is visible damage, - To remove any objects in the
home.
When leaving the...
Owner's Manual - Page 7

... well spent, since it is the only way to find out just what your machine can do and put it is just as this instruction manual is happy to -date sewing
Congratulations!
So now let's get started! Your new hobbylock 4860 can go amiss. He is to study the instruction manual nothing can take...
Owner's Manual - Page 11

... and the looper Threader Threading the needles Changing a spool when the machine is threaded Sewing foot lever Sewing test / thread cutter Seam width adjusting knob Stitch length adjusting knob Differential feed Changing the needle, sewing foot and needle plate Fixing the upper knife /sewing foot pressure
page 8, 9 page 9 page 10 page 11 page 1 2
page 1 3 - 1 6 page...
Owner's Manual - Page 12

Connecting the foot control Connect the plug of the foot control with the connection socket (30) of the sewing machine and the wall socket. j
C
Electrical connection Connect the mains cord between socket (28) of the sewing machine. The preset area of the sewing speed (see page 33) is regulated by pressing the pedal. Caution: Do not put anything under the pedal. 8
Owner's Manual - Page 13

To do to so pull the detachable work support I free arm
The free arm is particularly suited to the left. Insert the workpiece in the oppo
9 Main switch When the main switch (29) is turned on the sewing light and display (6) is now operational.
sew (17)
tubular goods without any difficulty. To remove detachable work support
site direction. The machine is turned up.
Owner's Manual - Page 14

Accessory box
To remove: Grip in the recess beneath the accessory box (19) and pull out in the direction of the arrow.
To insert: Push the accessory box (19) into the appropriate opening until it catches. The words ,,PFAFF hobbylock" must be facing upwards.
10 To open: Open the accessory box (19) by pressing the two points ,,A".
Owner's Manual - Page 15

... pull the spool stand (27) out fully in the direction of the arrow. When you have finished sewing push in the telescopic thread guide (23) and push the spool stand (27) in towards the machine, with or without the spools, until you must be turned slowly until ,it catches in place.
11...
Owner's Manual - Page 16

... notches on cover until you can hear
the looper cover it catch in
Note: The power now not possible
supply is interrupted when the to sew with the machine. ,,Close
looper looper
cover is dis
play. it inthe
is opened cover" appears
i.e.
Owner's Manual - Page 23

... a spool when the machine is a lot easier to pull the looper threads if you turn to looper tensions (4 and 5) to the thread spool and put on the new spools. Lower the sewing feet. Pull the needle... knots are about six inches through the looper eye and to the left under the sewing foot. It is threaded Cut the threads off and thread the appropriate needles. Tie the ends of the needles. ...
Owner's Manual - Page 24
Closing the looper cover When the machine has been threaded you must close the looper cover (13). Sewing foot lever The sewing foot is open i.e. The LEDs on the speed selection also flash.
Note: The power to sew. ,,Close looper cover" appears in the display. it is now impossible to the machine is cut off if the looper cover is raised and lowered with the sewing foot lever (32).
20
Owner's Manual - Page 25

...). Since the fabric is automatically fed, you should sew a test seam. First raise the sewing foot. Note: Make sure that the threads inter loop correctly when sewing (thread chain).
21
S..... Sewing test When the machine has been threaded, you just need to sew. Place a fabric remnant under the sewing foot right in front of the needle and...
Owner's Manual - Page 34

...
Adjusting the sewing foot pressure You can change the cutting width. The knife is disen gaged. Upper knife lock You can again move in an axial (side ways) direction. To sew light fabrics the...screwdriver from being displaced by about two turns, so that the knife can sew absolutely any type of fabric with this machine, regardless of the mate rial with the lever (21). Disengaging the upper...
Owner's Manual - Page 62
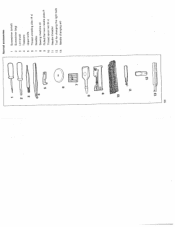
2 3
6
Normal accessories
1 Screwdriver (small) 2 Screwdriver (big) 3 Lint brush 4 Tweezers 5 Upper knife 6 Thread unreeling disc (4 x) 7 Needles 8 Sewing machine oil 9 Rolled/flat hem needle plate R 10 Thread spool net (4 x) 11 Needle threader 1 2 Tool for changing the light bulb 13 Needle changing aid
9 1o
11 12
58
Owner's Manual - Page 66

... must run along the edge of the
seam.
2.
Before sewing cut 2 cm off hem part 3. 12
43
Blindstitch sewing foot
Blindstitch is under the edge guide 2. The hem is...be visible. The needle penetration in one thread of the machine:
Program: Stitch length: Stitch width: Differential setting: Sewing foot pressure: Needle plate: Thread tension:
Sewing foot: .Upper knife:
4 4 N
N
N ...
Owner's Manual - Page 75

..., Insert the needle plate. Bring the cutting edge of the lower knife to the machine. Now tighten up the retain ing screw....
71 Secure the lower knife and the pressure plate with the slanted corner is pointing backwards to the same level as the needle plate (see page 58) and remove the screw, pressure plate and lower knife.
Remove the sewing...
Owner's Manual - Page 77

... (see page 58). One or two drops of a special material and do not need to be oiled.
73 All the other parts are made of PFAFF sewing machine oil are enough. You can now remove the upper knife (45) and clean the lint off Take out the upper knife retaining screw (42) with...
Owner's Manual - Page 82

Parts of the hobbylock 4860
(22) Thread guide with coloured markings (23) Telescopic thread guide (24) Spool pins (25) Thread cutter (26) Spool centering (27) Spool stands (28) Power socket (29) Main switch (30) Foot control socket (31) Hand whe& (32) Sewing foot lever (33) Stitch length adjusting knob (34) Adjusting ring for the differential feed (35) Reverse thread guide
(46) Waste box
Similar Questions

Edge Guide - Pfaff Select 1540 Sewing Machine
How does the Edge Guide work for the Pfaff Select 1540 sewing machine?
How does the Edge Guide work for the Pfaff Select 1540 sewing machine?
(Posted by jesjames 1 year ago)

Combination Foot Part # 29- 924 993-71/287
Where can I purchase a combination foot for my HobbyLock 4860 Serger
Where can I purchase a combination foot for my HobbyLock 4860 Serger
(Posted by mobleye 2 years ago)

Parts
Where can I purchace a light bulb for my Pfaff hobbylock 4860?
Where can I purchace a light bulb for my Pfaff hobbylock 4860?
(Posted by barbarapartridgeBP 7 years ago)

Pfaff 259 Sewing Machine Won't Run With Foot Petal
I have a pfaff 259. When I push on the foot petal the motor runs but the machine itself doesn't run....
I have a pfaff 259. When I push on the foot petal the motor runs but the machine itself doesn't run....
(Posted by Aemazing 8 years ago)
Sewing Machine Is Blinking Away And Not Able To Operate
Sewing machine was sewing constantly even after I removed my foot from the pedal. I had to switch it...
Sewing machine was sewing constantly even after I removed my foot from the pedal. I had to switch it...
(Posted by kasperflindt 11 years ago)