Get support for Pfaff hobbylock 4860

Pfaff hobbylock 4860 Support Question

Pfaff hobbylock 4860 Support Question

Find answers below for this question about Pfaff hobbylock 4860.
Need a Pfaff hobbylock 4860 manual? We have 1 online manual for this item!
Question posted by mobleye on June 19th, 2021

Combination Foot Part # 29- 924 993-71/287

Where can I purchase a combination foot for my HobbyLock 4860 Serger

Current Answers

Answer #1: Posted by SonuKumar on June 19th, 2021 10:14 PM
This answer was accepted by the poster of the original question.
SonuKumar

Member since:
May 9th, 2021

Points: 16,615,400
1,100
points


Please respond to my effort to provide you with the best possible solution by using the "Acceptable Solution" and/or the "Helpful" buttons when the answer has proven to be helpful.

Regards,
Sonu
Your search handyman for all e-support needs!!

Related Pfaff hobbylock 4860 Manual Pages

Owner's Manual - Page 4

...thread tension - right (5) Looper thread tension - left (2) Upper thread tension - left Cursor key - Parts of the hobbylock 4860 (1) Upper thread tension - middle Mod key (right) (11) LED needle display A, B (12) Knife guard (13) Looper cover (14) Sewing foot (combination foot) (15) Needle plate (1 6) Adjusting knob for seam width (1 7) Detachable work support (1 8) Window for the seam width...
Owner's Manual - Page 5

... its intended purpose as threading needle, changing needle, threading bobbin, or changing presser foot, etc. 16. Always use bent or blunt needles. It may be blocked. 10. Always unplug sewing machine from the accumulation of the sewing machine and foot control free from the electric outlet when removing covers, lubricating, or when making any opening. 6. Do...
Owner's Manual - Page 6

... sure not to clean the housing. 2 To remove any damage caused. 10. Do not use only original PFAFF parts. with regard to use the sewing machine if: - the machine which is wrongly operated, we cannot accept any liability for any stubborn dirt, use insecticides or che mical products such as indicated on safety...
Owner's Manual - Page 8

... plate Changing the sewing foot Changing the spool Cleaning the knife Cleaning the needle plate Converter Correction of the thread tension Cording foot Detachable work support. Changing the needle . Looper cover 4 Page 39, 46 39 48 43,48 39 48 39 57-68 10 15,16 67 62 70,71 72 27 29 19 73...
Owner's Manual - Page 9

... Thread chart Thread cutter Thread unreeling disc Threading the looper Threading the needles Threading the thread guides . Securing the seam Setting the programs Sewing foot chart Sewing foot lever Sewing foot pressure Sewing test Special accessories Specifications Speed pre-selection Spool disc Spool net Spool stands Standard thread tension . . Rolled hem . Lower knife Main switch Maintenance...
Owner's Manual - Page 11

... guides and the looper Threader Threading the needles Changing a spool when the machine is threaded Sewing foot lever Sewing test / thread cutter Seam width adjusting knob Stitch length adjusting knob Differential feed Changing the needle, sewing foot and needle plate Fixing the upper knife /sewing foot pressure page 8, 9 page 9 page 10 page 11 page 1 2 page 1 3 - 1 6 page 17 page...
Owner's Manual - Page 12

j C Electrical connection Connect the mains cord between socket (28) of the sewing speed (see page 33) is regulated by pressing the pedal. The preset area of the sewing machine and the wall socket. Caution: Do not put anything under the pedal. 8 Connecting the foot control Connect the plug of the foot control with the connection socket (30) of the sewing machine.
Owner's Manual - Page 13

sew (17) tubular goods without any difficulty. To do to so pull the detachable work support site direction. Insert the workpiece in the oppo 9 Main switch When the main switch (29) is turned on the sewing light and display (6) is now operational. To remove detachable work support I free arm The free arm is particularly suited to the left. The machine is turned up.
Owner's Manual - Page 18

The thread path is marked in the order ito 9 and draw the thread to the left under the sewing foot. Thread the right overedge looper (36) in pink. 14 Threading the right overedge looper The slider on the converter (37) must be in the right hand position B (see page 45).
Owner's Manual - Page 20

... wheel is not correctly set. 16 With the tweezers thread the thread through thread guide (10) and draw the thread to the left under the sewing foot. Pull the thread a bit more and at the same time let the slider slowly slide back. The threading path is marked in guide 9. 5.
Owner's Manual - Page 21

...thread through the eye to thread the needle. 17 Place the threader from the accesso ries (see page 58) with the sewing foot lever 32) and turn the hand wheel (31) until the small hook C passes through hook D and the thread ... tion. Slowly lower the threader behind hook C. Needle threader (accessory) Lower the sewing foot with the needle bet ween the two guide lugs B.
Owner's Manual - Page 22

The threading path for needle B in green (dots). 18 The threading path for needle A in the order 1 to the left under the sewing foot. Draw the thread to the left under the sewing foot. Draw the thread to 6 and draw the thread through the needle's eye 7 with the threader. This automaticaLly releases the needle thread...
Owner's Manual - Page 23

... the threads through until the knots are about six inches through the looper eye and to the left under the sewing foot. Tie the ends of the needles. Changing a spool when the machine is a lot easier to pull the looper threads if you turn to looper tensions (4 and 5) to -5. 19 Pull the needle...
Owner's Manual - Page 33

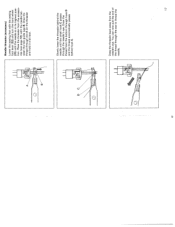
... down the lever to the left. To remove: Looper cover open Raise the sewing foot with the sewing foot lever (32) and set the needle in the guide screw at the front so that you can ...hear it catch. 29 To attach: Raise the spring on the sewing foot holder a little and place the needle plate (15) in its mount. Remove the sewing foot and press down at the back. Raise the...
Owner's Manual - Page 34

... axial lock screw on the upper knife with this machine, regardless of its thick ness. Note: The screw for very thick fabric 30 The knife is disen gaged. This prevents the knife from the accessories (see page 28, 29). Adjusting the sewing foot pressure You can sew absolutely any type of the mate rial with...
Owner's Manual - Page 62

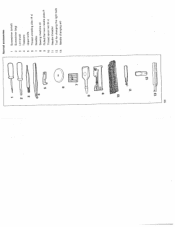
2 3 6 Normal accessories 1 Screwdriver (small) 2 Screwdriver (big) 3 Lint brush 4 Tweezers 5 Upper knife 6 Thread unreeling disc (4 x) 7 Needles 8 Sewing machine oil 9 Rolled/flat hem needle plate R 10 Thread spool net (4 x) 11 Needle threader 1 2 Tool for changing the light bulb 13 Needle changing aid 9 1o 11 12 58
Owner's Manual - Page 64

... foot Combination foot Taping foot Blindstitch foot Gimp thread sewing foot Elastic tape sewing foot Gathering foot Cording foot Bead sewing foot Lace sewing foot Needle plate N R N N R N N N R R Accessory Part no. normal accessory normal accessory 29-924 993-71/287 29-924 99 3-71/287 special accessory special accessory 29-924 993-71/295 29-924 993-71/29 1 special accessory 29-924 993-71...
Owner's Manual - Page 75

...lower knife holder and the upper knife. Now tighten up the retain ing screw. 71 Place the pressure plate on the hole in the lower knife so that the longer ...the same level as the needle plate (see page 28, 29). Bring the cutting edge of the lower knife to the machine. Raise the needles to 3. Secure the lower knife and ...see page 30). Remove the sewing foot as well as the needle plate.
Owner's Manual - Page 77

One or two drops of PFAFF sewing machine oil are made of lightly oiling the marked points with the screwdriver supplied. All the other parts are enough. You ...Switch the main switch off the upper and lower knife with the brush from the accessories (see page 58). Oiling the machine Before using your machine you should make a habit of a special material and do not need to be oiled. 73
Owner's Manual - Page 82

Parts of the hobbylock 4860 (22) Thread guide with coloured markings (23) Telescopic thread guide (24) Spool pins (25) Thread cutter (26) Spool centering (27) Spool stands (28) Power socket (29) Main switch (30) Foot control socket (31) Hand whe& (32) Sewing foot lever (33) Stitch length adjusting knob (34) Adjusting ring for the differential feed (35) Reverse thread guide (46) Waste box

Similar Questions

My Wife Pfaff Performance Icon Sewing Machine Started Freezing Up A Few Days Ago
my wifes performance icon sewing machine started freezing up after sewing for a few minutes. it migh...
(Posted by klandsemtrucking 9 months ago)
Pfaff 259 Sewing Machine Won't Run With Foot Petal
I have a pfaff 259. When I push on the foot petal the motor runs but the machine itself doesn't run....
(Posted by Aemazing 8 years ago)
Pfaff 1245 Sewing Machine
How can I change the oil wick on my Pfaff 1245 walking foot industrial sewing machine please?
(Posted by janeellenjones 11 years ago)
Sewing Machine Is Blinking Away And Not Able To Operate
Sewing machine was sewing constantly even after I removed my foot from the pedal. I had to switch it...
(Posted by kasperflindt 11 years ago)
Ask a New Question
Use the box below to post a new question about this Pfaff product .
Points & Prizes
  • You can earn points for nearly everything you do on HelpOwl.com
  • You can trade in those points for gift cards at leading retailers such as Amazon.com and Walmart
  • It's that simple!
See How it Works
Create a Free Account

Pfaff Manuals

Find free Pfaff hobbylock 4860 manuals and user guides available at ManualOwl.com. Try out our unique manual viewer allowing you to interact with manuals from directly within your browser!

Pfaff Reviews

View thousands of Pfaff user reviews and customer ratings available at ReviewOwl.com.

Contact Information

Complete Pfaff customer service contact information including steps to reach representatives, hours of operation, customer support links and more from ContactHelp.com.

Scoreboard Ratings

See detailed Pfaff customer service rankings, employee comments and much more from our sister site.