Pfaff hobbylock 2.0 Support Question
Pfaff hobbylock 2.0 Support Question
Find answers below for this question about Pfaff hobbylock 2.0.Need a Pfaff hobbylock 2.0 manual? We have 1 online manual for this item!
Question posted by cathieg1980 on September 6th, 2017
Hobbylock 787
Hobbylock 787, handwheel is stuck. Any suggestions??
Current Answers
Related Pfaff hobbylock 2.0 Manual Pages
Owner's Manual - Page 2
... capabilities, or lack of lint, dust, and loose cloth.
• Keep Àngers away from the electric outlet immediately after using this manual. This household sewing machine is designed to comply with IEC/EN 60335-2-28 and UL1594
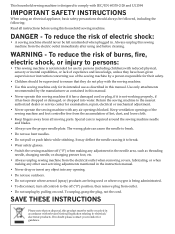
IMPORTANT SAFETY INSTRUCTIONS
When using an electrical appliance, basic safety precautions should always be...
Owner's Manual - Page 3

...cations 27
Disengage the movable upper cutter 8
Attaching the 2-thread overlock converter 8
Threading the machine 9
Threading the upper looper (red 10
Threading the lower looper (yellow 11
Threading the ...(green 12
Threading the left needle (blue 12
Changing threads 13
Start sewing 13
Thread tension settings 14
Differential feed adjustment 15
Presser foot pressure adjustment...
Owner's Manual - Page 4
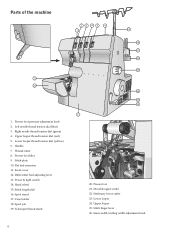
... cutter 22. Seam width/cutting width adjustment knob Stitch plate 10. Lower looper 24. Hand wheel 15. Stitch Ànger lever 26. Parts of the machine
7
8
9 10
1. Presser foot 21. Handle 7. Right needle thread tension dial (green) 4. Thread cutter 8. Spool stand 17. Stitch length dial 16...
Owner's Manual - Page 5
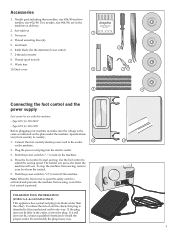
... the foot control and the power supply
Foot control to Àt in the machine on the machine.
2. SpeciÀcations vary from sewing, even if the foot control is intended to use with this plug is pressed... cord plug into the electric outlet. 3. The harder you press, the faster the machine will sew. Push the power switch to "O" to install the proper outlet. If it still does...
Owner's Manual - Page 6

...
on the back of the table. Removing and replacing the Áat bed extension
Free arm sewing
For a free arm machine, slide off the Áat bed extension to the left until it will not sew if the front cover is already threaded, straighten the threads to the right as far as armholes...
Owner's Manual - Page 7

... Raise the presser foot. 2. A
Changing the needles
Turn off the main power switch and unplug the machine. 1. Loosen, but do not remove the left and/or right needle clamp as far as it will... needle clamp screw. Changing the presser foot
A
Turn off the main power switch and unplug the machine. 1. Turn the hand wheel toward you until the needles are holding the needles. 3. Turn the...
Owner's Manual - Page 8

Push the movable cutter holder to its lowest position by turning the
handwheel toward you . 3. To place the movable upper cutter back in nonworking position 1.
Open the front... and toward you until the upper cutter is
raised to
the right as far as it will sew with the upper edge of the machine.
Note: Always have the cutter down in the hole of the
upper looper. 4. Insert the...
Owner's Manual - Page 9

... inside the front cover for quick reference. Right needle threading - (Green) 4. Thread the needle(s)
4
3
1
2
9 Lower looper threading - (Yellow) 3. Unthread the needle(s) 2. When threading the machine, thread only in the following ; 1. Upper looper threading - (Red) 2. Left needle threading - (Blue)
Important: If the lower looper should come unthreaded, do the following order...
Owner's Manual - Page 10

... upper looper from back to front through the looper and it between the tension discs (3).
2
3
4. Pass the thread from front to the back of the machine following the red color coded thread guides (4-7).
Owner's Manual - Page 11
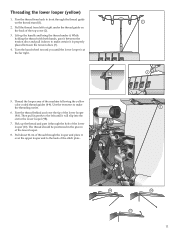
... from left until the lower looper is properly placed between the tension discs and pull it through the thread guide on the back of the machine following the yellow
color coded thread guides (4-8). Turn the hand wheel toward you until it will slip into the slot in the groove of the...
Owner's Manual - Page 13

...the back of the machine. Turn the hand wheel toward you reach the end of the fabric, continue sewing while drawing the ... and sew a test sample. When you .
Ensure that the upper blade moves against the lower blade correctly by turning the handwheel slowly ... both threads to change threads:
1. Sew until the knots are any fabric or waste thread stuck between the blades.
3. It prevents...
Owner's Manual - Page 15

... overlock (stretch, knit fabrics)
When overedging stretch fabric, such as silk and silky knitwear, adjust the differential feed to a number between 1.0 and 2.0.
Test sew with different settings before sewing on speciality fabrics. Stretch overlock (lightweight fabrics)
When overedging light woven or loosely knit fabrics, such as knits and jersey, adjust the differential...
Owner's Manual - Page 16

...arrow.
Width adjustment with the width adjustment knob. Adjust the stitch length to 4 mm when sewing on heavy weight fabrics.
Increase or decrease the pressure until the mark on your garment.
A) ..., using the graduations on light weight fabrics.
16 Adjust the stitch length to 2 mm when sewing on the stitch plates as a guideline. B) When only the right needle is in some conditions...
Owner's Manual - Page 17
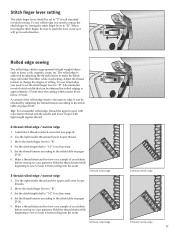
...narrow edge
3-thread narrow edge
17 Make a thread chain and test sew on a sample of your fabric before sewing on your fabric before sewing on pages 23-26.
Set the thread tension according to the stitch ... edge stitch is the narrow edge. It can be obtained for all standard overlock sewing. To sew rolled edge you need to retract the stitch Ànger by adjusting the thread tension...
Owner's Manual - Page 18

... one piece of the seam to the stitch table on the underside of the garment. 4. The tensions must be used both as a decorative construction stitch, sewing two pieces together (Standard Flatlock Stitch), or for the fabric to
Áatten. Place the movable upper cutter in the lower looper and needle.
The...
Owner's Manual - Page 19

...seam is attached in the front of the foot. 2. Warning: Sewing over pins will be used to the back of the machine
and sew the garment seam. 3. Corded overlock
Corded overlock can be easy to...damage and might destroy the edge of the seam and pull the chain
into a large eyed, hand sewing needle. 2. Insert the needle into the end of the cutters.
Cording prevents knit fabrics from the ...
Owner's Manual - Page 20

... brush from the accessory case. Open the front cover and remove all excess oil before sewing.
20 Wipe the machine surface to lubricate the internal working parts.
Use sewing machine oil. Machine maintenance
An overlock requires more frequent maintenance than a conventional machine for two reasons: - A lot of lint is produced when the cutters are cutting the...
Owner's Manual - Page 21

... stationary cutter (3).
3. Turn the handwheel so the needles are having any questions regarding service and/or operation, contact the store where the machine was purchased.
21 The stationary cutter....
6. Return the movable upper cutter (1) to the following directions.
Storage
When the machine is 1-2 mm lower than the cutting edge of the stationary cutter holder.
4. Replacing...
Owner's Manual - Page 22

... set screw.
7
- Insert new needle, current needle may be bent or have a blunt point. - Check the differential feed.
15
- Check alignment of fabric with conventional machine before sewing with overlock.
- Trouble shooting
Problem Fabric does not feed well Needle breaks Thread breaks
Stitches skip
Irregular stitches Fabric puckers
Irregular trimming Fabric jams...
Owner's Manual - Page 27
... thread
#60/2
#50/2 - #60/2
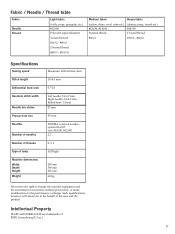
SpeciÀcations
Sewing speed Stitch length Differential feed ratio Overlock stitch width
Needle bar ...Needles
Number of needles Number of threads Type of lamp Machine dimensions Width Depth Height Weight
Maximum 1300 stitches/min
...mm 276 mm 6.0 kg
We reserve the right to change the machine equipment and the assortment of accessories without prior notice, or make...
Similar Questions

Edge Guide - Pfaff Select 1540 Sewing Machine
How does the Edge Guide work for the Pfaff Select 1540 sewing machine?
How does the Edge Guide work for the Pfaff Select 1540 sewing machine?
(Posted by jesjames 1 year ago)

Pfaff 259 Sewing Machine Won't Run With Foot Petal
I have a pfaff 259. When I push on the foot petal the motor runs but the machine itself doesn't run....
I have a pfaff 259. When I push on the foot petal the motor runs but the machine itself doesn't run....
(Posted by Aemazing 8 years ago)

Pfaff Hobbylock 2.0 Stitch Lever Problem
The stitch lever does not stay in S position, the tip of the lever keeps grinding on and then jumpin...
The stitch lever does not stay in S position, the tip of the lever keeps grinding on and then jumpin...
(Posted by Anonymous-152149 8 years ago)
Pfaff Hobbylock 2.0 Problem
Aloha! I have had my pfaff hobbylock 2.0 for 3 years now - never a problem - recently tho, when I am...
Aloha! I have had my pfaff hobbylock 2.0 for 3 years now - never a problem - recently tho, when I am...
(Posted by thezenkitchen 10 years ago)

Sewing Machine Is Blinking Away And Not Able To Operate
Sewing machine was sewing constantly even after I removed my foot from the pedal. I had to switch it...
Sewing machine was sewing constantly even after I removed my foot from the pedal. I had to switch it...
(Posted by kasperflindt 11 years ago)