
Pfaff Tipmatic 1035 Support Question
Pfaff Tipmatic 1035 Support Question
Find answers below for this question about Pfaff Tipmatic 1035.Need a Pfaff Tipmatic 1035 manual? We have 1 online manual for this item!
Question posted by isabel66 on March 25th, 2015
When I Lower The Foot It Wont Lower Enough To Hold The Material
The person who posted this question about this Pfaff product did not include a detailed explanation. Please use the "Request More Information" button to the right if more details would help you to answer this question.
Current Answers
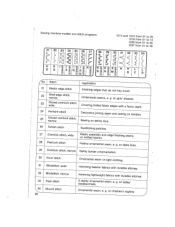
Related Pfaff Tipmatic 1035 Manual Pages
Owner's Manual - Page 2
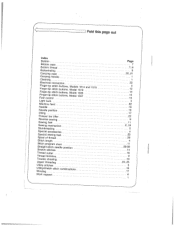
... Finger-tip stitch
Finger-tip stitch Finger-tip stitch Foot control
buttons, buttons, buttons, buttons,
Models 1014 Model 1019 Model 1035 Model 1037
and
1015
Light bulb
Machine feed
Needle
Needle position
Oiling
Presser bar lifter Reverse sewing
Sewing feet
Sewing mechanism
Slot-threading
Special accessories Special sewing feet Spool of thread
Stitch length
Stitch program chart...
Owner's Manual - Page 4
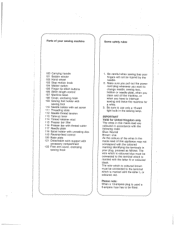
... your sewing machine
4 Some safety rules
100 Carrying handle 101 Bobbin winder 102 Hand wheel 103 Stop motion knob 104 Master switch 105 Finger tip stitch buttons 106 Stitch length control 107 Machine base 108 Cover, enclosing hook 109 Sewing foot holder with
sewing foot 110 Needle holder with set screw 111 Threading slots 112 Needle thread...
Owner's Manual - Page 5
lid (Q). For this has two holes at
sewing cabinet (not ill.) be placed on Model 1014 can
cabinet.
the the
carrying...(0), and lift it out toward Then open its
The accessory box sewing feet, thread
is used to arrow.
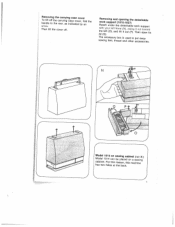
Removing and opening the work support it out (P). N
i
N
Model 1014 on a sewing reason, this machine the back.
)
1
Removing the carrying case cover
To lift ...
Owner's Manual - Page 7

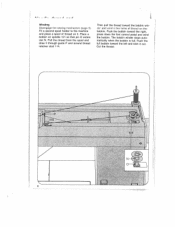
Electronic foot control aPthSolaolwlisfdrai.eteyidTosuRnhcreeeotnfautihlntleheepd=ti,oeeprlrhceeaiscgnlptfagrerotdehnpdleioecwstosoffeoprotohftosepfsceeotmwhendeaitnrcognhleinsespeederlteveodei.ss
Position 1 = full ...scWhoonhwternonlyiinosutphpleauctieltlduhseitnrmatthiaoecnhmi(nNae)c.haiwnaey,agthaien
foot as
Foot control dsPPterlapaercsrtseessstdseheowedwi,nfnotgoht.hteeTcfhoapnesettdremoarllo...
Owner's Manual - Page 8
...aindP:uasunhsdetphslemacasepllooolr of
unreeling O Large
disc 0 in spools of
front of thread facing to right. iFrTnioghtorhetnttwhthdeorr-aesnwlaeodet idttglobueaitdshceekewQliiennftgoto,nosfdltohrgateuwPindoeeanen0dedletaihnnrhtdeooaltddthheeer.
4 Placing spool of thread on the machine spool of thread
at the right. on pin
Load thread reel with diagonal of the thread: use
spool.
Owner's Manual - Page 9

... Thread the needle from you start winding the bobbin, disen gage the sewing mechanism.
Disengaging the sewing mechanism
Before you .
5 After bobbin winding, tighten the knob again ...by turning it away from front to the righE of the threads is then pulled into the left thread guide on the needle holder. Hold ...
Owner's Manual - Page 10
...
RI__II... LI_.._1 __.J
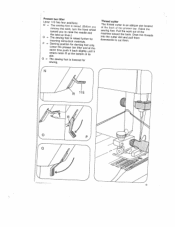
Winding
Disengage the sewing mechanism (page 5). Pull the thread from the spool and draw it . Fit a second spool holder to the machine and place a spool of thread on the ... matically when the bobbin is full. Push the bobbin toward the right,
press down the foot control pedal and wind
the bobbin. Place a bobbin on it through guide P and around thread retainer stud 114...
Owner's Manual - Page 12

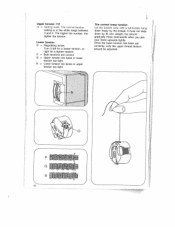
Inserting the bobbin case
Pull up the bobbin thread
Hold the needle thread a little taut. Replace cover 108 or close free arm cover 122. Turn hand wheel 102 toward the left and back under the sewing foot.
8
Release the latch. Pull the bobbin thread out of
the needle hole and lay both threads toward...
Owner's Manual - Page 13
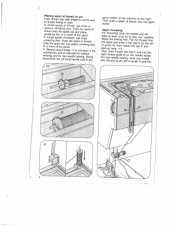
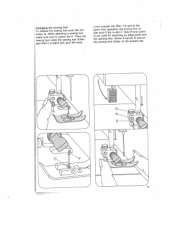
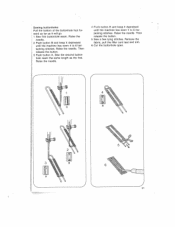
Presser bar lifter
Lever 115 has four positions:
N
o
The sewing remove the toward you
the take-up
foot is
lowered
for
Thread cutter dimsaTnoetthawwotechinhtnehtwighnearbeefracodactuodsokttwt.tecooarPufructdsttlulhelotterhtthteihpaseenrbaemdwansc.ospkreouk.rblllDobitquarhuatre.wemoRfstlhatohietseeltohtcrheaeatedds
9 foot
is raised. (Before you work, turn the hand wheel to raise the ...
Owner's Manual - Page 14
... tension should
gradually move downwards when you jerk your hand upwards lightly.
R = Lower tension too loose or upper tension too tight.
Upper tension 112 N = Setting... must not slide down freely by its own weight, but should be adjusted.
4
j
- 4
I
10 The correct lower tension
Let the bobbin case with a full bobbin hang down by the thread. Q-'
-'I . The normal tension
setting is...
Owner's Manual - Page 15
...
7 from 0 to 6 mm. , the control so that the number indicat the stitch lenght chosen is opposite
k N. . 0 shows how to set the stitch length trol for sewing stretch stitches (red stitch
ibols on push buttons). As tong as you keep this button depressed, the...
Owner's Manual - Page 21
stretch-stitch combinations 1he various stitch combinations are shown jn the chart and at the end of this booklet, ogether with sewing instructions. Right needle position (on Model 1037): push
buttons H and I
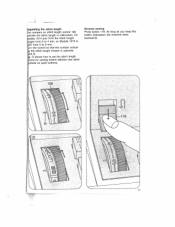
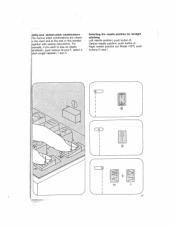
H Selecting the needle position for straight
stitching Left needle position: push button B. C?D
G
4
C)
I .
Central needle position: ...
Owner's Manual - Page 22
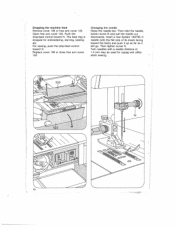
...needle distance of its shank facing toward 0. Dropping the machine feed Remove cover 108 or free arm cover 122. The feed dog is dropped for zigzag and utility stitch sewing.
18 For sewing, push the drop-feed control toward the back) and...the needle bar. Then tighten screw N. Push the drop-feed control toward N. Then hold the needle, loosen screw N and pull the needle out downwards.
Owner's Manual - Page 23
Changing the sewing foot To release the sewing foot push the red button N. Lower presser bar lifter 115 and at the
same time reposition the sewing foot so
that stud 0 Q are used
fits for
in place with your left hand. Place the sewing foot under the sewing foot holder and hold it in slot P. Screw S serves to secure
the sewing foot holder on the presser...
Owner's Manual - Page 24
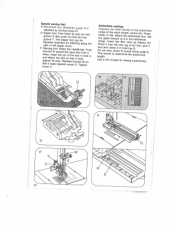
....pn.elaiprdtoCstvIefeoenercwvts(slhtNteeah,eerrm)tento.atspsrhAsttidrtihoeoitteitetntcwtcarheihcenrafhRamitlldferlrtien3emohnlrnguneeiotsgnthcivbttoleohtyuurhcsfedgoteittnnaohbQbaltneuorts.uohhtnttlfeogtoofol(onoebn0slhtulh)c,foo.toaowtplololePueestnl.rlheS(SosiP.tsel)e:t Use a thin thread for sewing buttonholes.
20 Blindstitch adjusted by turning screw
guide Q.
Special...
Owner's Manual - Page 25
... the buttonhole foot for
ward as far as the first.
Raise the needle.
4 Push button B and keep it will go. 1 Sew first buttonhole seam. Then release the button.
5 Sew a few tying stitches. Raise the needle. Then
release the button. 3 Push button A. Raise the
needle. 2 Push button B and keep it depressed until the machine has...
Owner's Manual - Page 27
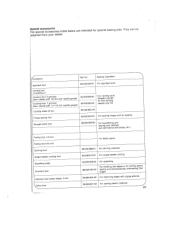
...-03595091 91
9303595245 93-03594391
For cording work
1 Cording set consisting of
f
Cording foot, 5 grooves (twin needle with 18-2.5
mm
needle
gauge>
J
Cording foot, 7 grooves (twin needle with zigzag stitches
98-694 801-00 For sewing plastic materials
-J
23
Sewing Operation
93-035920-91 For appliqué work (Needle size 80, for fine cording needle...
Owner's Manual - Page 29
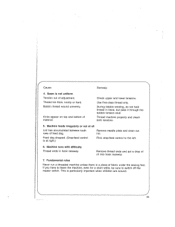
... Thread ends in hand, but pass it through the bobbin tension stud. Remove thread ends and put a drop of material,
Check upper and lower tensions. 4
Cause:
Remedy:
4.
This is a piece of fabric under the sewing foot.
Thread machine properly and check both tensions.
5. Remove needle plate and clean out lint. Fundamental rules
Never run a threaded...
Owner's Manual - Page 30
... 9 LIL_9;
E
--
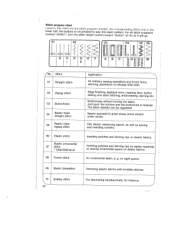
---. Stitch program chart
Listed in the stitch programs as far
stitch and, in this chart are
lower half, the buttons marked "stretch", turn
the stitch program number, the to be pressed to sew this seam the stitch length control toward
corresponding pattern.
D E
-..-
-.---
-.---.-
-
.._-.•-..
II
m
'
III
II
- -- F
03
04
1F=I
..'.-
..-
-
-
-..
E CI...
Owner's Manual - Page 32
Sewing machine models and stitch programs:
1014 and 1015 from 01 to 05 1019 from 01 to 15 1035 from 01 to 30 1037 from 01 to 48
21 22 23 24 25 26 27
Similar Questions


Pfaff 1035 Sewing Machine Service Manual
- I need a service manual please. Not instructions but actual service manual. Although these are lis...
- I need a service manual please. Not instructions but actual service manual. Although these are lis...
(Posted by rnoel28 6 years ago)

Pfaff 259 Sewing Machine Won't Run With Foot Petal
I have a pfaff 259. When I push on the foot petal the motor runs but the machine itself doesn't run....
I have a pfaff 259. When I push on the foot petal the motor runs but the machine itself doesn't run....
(Posted by Aemazing 8 years ago)

Problem Upper Presser Foot On Pfaff Hobbymatic 935 Sewing Machine
The upper presser foot on my Pfaff Hobbymatic 935 will not lower completely. I lowered the arm but t...
The upper presser foot on my Pfaff Hobbymatic 935 will not lower completely. I lowered the arm but t...
(Posted by Anonymous-118282 10 years ago)