
Optoma EP719 Support Question
Optoma EP719 Support Question
Find answers below for this question about Optoma EP719.Need a Optoma EP719 manual? We have 1 online manual for this item!
Question posted by lacarmota26 on September 12th, 2012
Como Desbloquear El Proyector, Me Pide Contraseña Y No Tengo Control Remoto???
The person who posted this question about this Optoma product did not include a detailed explanation. Please use the "Request More Information" button to the right if more details would help you to answer this question.
Current Answers
Related Optoma EP719 Manual Pages
User Manual - Page 2

... lamp itself.
Warning-
Turn on . To replace the lamp, follow all warnings, precautions and maintenance as this happens, the projector will detect the life of your eyes. Do not look into the projector's lens when the lamp is in this product to change the lamp when it will burn out and may...
User Manual - Page 4

... Auto detection, Auto image and
Auto saving the adjustments Full function remote control User friendly multilingual on screen display menu Advanced digital keystone correction and ...high
quality full screen image re-scaling User friendly control panel Built-in one speaker with 2 Watt amplifier ...
User Manual - Page 5

...; Quick Start Card Warranty Card
Carrying Case
5 ... Composite Video Cable 1.8m
Wireless Remote Controller
SCART RGB/S-Video Adaptor
(available in applications for each country, some regions may have different accessories.
English Introduction
Package Overview
This projector comes with lens cap
Power Cord 1.8m
VGA Cable 1.8m
Due to make sure...
User Manual - Page 6
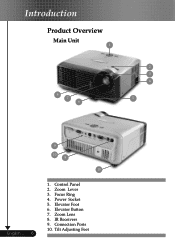
Zoom Lever 3. Power Socket 5. Elevator Button 7. Zoom Lens 8. IR Receivers 9. Elevator Foot 6. Tilt Adjusting Feet Focus Ring 4. Connection Ports 10. Control Panel 2. Introduction
Product Overview
Main Unit 1
8 7 6
2 3 4
5
English ... 6
9
10 8
10
1.
User Manual - Page 7
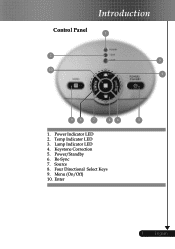
English Lamp Indicator LED 4. Power/Standby 6. Re-Sync 7. Four Directional Select Keys 9. Enter
7 ... Menu (On/Off) 10. Power Indicator LED 2. Source 8. Keystone Correction 5. Temp Indicator LED 3. Introduction
Control Panel 1
2 3
10 4
98
7
46
5
1.
User Manual - Page 10

... Cable 5 S-Video Cable (Optional Accessory) 6 D-15 to RCA Adapter for YPbPr (Optional Accessory)
English ... 10
To ensure the projector works well with the projector. Refer to 1024 X 768 resolution.
Installation
Connecting the Projector
EUR
RGB
RS232
1
DVD Player, Set- Make sure the timing of the display mode is compatible with your computer...
User Manual - Page 16

... Directional Select Keys
Use
selection.
To exit OSD, press "Menu" again. Menu
Press "Menu" to control the functions: Remote Control and Control Panel.
Keystone /
Adjusts image distortion caused by tilting the projector (±15
degrees). User Controls
Control Panel & Remote Control
There are two ways for you to launch the on pages
12-13...
User Manual - Page 17

...61492; Press "VGA1" to restore display of an image. Re-Sync
Automatically synchronizes the projector to pause the screen image. Freeze
Press "Freeze" to the input source. D-Zoom
..." to zoom in of the
image. User Controls
EUR EUR
Using the Remote Control
Power Refer to the "Power On/Off the Projector" section on screen display menu. Keystone /
...
User Manual - Page 19

... the source. English
While making a selection on the Remote Control or Control Panel.
2. To exit, press "Menu "again. The projector will return to select any item in the sub menu and... to the main menu.
6.
How to enter sub menu.
3. User Controls
On Screen Display Menus
The Projector has multilingual On Screen Display menus that allow you to select the desired item...
User Manual - Page 21
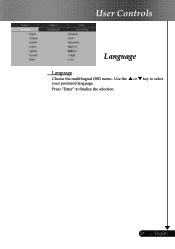
Press "Enter" to select
21 ... English or key to finalize the selection. Use the your preferred language. User Controls
Language
Language
Choose the multilingual OSD menu .
User Manual - Page 22

Keystone (Keystone Correction)
Adjust image distortion caused by tilting projector. (±15 degrees)
Color
Press "Enter" to increase the contrast. If you prefer a stronger image, adjust towards
User Controls
English ... 22
Image-I
Display Mode
There are many factory presets optimized for maximum peaking. Adjusting the contrast changes the amount of black and white...
User Manual - Page 23

For a smooth and more natural image, adjust towards the minimum setting.
Adjust the color temperature. At higher temperature, the screen looks colder;
User Controls
the maximum setting. English Color Temp. at lower temperature, the screen looks warmer.
23 ...
User Manual - Page 24

...)
Press the to move the image down. Press the to move the image up. Aspect Ratio
Use this function to correct it. V. User Controls
English ... 24
Image-II
(Computer Mode)
Frequency
"Frequency"changes the display data frequency to bring out the best image quality for the input. If you...
User Manual - Page 25
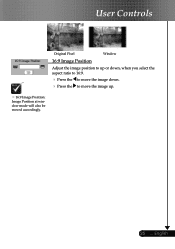
User Controls
Original Pixel
Window
16:9 Image Position
Adjust the image position to up or down, when you select the aspect ratio to 16:9.
Press the to move the image down. Press the to move the image up.
16:9 Image Position: Image Position at window mode will also be moved accordingly.
25 ... English
User Manual - Page 26

....
Adjusts the color balance of red and green.
Press the Press the Sharpness
to decrease the amount of color in the image.
User Controls
Image-II
(Video Mode)
"Saturation", "Tint" and "Sharpness" function is bigger than a 16:9 screen,
select the "Window" mode to fit the image onto the...
User Manual - Page 27

User Controls
Original Pixel
Window
16:9 Image Position
Adjust the image position to up or down, when you select the aspect ratio to 16:9.
Press the to move the image down. Press the to move the image up.
16:9 Image Position: Image Position at window mode will also be moved accordingly.
27 ... English
User Manual - Page 28
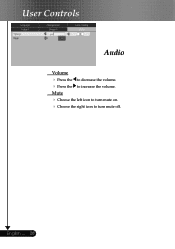
English ... 28 to increase the volume.
Choose the left icon to turn mute on. Choose the right icon to decrease the volume. User Controls
Audio
Volume
Press the
Press the Mute
to turn mute off.
User Manual - Page 29

...
Front-Ceiling
When you select this function, the projector reverses and turns the image upside down for other signals if the current input signal is turned ...this function, the projector reverses the image
so you select this function, the projector turns the image
upside down at full speed continuously to turn on the display screen.
User Controls
Management
Menu Location
...
User Manual - Page 30

... "Enter" key to use security verification while user switch
on projector.
Off: When user switch on projector without password.
Timer: Displays the usable hours when switch on the...password. (First time)
1. Use
keys to select your selection.
4. User Controls
Security Settings
A.
Press "Enter" to confirm your input bits, and then press
"Enter"...
User Manual - Page 31

...
to confirm finally.
8. English Move to
and then press "Enter" key to reduce the size of 4~8 bits, Default value is "0000".
5. User Controls
1. On this Screen, press "Menu" key to magnify an image on the screen by "*" while inputting.
6. Confirms the password, please input the new...
Similar Questions
