
NordicTrack A2550 Pro Treadmill Support Question
NordicTrack A2550 Pro Treadmill Support Question
Find answers below for this question about NordicTrack A2550 Pro Treadmill.Need a NordicTrack A2550 Pro Treadmill manual? We have 1 online manual for this item!
Question posted by Anonymous-141907 on August 19th, 2014
How To Move A Nordic Track A 2550 Pro
The person who posted this question about this NordicTrack product did not include a detailed explanation. Please use the "Request More Information" button to the right if more details would help you to answer this question.
Current Answers
Related NordicTrack A2550 Pro Treadmill Manual Pages
User Manual - Page 2

TABLE OF CONTENTS
WARNING DECAL PLACEMENT 2 IMPORTANT PRECAUTIONS 3 BEFORE YOU BEGIN 5 ASSEMBLY 6 OPERATION AND ADJUSTMENT 14 HOW TO FOLD AND MOVE THE TREADMILL 20 TROUBLESHOOTING 22 EXERCISE GUIDELINES 25 PART LIST 26 EXPLODED DRAWING 28 ORDERING REPLACEMENT PARTS Back Cover LIMITED WARRANTY Back Cover
WARNING DECAL PLACEMENT
This drawing shows the locations ...
User Manual - Page 3
... aerosol products are standing on page 14. Never move the walking belt while the power is being administered.
7. Wear appropriate exercise clothes when using the treadmill.
18. Never start the treadmill while you are used only by or through the use an extension cord.
12. Various factors, including the user's movement, may result...
User Manual - Page 4
... remove the key, unplug the power cord, and switch the reset/off position when the treadmill is intended for the location of the treadmill regularly. Inspect and properly tighten all parts of the circuit breaker.)
21. 20.
Over exercising may result in the storage position.
23. less instructed to the off circuit breaker...
User Manual - Page 5
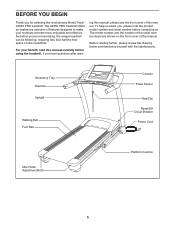
... number and serial number before using the treadmill. To help us assist you ʼre not exercising, the unique treadmill can be folded up, requiring less than half the floor space of this manual carefully before contacting us. If you for selecting the revolutionary NordicTrack® A2550 PRO treadmill.
BEFORE YOU BEGIN
Thank you have questions...
User Manual - Page 6
...3/8" x 2" Bolt (3)-1
3/8" x 5 1/2" Patch Bolt (7)-4
Bolt Spacer (88)-4
Wheel Axle (97)-2
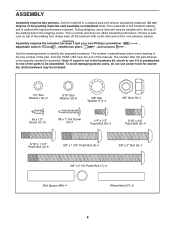
6 ASSEMBLY
Assembly requires two persons. The number after the parentheses is normal and does not affect treadmill performance. Assembly requires the included hex keys and your own Phillips screwdriver
,
adjustable wrench
, needlenose pliers
, and scissors
. Do not dispose of this manual. If...
User Manual - Page 7

... four Base Feet (92) to pull the Upright Wire out of a second person, carefully tip the treadmill onto its left side. Hold a Wheel (95) centered in the Wheel Housing (96). Make sure that the treadmill is bundled at the front of the Base (94).
Insert the Upright Wire back into the end...
User Manual - Page 9

...Patch Bolts yet.
7 83
11 85 91
88
6. Partially fold the Frame (55) so that the treadmill is more stable; Tighten the 3/8" x 5 1/2" Patch Bolt (7) until the heads of the Right Upright... (83). 5. Hold a Bolt Spacer (88) inside the lower end of a second person, carefully tip the treadmill onto its right side. Insert a 3/8" x 5 1/2"
5
Patch Bolt (7) with the two curved corners positioned ...
User Manual - Page 10

... the Base Cover (84) to overtighten the Screws. Identify the Right and Left Upright Covers (86, 87). 7. With the help of a second person, tip the treadmill so that the Base (94) is flat on the floor.
7
1 84
1 94
1
8. Be careful not to the Base (94) with four #8 x 1/2" Screws (1).
Slide the Left...
User Manual - Page 12
... a 5/16" x 1 1/2" Patch Bolt (4) into the Right
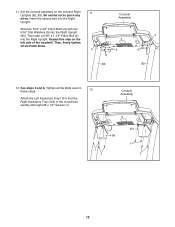
Upright. Start two 5/16" x 3/4" Patch Bolts (5) with eight #8 x 1/2" Screws (1). Set the console assembly on the left side of the treadmill.
Then, firmly tighten all the Bolts used in these steps.
12
Attach the Left Accessory Tray (101) and the Right Accessory Tray (104) to pinch...
User Manual - Page 13

...51
Large Barrel
10 94
3
14.
Lower the Frame (55) (see HOW TO LOWER THE TREADMILL FOR USE on the treadmill decals, remove the plastic. Make sure that the large barrel and the Latch Knob (52) ...so that all parts are positioned as shown. 13. To protect the floor or carpet, place a mat under the treadmill. See step 4 on the power (see pages 23 and 24).
13
Raise the Frame (55) to the "...
User Manual - Page 14
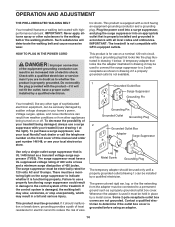
...fit the outlet, have a UL suppressed voltage rating of 400 volts or less and a minimum surge dissipation of the treadmill.
IMPORTANT: The treadmill is not available.
1 Grounded Outlet Box
Surge Suppressor
Grounding Pin
Your treadmill...held in drawing 1 below. Whenever the adapter is equipped with your treadmill being turned on the front cover of electric shock.
This product is...
User Manual - Page 15
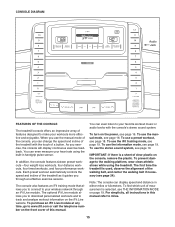
...you to connect to your wireless network through an effective exercise session.
To turn on page 19. The first time the treadmill is selected, see page 19. Each preset workout automatically... damage to track and analyze workout information on the console, remove the plastic. IMPORTANT: If there is a sheet of measurement is used, observe the alignment of the treadmill with the ...
User Manual - Page 16
... room temperature before turning on the power. For example, to select a speed setting of the treadmill. Select the manual mode. Locate the clip attached to turn off the demo mode. After a..., the displays will change the speed of the numbered 1 Step Speed buttons.
16
If you exercise, change in increments of your clothes. if you press the Start button or the Speed increase...
User Manual - Page 17

... your hands. As you may wear prematurely.
17 Before using the treadmill, switch the reset/off circuit breaker to hold the contacts-avoid moving your pulse is shown. When you are finished exercising, remove the key from the console.
• The speed of the walking belt. • The distance that you press...
User Manual - Page 18
... step 5 on page 17. 5. is an estimate of the number of the workout begins, the treadmill will automatically adjust to the main menu.
Hold the handrails and begin to a stop the workout at...the display.
3. Press the Enter button. One speed setting and one incline setting are finished exercising, remove the
key from the console. Note: The calorie goal for each weight loss workout...
User Manual - Page 19

...release the Stop button. For more information on the console.
You can download personalized workouts and track and analyze workout information on , the word "ON" will appear in the display:
The ... personal CD player and the CD skips, set the CD player on the side of hours the treadmill has been used . The display will function normally when you must connect your MP3 player, CD ...
User Manual - Page 20

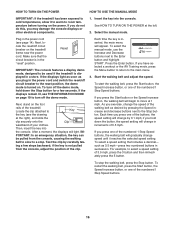
... If you do not do not lift the frame by the arrow at the right.
Place one of injury, do this, you may damage the treadmill when you raise the frame. CAUTION: To decrease the possibility of the wheels.
2.
To reduce the risk of direct sunlight. Raise the frame about halfway...
User Manual - Page 21

... frame forward as you pull the knob to the floor. Pivot the frame downward and release the latch knob. Frame
21 HOW TO LOWER THE TREADMILL FOR USE
1. Hold the upper end of the...
User Manual - Page 25

... is the heart rate for fat burning, the middle number is the heart rate for a sustained period of heart rate readings. For maximum fat burning, exercise with 5 to find your age at a low intensity level for maximum fat burning, and the highest number is near the middle number in your training...
User Manual - Page 32

...that specifically set forth herein. or other warranties, and any implied warranties of merchantability or fitness for indirect, special, or consequential damages arising out of or in lieu of any ...particular purpose are warranted for commercial or rental purposes or as store display models; ICON Health & Fitness, Inc., 1500 S. 1000 W., Logan, UT 84321-9813
Part No. 289518 R0210A
Printed in...
Similar Questions

Nordic Track E 2500 Treadmill Weight
How much does the Nordic Track E 2500 treadmill weigh
How much does the Nordic Track E 2500 treadmill weigh
(Posted by karont730 8 years ago)

Picture Exercise Instructions For Using The Nordic Track E8200
HiI need the original exercise instructions for using the Nordic track E8200 the exercises are on PI...
HiI need the original exercise instructions for using the Nordic track E8200 the exercises are on PI...
(Posted by hitechaluminium 8 years ago)

How Do I Get My Nordic Track Off Demo Mode E 7.7 Treadmill
(Posted by ryderhas 9 years ago)

Loud Motor On My Nordic Track T6.3 Treadmill
3 months after I bought the Nordic Track T6.3 treadmill, the motor started getting louder everytime ...
3 months after I bought the Nordic Track T6.3 treadmill, the motor started getting louder everytime ...
(Posted by chris487 9 years ago)

Does Nordic Track Elite 7700 Has Google Maps Workout.
(Posted by allstarkry 10 years ago)