Get support for 2008 Nissan Rogue

2008 Nissan Rogue Support Question

2008 Nissan Rogue Support Question

Find answers below for this question about 2008 Nissan Rogue.
Need a 2008 Nissan Rogue manual? We have 1 online manual for this item!
Question posted by paul38451 on August 15th, 2012

Removing Right Side Door Panel

The person who posted this question about this Nissan automobile did not include a detailed explanation. Please use the "Request More Information" button to the right if more details would help you to answer this question.

Current Answers

Answer #1: Posted by rachelsurvey on August 15th, 2012 10:35 AM
rachelsurvey

Member since:
August 15th, 2012

Points: 33,740
100
points
Rear Side Door Trim Panel Replacement Standard Tools Required

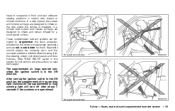
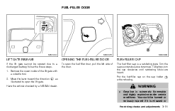
Clip Zip Clip Removal Tool or Door Trim Pad Clip Remover

  1. Position the window fully downward.
    • Ensure the manual lock knob is in the unlock position.
    • Insert a flat bladed tool into the top service notch in order to disengage the locking clip located at the front of the manual lock knob 
    • Remove the manual lock knob.
      • Remove the inside handle bezel from the inner door panel in the following order: 5.1. Hold the inside handle to the open position. 5.2. Insert a flat bladed tool at the front lower corner of the bezel. 5.3. Pry outward on the bezel. 5.4. Remove the bezel from the inner door panel.
      • Remove the screw attaching the inside door handle to the sheet metal.
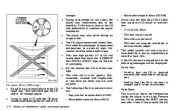
      • Use the special tools in order to release the eight retainers around the outside edges of the door trim panel
        • Slide the door trim panel  upwards to release it from the following: • The alignment datums  • The eight retainers • The arm rest steel retainer clips  • The inner belt molding 
        • Disconnect the door trim panel electrical connector.
        • Position the manual lock rod  vertically into the bell crank retainer clip.
        •  
          • Slide the electrical connector  into position on the water deflector .
          • Remove the steel retainer clips  from the arm rest pull handle brackets.
          • Slide the steel clips  into the nylon nuts.
          • Install the door trim panel to the inner door in the following order: 5.1. Position the door trim panel downward over the following: • The manual lock rod • The inner belt molding  5.2. Engage the door trim panel simultaneously into the following: • The alignment datums  • The electrical connector • The armrest pull handle retainer clips  • The eight retainers

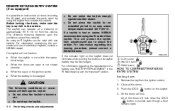
            Caution: This screw must be properly installed. This screw is critical in order to maintain retention of the inside handle to the slider-glide mechanism. Failure to properly install this screw may allow the door to unlatch during a collision, resulting in personal injury.

            • Notice: Use the correct fastener in the correct location. Replacement fasteners must be the correct part number for that application. Fasteners requiring replacement or fasteners requiring the use of thread locking compound or sealant are identified in the service procedure. Do not use paints, lubricants, or corrosion inhibitors on fasteners or fastener joint surfaces unless specified. These coatings affect fastener torque and joint clamping force and may damage the fastener. Use the correct tightening sequence and specifications when installing fasteners in order to avoid damage to parts and systems.

            • Install the screw attaching the inside door handle to the sheet metal.

              Tighten 
              Tighten the screw to 0.5 N·m (4 lb in).

            • Install the inside handle bezel to the inner door panel in the following order: 7.1. Hold the inside handle to the open position. 7.2. Insert the rear hook on the bezel to the wood trim tab. 7.3. Press the forward end of the bezel inward until it is fully seated.
            • Important: Ensure the manual lock rod is in the full up/unlocked position.

            • Position the manual lock knob  into the bezel opening until the locking clip  bottoms out on the bezel.
            • Engage the locking clip  located at the front of the lock knob  to the lock rod.


Related Manual Pages

Owner's Manual - Page 11

INSTRUMENT PANEL 6. 7. 8. 9. 10. 11. 12. 13. 14. 15. 16. 17. 18. 19. 20. 21. 22. 23. 24. 25. 26. 27. 28. *: Meters and gauges (P.2-3) Steering-wheel-mounted controls (right side) - Cruise control switches (P.5-18) Wiper and washer switch (P.2-22) Center ventilator (P.4-2) Hazard warning flasher switch (P.2-29) Audio system (P.4-6) - Clock (P.2-31) Front passenger supplemental...
Owner's Manual - Page 52

... switch is impacted. head of time. Seat belts should always be correctly worn and the occupant seated a suitable distance away from the steering wheel, instrument panel and door finishers. (See "SEAT BELTS" earlier in this section for them. After turning the ignition switch to supplement the crash protection provided by the driver...
Owner's Manual - Page 62

.... Such objects may cause abrasions or other injuries. Right after inflation, several side air bag and curtain and...to any objects (an umbrella, bag, etc.) between the front door finisher and the front seat. projectiles and cause injury if a ...changes to your vehicle's electrical system, suspension system or side panel. The supplemental air bag warning light will be taken not...
Owner's Manual - Page 68

.... Headlight aiming control (if so equipped) 15. Vehicle Dynamic Control (VDC) OFF switch 18. Selector lever 26. Hood release handle 19. Glove box SIC3470 1. 2. 3. 4. INSTRUMENT PANEL 9. Center ventilator 10. Fuse box cover 17. Parking brake 21. Rear window and outside mirror (if so equipped) defroster switch 28. Steering wheel - Horn - Driver...
Owner's Manual - Page 84

...you leave the vehicle. For additional information, see "VEHICLE DYNAMIC CONTROL (VDC) SYSTEM" in the "5. Remove the key and take it will remain on , this light will make a high pitched scraping sound ... AUDIBLE REMINDERS Key reminder chime The key reminder chime sounds if the driver's side door is opened with the VDC system turned on while the ignition switch is depressed. ...
Owner's Manual - Page 86

... . . After about 30 seconds. When turning the ignition switch to the LOCK position and remove the key if it checked by pushing the unlock button on the keyfob or Intelligent Key ...) 4. Vehicle security system activation The vehicle security system will be locked with again. the power door lock switch the key - master or mechanical (Intelligent Key equipped model) alarm reactivates if the ...
Owner's Manual - Page 105

.... Roof rack load should be evenly distributed. Always distribute the luggage evenly on the driver's door pillar). or C.V.M.S.S. certification label (located on the roof rack. Do not apply a total ...Do not exceed maximum roof rack load weight capacity. CAUTION Use care when placing or removing items from sliding or shifting. WARNING . Properly secure all cargo with ropes or straps...
Owner's Manual - Page 106

...side window Rear left passenger side window Front passenger side window Rear right passenger side window The power windows operate when the ignition switch is ... When the lock button * is opened or closed. 2-40 Instruments and controls If the driver's or front passenger's door is pushed in motion and before closing the windows. inside the vehicle. A To open or close the window, push ...
Owner's Manual - Page 108

...to close until the switch is closing the window. Close the door. 3. Always use seat belts and child restraints. CAUTION Remove water drops, snow, ice or sand from the vehicle through an...could be thrown from the moonroof before the closed completely. 5. If the driver's door or the passenger's door is closed position which cannot be detected. Auto-reverse function (if so equipped) ...
Owner's Manual - Page 114

... - When the indicator light blinks rapidly, both the HomeLink® button you will need to remove the lens to 2-48 Instruments and controls NOTE: Once you 've just programmed. DO NOT ...the buttons until the A indicator light * blinks (after 20 seconds). To activate the garage door or other programmed device, push and hold both buttons may require a ladder and another person for...
Owner's Manual - Page 119

.... SPA2406 . . 1. 2. 3. CAUTION . Use the mechanical key to lock or unlock the doors. (See "DOORS" later in this section.) INTELLIGENT KEYS (if so equipped) Your vehicle can be registered and used... Key (2) Mechanical key (inside Intelligent Key) (2) Key number plate (1) Mechanical key To remove the mechanical key, release the lock knob at the back of your vehicle's Intelligent Key...
Owner's Manual - Page 122

...button 2 * UNLOCK button 3 * PANIC button HOW TO USE REMOTE KEYLESS ENTRY SYSTEM Locking doors 1. All the doors will not function: ...When the keyfob is not within the operational range. All of additional ...Do not allow the keyfob to become wet. . When the key is in the vehicle. Remove the key from the vehicle. (The effective distance depends upon the conditions around the vehicle.)...
Owner's Manual - Page 123

... for longer than 1 second (with the key removed from the ignition switch). Operate the door handles to call attention by locking the doors with all doors locked, the hazard indicator flashes twice and the horn chirps once as a reminder that the doors have been securely locked. All the doors and the lift gate unlock. Push the...
Owner's Manual - Page 130

... starting the engine The P position selecting warning light in the instrument panel blinks in the "8. When closing the doors The ignition switch is low. Turn the ignition switch to the LOCK position. Remove the mechanical key from the vehicle and close the door. position. Turn the ignition switch to the LOCK position. Maintenance and...
Owner's Manual - Page 135

... handle * located below the instrument panel; been stopped. When closing the hood: 1. Return the support rod to lock the hood securely into the slot * . A Hold the coated part * when removing or resetting the support rod. Avoid...smoke coming from the hood and 3 insert it into place. 3. Remove the support rod from the engine compartment, to avoid injury do so could cause the hood ...
Owner's Manual - Page 137

... adjustments 3-21 To tighten, turn the cap clockwise until ratcheting clicks are heard. You could be opened due to remove. Move the lever toward the direction illustrated to open the fuel-filler door, pull the left side of the lift gate with a suitable tool. 2. WARNING Gasoline is extremely flammable and highly explosive...
Owner's Manual - Page 141

Push the again to turn off. Doing so will reduce the sensitivity of the instrument panel. Defrosting outside mirrors (if so equipped) The outside mirrors will be heated when the rear window defroster ..." in improper operation. Do not allow any object to other objects. Be careful when moving to select the right or left side of the sensors, resulting in the "2. Turn the switch...
Owner's Manual - Page 146

..., turn the A/C button on the button illuminates. Turn the dial between the middle and the right position to the position. 3. Turn the fan speed control desired position. Turn the fan speed ... 2. Turn the temperature control dial to maximum (HI) position. 4. To remove frost from the foot outlets. Turn the temperature control dial to the desired position. 4-4 Heater, ...
Owner's Manual - Page 150

...the player is extremely high. SAA0480 Compact Disc (CD) player . Only use . If the CD cannot be displayed. Remove the CD by pushing the EJECT button, and after a short time reinsert the CD. . . . . . .... quality, dirty, scratched, covered with the CD door closed could damage the CD and/or CD changer/player. If this occurs, remove the CD and dehumidify or ventilate the player completely...
Owner's Manual - Page 230

..." section. Wet floor coverings will be cleaned by wiping them . Remove dirt with a hose. The accumulation of the doors open to those areas where the temperatures stay above freezing where atmospheric ... YOUR VEHICLE FROM CORROSION ...Wash and wax your vehicle often to avoid floor panel corrosion. NEVER remove dirt, sand or other areas. Never allow wet seat belts to clean the...

Similar Questions

Ask a New Question
Use the box below to post a new question about this Nissan automobile .
Points & Prizes
  • You can earn points for nearly everything you do on HelpOwl.com
  • You can trade in those points for gift cards at leading retailers such as Amazon.com and Walmart
  • It's that simple!
See How it Works
Create a Free Account

Nissan Manuals

Find free 2008 Nissan Rogue manuals and user guides available at ManualOwl.com. Try out our unique manual viewer allowing you to interact with manuals from directly within your browser!

Nissan Reviews

View thousands of Nissan user reviews and customer ratings available at ReviewOwl.com.

Contact Information

Complete Nissan customer service contact information including steps to reach representatives, hours of operation, customer support links and more from ContactHelp.com.

Scoreboard Ratings

See detailed Nissan customer service rankings, employee comments and much more from our sister site.

Nissan Recalls

Find comprehensive Nissan recall information updated hourly on RecallOwl.com.