2000 Nissan Quest Support Question
2000 Nissan Quest Support Question
Find answers below for this question about 2000 Nissan Quest.Need a 2000 Nissan Quest manual? We have 1 online manual for this item!
Question posted by dram4apple on May 2nd, 2014
How Do I Take Out The Middle N Back Seats From The Tracks On The Floor
The person who posted this question about this Nissan automobile did not include a detailed explanation. Please use the "Request More Information" button to the right if more details would help you to answer this question.
Current Answers
Related Manual Pages
Owner's Manual - Page 7

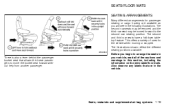
... ...1-7 Head restraint adjustment ...1-10 Armrests ...1-11 Underseat storage tray...1-11 Flexible seating ...1-12 Tabletop seats...1-18 Seats/floor mats ...1-19 Seating arrangements ...1-19 Seat positions...1-20 With second row bench seat...1-20 With second row bucket seats ...1-24 Floor mat positions...1-27 Supplemental restraint system...1-31 Precautions on supplemental restraint system ...1-31...
Owner's Manual - Page 15

..., release the slide lever. This prevents a passenger from using a seat or seat belt that is obtained.
Slide the seat until locked. Lift the slide release lever and grasp the bar under the seat in a storage position. Continue to the center buckle and remove the appropriate floor mats.
1-8 Seats, restraints and supplemental air bag systems Lift the...
Owner's Manual - Page 16

... a qualified person remove it from the vehicle by attempting to be injured in this section. The three-passenger sliding bench seat is not intended to replace and reposition floor mats as discussed in ''Floor mat positioning'' in sudden braking or a collision. In a sudden stop or collision, unsecured cargo could be seriously injured or...
Owner's Manual - Page 17
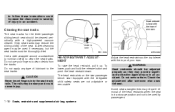
... dried. Use a cloth wrapped around a screwdriver (or similar object) to the seat tracks. The head restraints on the two-passenger bench seat equipped with a high-powered vacuum cleaner. Do not use your ears.
Cleaning the seat tracks
The seat tracks for the three-passenger sliding bench seat should be adjusted properly as they may be cleaned periodically with...
Owner's Manual - Page 20
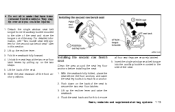
... anchor positions. With the seatback fully folded, place the seat behind the floor anchors and catch the seat leg hooks into the auxiliary buckle mounted to secure the two rear floor latches. 3. Insert the single window seat belt tongue into each floor anchor. 2. Detach the single window seat belt tongue from the vehicle. They may tip over...
Owner's Manual - Page 23
Unlock the seat legs at the two rear floor latch levers by pulling up on the two straps. 4. Lift the back of the seat and slide it rearward off the front anchor positions.
1-16 Seats, restraints and supplemental air bag systems ARS1143
3.
Owner's Manual - Page 24

... supplemental air bag systems 1-17
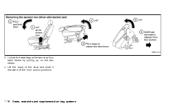
ARS1142
ARS1144
Installing the second row bucket seats
Clean the area around the seat leg floor anchors before installing the seat. 1. If you may have them in the wrong location. Second row passenger side bucket seat
The bucket seat near the passenger side sliding door can be sure it is securely...
Owner's Manual - Page 26
... tabletop feature. Before you will see in this section, including the information on the removable floor mats.
LRS0050
There is also a lever behind the passenger bucket seat that are available as you begin to arrange the seats in your vehicle, read all of the cautions and warnings in the following illustrations. Also observe...
Owner's Manual - Page 34

... might result in personal injury. Failure to replace the floor mats might become stuck in the seat tracks. Seats, restraints and supplemental air bag systems 1-27 The cargo mat is important to replace the floor mats whenever they are specifically designed to keep the seat tracks clear of the seat tracks. Be sure to keep objects out of debris...
Owner's Manual - Page 37

... or shifting. The cargo mat and front mats do not have holes in the step mats and into the seat tracks to pins. However, the driver's front floor mat has a grommet which is using a seat belt properly. ● Failure to three of a vehicle. When the mats are arranged properly, the positioning pins of the...
Owner's Manual - Page 48

... outgrow rear facing child restraints. Place the shoulder belt over their small hip bones. Seats, restraints and supplemental air bag systems 1-41
You should choose a child restraint that it.... Contact your shoulder and across the top, middle portion of child restraints available for larger children which are provided. The vehicle's seat belts may not fit over your doctor for ...
Owner's Manual - Page 54

... buckle on the side of the vehicle. The seat belt tongue with a child seat or during seat belt usage. positioned properly and fastened to the buckle mounted ...seat belt tongues has two ''windows'' (or holes) and the other has only one window attaches to the auxiliary buckle mounted to the side of the seat. When the two buckle seat belt system is not in the middle of the seat. The seat...
Owner's Manual - Page 81

...seat equipped with the integrated child safety seats, are not adjustable or removable.
1-74 Seats, restraints and supplemental air bag systems Pull the cushion release strap and lower the intregrated child safety seat...safety seat. 2. Securing the child
Before using the integrated child safety seats, carefully read the shoulder harness, seatback release, and integrated child safety seat ...
Owner's Manual - Page 112

...● Do not allow people or pets on or under the parcel shelf net to the vehicle floor. In a sudden stop or collision, unsecured packages could cause personal injury. ● Be sure to... and controls 2-25
APD1071
WARNING ● Before using the parcel shelf, the three-passenger bench seat must be upright. ● After adjusting the parcel shelf to the desired height, make sure the...
Owner's Manual - Page 127
... helping to prevent persons from being thrown from unintentionally opening the doors, and will help keep track of your key number plate. Do not attempt to open or close the doors by an ...They could become involved in a safe place (such as this provides greater safety in the event of seat belts, this may cause injury.
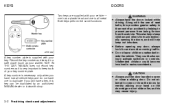
3-2 Pre-driving checks and adjustments KEYS
Two keys are supplied with ...
Owner's Manual - Page 145
... Interior air is used to prevent cold air from entering the passenger compartment under both front seats. 1.
Move the air control dial to help keep out traffic fumes. po- OFF position... sition. po-
2.
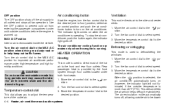
Defrosting or defogging
This mode is provided by the front system through floor outlets located under cold outside conditions before the engine is more than 45°F (7°...
Owner's Manual - Page 146
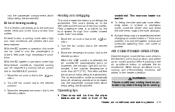
...compartment which helps defog the windshield. Move the temperature control dial to the front and rear floor outlets. When the air conditioner is running.
2. Move the temperature control dial to the ...moving the air control dial to cool the passenger's or driver's feet under both front seats. 1. windshield. Bi-level is selected, the air conditioner automatically turns on , cooling and...
Owner's Manual - Page 153

...maximum heating, push the side of the button to rapidly change the temperature setting in the middle of the TEMP button until a cooler temperature is selected. Return to the windshield. Fan ...speed and thumbwheel
Your EATC automatically adjusts the fan speed to the front and rear floor outlets and windshield at the same indicator light comes on, time. Push this button to select...
Owner's Manual - Page 182
... tires for proper inflation. ● Lock all doors. ● Position seat and adjust head restraints. ● Adjust inside and outside mirrors. ● Fasten seat belts and ask all windows and lights are clean. ● Visually inspect...or hot weather, depress the accelerator pedal to the floor and hold it to idle for a short distance first, especially in the ''Instrument and controls'' section....
Owner's Manual - Page 210
7 Appearance and care
Cleaning exterior ...7-2 Washing ...7-2 Waxing...7-2 Removing spots...7-3 Underbody ...7-3 Glass ...7-3 Aluminum alloy wheels...7-3 Chrome parts...7-3 Cleaning interior ...7-4
Floor mats ...7-4 Seat belts ...7-4 Corrosion protection ...7-5 Most common factors contributing to vehicle corrosion...7-5 Environmental factors influence the rate of corrosion...7-5 To protect your ...
Similar Questions


How To Remove Tray From Middle Console In Nissan Quest
(Posted by NEMfash 10 years ago)

Nissan Quest 2004- Foot Pedal To The Floor Van Wont Go Above 60
(Posted by CinRobinH 10 years ago)

Seat Belt Retractor Broke Nissan Quest 1995
Locate the motor to my seat belt retractor, which is stuck and vibrating in the drivers side positio...
Locate the motor to my seat belt retractor, which is stuck and vibrating in the drivers side positio...
(Posted by jaharisai 11 years ago)