2000 Nissan Quest Support Question
2000 Nissan Quest Support Question
Find answers below for this question about 2000 Nissan Quest.Need a 2000 Nissan Quest manual? We have 1 online manual for this item!
Question posted by Anonymous-95635 on January 24th, 2013
Were To Find The Fuses For The Front Side Marker And Parking/cornering Light
The person who posted this question about this Nissan automobile did not include a detailed explanation. Please use the "Request More Information" button to the right if more details would help you to answer this question.
Current Answers
Related Manual Pages
Owner's Manual - Page 87
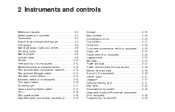
... window wiper and washer switches...2-13 Rear window defogger switch ...2-14 Headlight control switch ...2-14 Autolamp switch (if so equipped)...2-15 Turn signal switch ...2-16 Cornering light ...2-17 Hazard warning flasher switch ...2-17 Horn...2-18 Rear power socket ...2-18 Cigarette lighter and ashtray (accessory) ...2-19
Storage ...2-20 Map pockets ...2-20 Conversation mirror...
Owner's Manual - Page 93
... do so.
2-6 Instruments and controls Use
the dipstick to the ON position without starting the engine. Have the system repaired promptly.
WARNING/INDICATOR LIGHTS AND CHIMES
WIC0018
CHECKING BULBS
With all doors closed, apply the parking brake, fasten seat belts, and turn the ignition key to check the oil level. The following...
Owner's Manual - Page 94
... mean that the supplemental air bag will not operate in the ON position, the light comes on when the parking brake is applied, and also warns of the following : Instruments and controls 2-7
Seat belt warning light and chime
The light and chime remind you to fasten your vehicle should be taken to an authorized...
Owner's Manual - Page 101
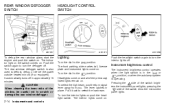
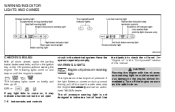
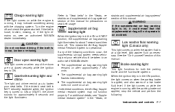
... the defogger off in place.
Push the switch again to scratch or damage the rear window defogger. The interior lights come on . Pull it back to the position: The front parking, side marker, tail, license plate and instrument lights come on .
It automatically turns off . The lever latches in approximately 15 minutes. The indicator...
Owner's Manual - Page 102
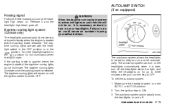
...turn on . Instruments and controls 2-15 Failure to OFF. If the parking brake is applied before the engine is light, and keep the headlights on for full illumination when the driving at...headlight switch to be on until the ignition switch is started , the daytime running lights operate with the parking brake released. AIC1058
The autolamp system allows the headlights to position for up to...
Owner's Manual - Page 104
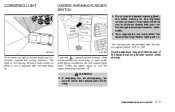
... to drive so slowly that your vehicle might become a hazard to other drivers when you must stop or park under emergency conditions.
The light on the turning direction side comes on .
AIC0102 AIC1060
The cornering light provides additional illumination toward the turning direction. Some state laws may prohibit the use the hazard warning flashers...
Owner's Manual - Page 131
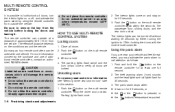
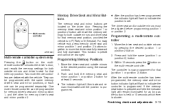
... be used with the multi-remote controller. The parking lights flash twice and the horn chirps once to ON or locking the doors with one full... using the remote controller from outside the vehicle. Close all doors, turn the interior lights on the 1.
Parking lights flash once.
3-6 Pre-driving checks and adjustments
The theft warning alarm (horn) sounds and the headlights and tail...
Owner's Manual - Page 138
... outside mirrors must be changed.
● After the position has been programmed the indicator light will flash to the desired position using the manual controls. 2. Programming a multi-remote ... seat and mirror position 1 and position 2 buttons together to indicate the controller is in P (Park) or N (Neutral). They can be programmed with the vehicle. Memory Driver Seat and Mirror Buttons...
Owner's Manual - Page 147

...
2. Push the air conditioner button. po- This allows the air conditioner to vent heat buildup when parked in the sun, drive for about ten minutes at least once a month. When the position is...to the desired position. The indicator light on .
Operating tips
● Keep windows and sun roof closed while the air conditioner is in operation. ● After parking in the sun.
2.
Move the...
Owner's Manual - Page 163
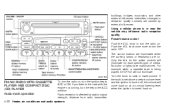
...in or near the vehicle may influence radio reception quality. No bulbs or lights have malfunctioned. For example when a cassette tape is being played, SHUFFLE ...the radio with the engine not running, turn the radio OFF. The control buttons are illuminated when the parking lamps or headlamps are caused by station signal strength, distance from radio transmitter,
Turn the knob to turn...
Owner's Manual - Page 182
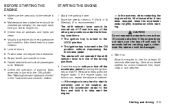
Apply the parking brake. 2. The starter will not operate if the shift selector lever is turned to the ON position. See ''Warning/Indicator lights and chimes'' in extremely cold or hot ...engine oil). ● Check that all passengers to do likewise. ● Check the operation of warning lights when key is in cold weather. CAUTION Do not operate the starter for more than 15 seconds at...
Owner's Manual - Page 186
... 2. Press and release the parking brake completely. 4. When parking, be sure the brake warning light goes out. ASD1017
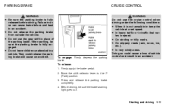
To engage: Firmly depress the parking brake. Before driving, be sure the parking brake is fully engaged. &#...so can cause brake failure and lead to an accident. ● Do not release the parking brake from outside the vehicle. ● Do not use the cruise control when driving ...
Owner's Manual - Page 204
...In case of emergency 6-9 It could come on the battery (if so equipped).
Apply the parking brake. CAUTION ● Always connect positive (+) to positive (+) and negative (−) to ... personal injury. 1. Do not allow the two vehicles to the P (Park) position. Switch off all unnecessary electrical systems (lights, heater, air conditioner, etc.).
3.
Failure to do so could explode ...
Owner's Manual - Page 216
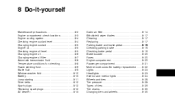
... blades ...8-17 Cleaning ...8-17 Replacing ...8-17 Parking brake and brake pedal...8-19 ...8-19 Checking parking brake ...8-19 Checking brake pedal ...8-19 Brake booster ...8-20 Fuses...8-20 Engine compartment ...8-20 Passenger compartment ...8-21 Multi-remote controller battery replacement ...8-22 Lights ...8-23 Headlights ...8-23 Exterior and interior lights ...8-24 Wheels and tires ...8-28 Tire...
Owner's Manual - Page 234

... noise during light to normal. If the number of clicks is out of the pedal and the floor. If it -yourself
ADI1089
ADI0027
CHECKING PARKING BRAKE
From the released position, push the parking brake foot ... heard. The front disc-type brakes self-adjust every time the brake pedal is applied. PARKING BRAKE AND BRAKE PEDAL
CHECKING BRAKE PEDAL
WARNING See an authorized NISSAN dealer for a brake ...
Owner's Manual - Page 239
...
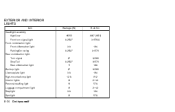
Item Headlight assembly High/Low Front turn signal light Front combination light: Front side marker light Parking/Cornering Rear combination light: Turn signal Stop/Tail Rear side marker light Back-up light License plate light High-mounted stop light Interior lights Personal reading light Luggage compartment light Steplight Spotlight 27 8.25/27 5 27 3.8 12.8 12 10 12 3.8 10 3156K 3157K 168 3156K...
Owner's Manual - Page 277
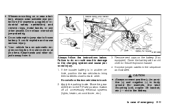
...mounted. Never add more than one trailer light bulb to operate trailer stop and tail light pickup into the vehicle electrical circuit. Trailer lights
Trailer lights should comply with the trailer and tire ... Tow electrical wiring provides two circuits (right and left hand) to one combination stop /turn light bulb (#1157, 3157, 2357, or 3357) on the inside of additional damage if your...
Owner's Manual - Page 278
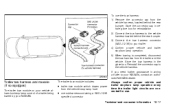
...to the vehicle harness. Always confirm proper vehicle and trailer stop /turn lamp operation every time the trailer light circuits are connected for use the tow harness: 1) Remove the connector cap from the trailer and the ...connector cap to your vehicle allows turn/stop lamp fuse ● one subharness containing a SAE J1239 specified connector
Technical and consumer information 10-17
Owner's Manual - Page 287
... level ...8-4 Engine coolant temperature gauge ...2-4 Cornering light ...2-17 Corrosion protection ...7-5 Cruise control...5-9 Cup holders ...2-21 D Daytime running light system (Canada only) ...2-15 Defogger switch... rating...10-3 Fuel recommendation ...10-2 Interia fuel shut-off switch ...6-11 Fuses ...8-20
11-2 fuel...5-12 Emission control information label...10-11 Emission control system warranty...10...
Owner's Manual - Page 288
...the license plate ...10-12 Light Air bag warning light...1-37 Brake light (See stop light) ...8-24 Bulb check/instrument panel ...2-6 Bulb replacement...8-24 Cornering light ...2-17 Headlight control switch ...2-14 Headlights...8-23 Interior lights ...2-31 Light bulbs ...8-23 Luggage compartment lights ...2-31 Spotlights (See map light) ...2-32 Warning/indicator lights and chimes ...2-6 Lock Child...
Similar Questions

Where Can I Find A Fuse For 2006 Nissan Quest Odometer Light Panle
(Posted by michaGou 9 years ago)

How To Install Trailer Lights On A 2000 Nissan Quest
(Posted by mallmia8 10 years ago)


My Sunroof Is Not Working And Cant Find Its Fuse Box
(Posted by Anonymous-106912 11 years ago)
Ecm/relay Problems?
My husband was messing with the wiring trying to connect the fans to the ignition (they weren't gett...
My husband was messing with the wiring trying to connect the fans to the ignition (they weren't gett...
(Posted by susaahn6 11 years ago)