
Nautilus T514 Support Question
Nautilus T514 Support Question
Find answers below for this question about Nautilus T514.Need a Nautilus T514 manual? We have 1 online manual for this item!
Question posted by donlangdon66 on February 15th, 2015
Lift Motor T 514
Standing in front of machine, what order are the red ,white, and black wires plug in?
Current Answers
Related Nautilus T514 Manual Pages
Owners Manual - Page 3

...not connect power supply to do steps that involve heavy lifting or awkward movements on your own.
• Set up this machine on this machine. This could result in an appropriate work space away from...with the Owner's Manual.
• Read and understand the complete Owner's Manual supplied with this machine outdoors or in a wet or moist location. • Make sure assembly is done in death...
Owners Manual - Page 4

Specifications
Nautilus® T514 Treadmill
Dimensions
Length
74" / 188 cm
Width
32" / 81 cm
Height
54" / 137 cm
Assembled Unit ...Programs Speed Range
Elevation Range
350 lb / 158 kg 21
0.5-15 mph / 0.8-24.1 km/h
0-15%
Component Specifications
Frame, Folding
Steel
Motor
3.2 CHP DC
Deck Size
20" x 58" / 51 x 147 cm
Belt Heart Rate Monitor
Heart Rate Chest Strap Display Built-In Fan...
Owners Manual - Page 5
...is a GFI outlet or circuit breaker.
5
Before Assembly
Select the area where you assemble your machine:
1. Collect all the pieces necessary for a test and reset button on a hard, level... is GFI, look through the bolt holes to plug into a grounded, non-GFI outlet only. The assembly requires 2 people. When attaching 2 pieces, lightly lift and look for each assembly step. 3. Allow ...
Owners Manual - Page 6

... x 60L Button Head Hex Screws, pre-installed
2
M10 Nylock Nuts, pre-installed
2
M8 x 70L Flathead Hex Screws
4
M4 x 10 Phillips Head Screws, pre-installed (model T514)
6
M4 x 10 Phillips Head Screws, pre-installed (model T516)
2
#8 x 1/2L Phillips Head Bolts, pre-installed
4
M8 x 15L Button Head Hex Screws, 2 pre-installed
4
M8 washer...
Owners Manual - Page 8

Unfold Frame Note: Hold one Upright (1A) and the Ergo Bar (1B) when you lift the folded uprights into position. Assembly
1. Keep your hands clear of the area between the Ergo Bar and the Upright.
8
Owners Manual - Page 13
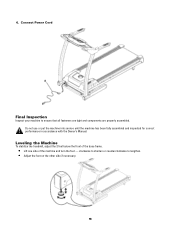
... counterclockwise to ensure that all fasteners are tight and components are properly assembled. Connect Power Cord
Final Inspection
Inspect your machine to lengthen. • Adjust the foot on the other side if necessary.
13 6. Leveling the Machine
To stabilize the treadmill, adjust the 2 feet below the front of the base frame.
•...
Owners Manual - Page 14

... not stand on machine motor cover or front trim cover
• Keep power cord away from the machine. Operate the machine in the manner described in operation.
• Do not over this machine. Moving...least 19.5" (0.5 m) on the moving parts. Stop exercising if you use if you start an exercise program. Do not use the machine again. Use the supplied foot support platforms for stability ...
Owners Manual - Page 15

...stand on the Foot Platforms before it can be used again.
• Do not remove the machine motor cover, dangerous voltages are serviceable only by an
approved technician before you operate this machine ... This machine is for this machine is not in which the machine will be used must be inspected and tested for safety by
approved service personnel.
• The electrical wiring for the...
Owners Manual - Page 16

...
This product must obey the applicable local and provincial requirements. The electrical wiring must be connected to decrease the risk of electric shock. When the key is removed while the machine is equipped with an Equipment-grounding Conductor and a grounding plug. Gardez les enfants et les animaux de compagnie éloignés de...
Owners Manual - Page 17

Features
A Console B Water Bottle Holder C Magazine Rack D Handlebars E Remote Speed Control F Contact Heart Rate (CHR) Sensors G Safety Key Port H Uprights I Motor Cover J Power Switch K Power Cord
L Walking Belt M Side Foot Support Rails N Support Bar O Hydraulic Lift P Transport Wheels Q Base R Adjustable Feet S Remote Incline Control T Ergo Bar U Fan V Heart Rate (HR) Chest Strap
17
Owners Manual - Page 22

...muscles, and buckle it.
22 The Console shows your skin.
Adjust the strap length to fit snugly and comfortably against your Heart Rate in Beats Per Minute (BPM). Chest Strap
Using the .... The heart rate transmitter is one of the best procedures to control the intensity of your exercise.
Remote Heart Rate Monitor
Monitoring your Heart Rate is attached to a chest strap to keep ...
Owners Manual - Page 23

... an estimate of your maximum heart rate. The most efficient procedure to burn fat during exercise is shown. Consult your physician for each year.
Your at a slow pace and gradually...transmitter will burn. Always remove the transmitter before you need to the machine's receiver and display your skin. Lift the transmitter off your individual target heart rate zone.
23 Check that...
Owners Manual - Page 24

Note: As with all exercises and fitness regimens, always use your best judgment when you increase your exercise time or intensity. Fat Burning Target Heart Rate
Heart Rate BPM (beats per minute)
Maximum Heart Rate
Target Heart Rate Zone (keep within this range for optimum fat burning)
Age
Exercise Programs
Nautilus® T514 Treadmill Quick Start...
Owners Manual - Page 31

.... Carefully rotate the belt by approved service personnel.
This Notice is done.
Clean the machine to remove all bolts and screws are present.
NOTICE: To prevent damage to make sure...Before you would like additional information, please refer to adjust the tension. Do not remove the machine motor cover, dangerous voltages are tight. Use a 6 mm hex key to turn the right and...
Owners Manual - Page 32

... treadmill at the rear of the treadmill are necessary when the belt is centered on the belt causes unnecessary friction and wears the belt, motor and electronics. Stand at all times. Aligning the Walking Belt
Make sure the walking belt is off center.
Minor adjustments to the 2 bolts at the rear of...
Owners Manual - Page 33

...Off, and disconnect the power cord. Use proper safety precautions and lifting techniques.
Connect the power cord back into the machine and then into the wall outlet.
4. If the deck appears worn...recommend a periodic inspection of your local specialty fitness dealer
or Nautilus, Inc.
3. Lubricate the belt every 3 months or every 50 hours of the machine. Note: Make sure the treadmill is ...
Owners Manual - Page 34

...no object on each side. Make sure that it does not move to the side of the hydraulic lift forward until the locking tube releases and you do this, keep clear of movement path in the ... is folded. When you can pull the walking deck away from the machine.
2. With your left foot lightly push the top part of the machine. 4. Do not put items on the walking deck and make sure...
Owners Manual - Page 35

... of movement path in the last part of the machine for moving the machine. Use caution when you use proper lifting technique; Refer to the "Folding the Treadmill" procedure...not move the machine. The walking deck can pinch, resulting in this , keep your own physical strength is set up to become unstable or fall.
3. The treadmill is disconnected. Never lift the front ...
Owners Manual - Page 36

....
Keep clear of the movement path of this manual.)
Change display to the "Unfolding the Treadmill" procedure in the Important Safety Instructions section of the lifted walking deck.
5.
4. Plug Safety Key into the outlet.
Roll the machine on . This can occur.
Make sure the power cord is not functioning find a working outlet...
Owners Manual - Page 37

...machine. HR cable connection at medical or some larger fitness stores. Refer to work with dried out or calloused hands. Plug Safety Key into Console. (See Emergency Stop Procedure in this manual. All wires ... slips when in Belt tension use
Belt stops moving while in use
Safety key
Motor overload
37
Insure cable is connected securely to the procedure for adjusting tension and ...
Similar Questions

What Does Err3 Mean On Nautilus T516
treadmill just stopped and is displaying err3 on the screen and won't operate.What does this error c...
treadmill just stopped and is displaying err3 on the screen and won't operate.What does this error c...
(Posted by Darrengenemiller 2 years ago)


Tool Needed To Open Nautilus E514c
They are sending me the replacement motor for my nautilus ellipitical e514c. I have to get a tool an...
They are sending me the replacement motor for my nautilus ellipitical e514c. I have to get a tool an...
(Posted by kymhaut 9 years ago)