Memorex MDF1062-MTL Support Question
Memorex MDF1062-MTL Support Question
Find answers below for this question about Memorex MDF1062-MTL - Digital Photo Frame.Need a Memorex MDF1062-MTL manual? We have 1 online manual for this item!
Question posted by marksc01 on February 25th, 2015
Can The Device Be Operated Without The Remote? My Batteries Are Dead. Thx.
The person who posted this question about this Memorex product did not include a detailed explanation. Please use the "Request More Information" button to the right if more details would help you to answer this question.
Current Answers
Related Memorex MDF1062-MTL Manual Pages
User Guide - Page 1

... INSIDE.
The user could lose the authority to the presence of uninsulated dangerous voltage within an equilateral triangle is intended to alert the user to operate this equipment may generate or use radio frequency energy. ATTENTION: POUR ÉVITER LES CHOC ÉLECTRIQUES, INTRODUIRE LA LAME LA PLUS LARGE DE LA...
User Guide - Page 2

... warranty for this equipment does cause harmful interference to radio or television reception, which the receiver is recommended to radio communications. This Class B digital apparatus complies with Class B digital device regulations. This equipment generates, uses and can be determined by turning the equipment off and on, the user is encouraged to try to...
User Guide - Page 4

... of Unit) 4. Navigation π Button 7. Navigation √/
VOLUME - USB Jack (Side of Unit) 14. Screen 2. Navigation † Button 6. Navigation ®/
VOLUME + Button 12. Stand 10. Remote Sensor 3. Power Button (Side of Unit)
(USB CABLE PART NO. 337-01000-E050*) 15. DC 12V IN Jack (Side of Unit) 17. LOCATION OF CONTROLS...
User Guide - Page 5
... OUT Button 14. MENU Button 6. Navigation ®/ VOLUME + Button 10. Navigation † Button 5. Button 3. Battery Compartment (Rear of Unit) 8. TIME Button 9. LOCATION OF CONTROLS (CONTINUED)
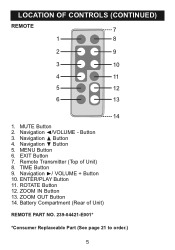
REMOTE
7
1
8
2
9
3
10
4
11
5
12
6
13
14
1. MUTE Button 2. Remote Transmitter (Top of Unit)
REMOTE PART NO. 239-04421-E001*
*Consumer Replaceable Part (See page 21 to order...
User Guide - Page 6

... adapter which has the following specs: DC 12V Z
REMOTE BATTERY INSTALLATION
1. Replace only with the same or equivalent type. 2. Do not try to recharge a battery not intended to be used for a long period of time, remove the batteries to disconnect the AC adapter
when not in the Battery Compartment (positive side up).
3.
AC Adapter, DC...
User Guide - Page 7
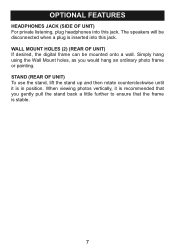
... stand up and then rotate counterclockwise until it is recommended that you would hang an ordinary photo frame or painting. The speakers will be mounted onto a wall. WALL MOUNT HOLES (2) (REAR OF UNIT) If desired, the digital frame can be disconnected when a plug is stable.
7 OPTIONAL FEATURES
HEADPHONES JACK (SIDE OF UNIT) For private...
User Guide - Page 8
...from an external memory card as
shown).
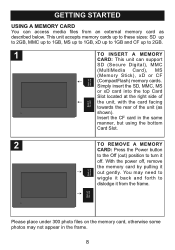
Insert the CF card in the frame.
8 Please place under 300 photo files on the memory card, otherwise some photos may need to
wiggle it back and forth to turn it
out gently. ...described below. GETTING STARTED
USING A MEMORY CARD You can support
SD (Secure Digital), MMC
(MultiMedia Card), MS
(Memory Stick), xD or CF
(CompactFlash) memory cards.
User Guide - Page 9

...option in ) position. This unit will either show the Main menu or automatically start showing a photo Slideshow (if the Auto Play option in Slideshow mode, press the EXIT button twice to ON).... copy.
Connect the USB cable to the USB jack located under the left cover of this digital frame using a USB cable. GETTING STARTED (CONTINUED)
COPYING MEDIA FILES FROM YOUR COMPUTER You can also...
User Guide - Page 10

OPERATION
SETTING THE TIME AND DATE
1
2
2
1
Press the Power button to the On (in the Time Mode Setup option).
Repeat to start (if the
Auto Play ...
User Guide - Page 11

... (if the Auto Play option in ) position to turn the unit on. then press the ENTER/PLAY button 2 again to the Main menu.
11 OPERATION (Continued)
BASIC PHOTO PLAYBACK (Supported format: JPEG)
1
21
2
3
Press the Power button to the On (in the Setup menu is in Slideshow mode, press the EXIT button...
User Guide - Page 12

ZOOM
1
OPERATION (Continued)
ROTATE
2
2
1
4
3
While viewing a photo (see the previous page), press the Navigation √ and/or ® button to skip to the previous or next picture.
12
Repeatedly press to zoom up to zoom back out of the photo. Repeat to continue to normal photo playback, press the EXIT button 4. Press the ZOOM OUT button...
User Guide - Page 13

OPERATION (Continued)
PHOTO "FAVORITES" PLAYBACK
1 1
2
2
3
2
While in Landscape or
Portrait mode. a red frame will appear. then press the OK button 3 again...press the ZOOM IN button 2 to select
between Single or Double; To change the favorite's view (Single photo or Double photos) on the screen, select Play Mode using the Navigation √, ® buttons; Then, press the ...
User Guide - Page 14

...to confirm. Press
this button again, or either show the Main menu or au1tomat1ically start showing a photo Slideshow (if the Auto Play option in the Setup menu is in ) position to the previous ...14 then press the ENTER/PLAY button 2 again to unmute.
the Pause
icon will appear on . OPERATION (Continued)
BASIC MUSIC PLAYBACK (Supported format: MP3)
1
21
2
3
Press the Power button to ...
User Guide - Page 15

...OPERATION (Continued)
BASIC VIDEO PLAYBACK (Supported format: MOV)
Video: Compress type: MPEG-4 Video Frame ...Rate: 30fps Dimensions: 352 x 288 CIF
Audio: µ-Law 2:1 or A-Law 2:1
1
2
1
2
Press the Power button to the On (in Slideshow mode, press the EXIT button twice to exit and access the Main menu. Playback will ei1ther sh1ow the Main menu or automatically start showing a photo...
User Guide - Page 16

...button 1; a pop-up menu will e1ither sh1ow the Main menu or automatically start showing a photo Slideshow (if the Auto Play option in the Setup menu is in ) position to delete ... the Navigation buttons 1;
Select "No" (to NOT delete the file) or "Yes" (to turn the unit on. OPERATION (Continued)
DELETING A FILE
1
2
1
2
3
Press the Power button to the On (in Slideshow mode, press the...
User Guide - Page 17

...buttons 1.
Select "No" (to NOT replace the file by the pop-up window to replace the existing file?" OPERATION (Continued)
COPYING A FILE
1
21
2
3
Press the Power button to the On (in the Setup menu ... the Folder menu. This unit will ei1ther sh1ow the Main menu or automatically start showing a photo Slideshow (if the Auto Play option in ) position to turn the unit on the target media...
User Guide - Page 18

...setting (i.e. "Select Card") on the two available pages of the Setup
options (i.e. choose between your photos, adjust the speed of the Slideshow and more!
Use the Navigation π,† buttons 2 to ...Power button to the On
(in blue.
4. OPERATION (Continued)
SETUP MENU
The Setup menu lets you customize this digital frame by allowing you to turn the unit on. Use the following page....
User Guide - Page 19
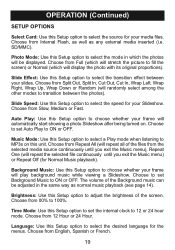
...photos will display the photo with its original proportions). Choose from 00% to MP3s on .
Music Mode: Use this Setup option to select a Play mode when listening to 100%. Choose from Full (which will stretch the picture... Setup option to choose whether your frame will randomly select among the other ...photos). OPERATION (Continued)
SETUP OPTIONS
Select Card: Use this Setup option to ON...
User Guide - Page 20

Battery not inserted or inserted incorrectly. No photos are present in frame. Frame is not connected. No photos in Internal Flash or external media source.
Remote, no power.
USB cable not connected securely. Copy files onto the frame or insert external media source, see pages 8 & 9.
CAUSE AC adapter is not turned on the rear of the frame.
20 SOLUTION...
User Guide - Page 21

....9" (W) x 1.75" (D) Weight and dimensions are subject to change without notice. Resolution 800 x 480 Internal Memory 128MB Speaker 2 x 0.6 W
Specifications are approximate. FOR ADDITIONAL SET-UP OR OPERATING ASSISTANCE, PLEASE VISIT OUR WEBSITE AT:
WWW.MEMOREXELECTRONICS.COM OR CONTACT CUSTOMER SERVICE AT 1-800-919-3647.
Similar Questions

Sir,.my Son Has Gifted Me Memorex Mdf1061-wls Digital Photo Frame,but Unfortunat
Dear sir.My son has gifted me Memorex digital photo frame model no memorex mdf 1061-wils.but unfortu...
Dear sir.My son has gifted me Memorex digital photo frame model no memorex mdf 1061-wils.but unfortu...
(Posted by Vkrewoo 7 years ago)

Digital Photo Frame With Model# Mdf-0153
Hi dear, I have a digital photo frame with model# MDF-0153.I lost catalogue of my photo album, and f...
Hi dear, I have a digital photo frame with model# MDF-0153.I lost catalogue of my photo album, and f...
(Posted by ali85681 8 years ago)
Why Won't My Memorex Digital Frame Play Music And Show Pictures At The Same Time
(Posted by celiat62 12 years ago)

My Digital Picture Frame Was Working Fine And Now Wont Turn On. Whats Wrong?
I have a memorex digital photo frame model number: MDF0712C. It was working fine and then it randoml...
I have a memorex digital photo frame model number: MDF0712C. It was working fine and then it randoml...
(Posted by karliepaige 13 years ago)

I Turned It On And Cant Load New Photos But I Have A New Computer. Please Help
(Posted by dsunshine7 13 years ago)