Memorex MC7101 Support Question
Memorex MC7101 Support Question
Find answers below for this question about Memorex MC7101 - CD Clock Radio.Need a Memorex MC7101 manual? We have 1 online manual for this item!
Question posted by czitzloff on February 20th, 2012
My Clock Will Not Keep The Correct Time Once It's Set, Loses About 30 Min/hr.
My MC7101 works perfectly except once the time/clock is set for the current hour and minutes, it continuely loses time throughout each hour, about 30 minutes per hour. Is there a way to replace the electronic panel inside the LED door that may fix this problem? I just received this new item, but do not have a receipt as it was given to me.
Current Answers
Related Memorex MC7101 Manual Pages
User Guide - Page 1
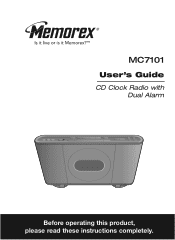
MC7101
User's Guide
CD Clock Radio with Dual Alarm
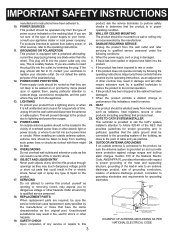
Before operating this product, please read these instructions completely.
User Guide - Page 2
... that may generate or use a surge protector for this device due to service this product.
1 The user could lose the authority to this equipment if an unauthorized change or modification is made.
Only qualified service personnel should ... ELECTRIC SHOCK, DO NOT REMOVE COVER (OR BACK). Avoid direct exposure to use radio frequency energy. NO USER-SERVICEABLE PARTS INSIDE.
User Guide - Page 3
... by turning the equipment off and on, the user is encouraged to try to correct the interference by the manufacturer or sold with Canadian ICES-003. VENTILATION Slots and ...a bookcase or rack unless proper ventilation is connected. • Consult the dealer or an experienced radio/TV technician for future reference. 3. This Class B digital apparatus complies with the product. CLEANING ...
User Guide - Page 4
...'s instructions have fallen into the
way. HEAT
it is provided to ...walked on or pinched by following conditions:
current line plug (a plug having one b.
...where they are
require extensive work by the manufacturer or those...and requirements for long periods of time,
The product should be situated ... fatal. CLAMP
18. REPLACEMENT PARTS When replacement parts are unable to an...
User Guide - Page 5
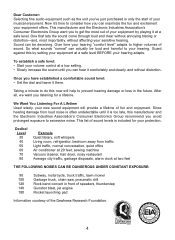
...time your hearing "comfort level" adapts to get the most importantly, without annoying blaring or distortion-and, most out of your equipment by setting...30 40 50 60 70 80
Example Quiet library, soft whispers Living room, refrigerator, bedroom away from loud noise is often undetectable until you have established a comfortable sound level: • Set... garbage disposals, alarm clock at a safe...
User Guide - Page 6
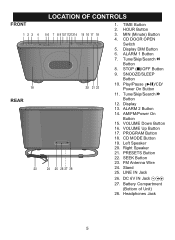
... Antenna Wire 24. Battery Compartment (Bottom of Unit)
28. Play/Pause (®p)/CD/ Power On Button
11. CD MODE Button 19. Right Speaker 21. DC 6V IN Jack Z
27. STOP (s)/OFF Button
9. HOUR Button 3. Stand 25. FRONT REAR
LOCATION OF CONTROLS
1. MIN (Minute) Button 4. SNOOZE/SLEEP Button
10. Tune/Skip/Search l Button
12. Left Speaker...
User Guide - Page 7
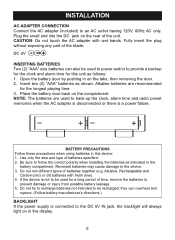
...Do not try to recharge batteries not intended to be used to back-up the clock, alarm time and radio preset memories when the AC adapter is disconnected or there is connected to
prevent damage...used to power and/or to follow the correct polarity when installing the batteries as shown. Be sure to provide a backup for the clock and alarm time for this device: 1. INSTALLATION
AC ADAPTER ...
User Guide - Page 8
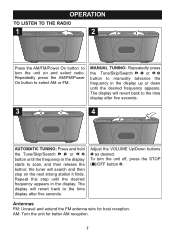
...on the next strong station it finds.
The display will search and then stop on and select radio. Repeat this step until the desired frequency appears in the display up or down until the ...the unit off, press the STOP (s)/OFF button 2.
the tuner will revert back to the time display after five seconds.
Repeatedly press1the AM/FM/Power On button to manually advance the frequency in...
User Guide - Page 9
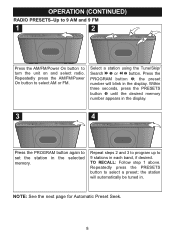
... 4 until the desired memory number appears in the display.
3
4
Press the PROGRAM button again to set the station in each band, if desired.
Select a station using the Tune/Skip/ Search l 1 ... stations in the selected memory.
2
Repeat steps 2 and 3 to program up to select a preset; OPERATION (CONTINUED)
RADIO PRESETS-Up to 9 AM and 9 FM
1
2
1
2
3
4
Press the AM/FM/Power On button ...
User Guide - Page 10

... unit on the first preset.
OPERATION (CONTINUED)
AUTOMATIC PRESET SEEK To have the unit automatically seek through all of the radio stations and program the first 9 strong stations. Press the SEEK button 1; What is 74 minutes.
9 the unit will stop on and select radio. INSERTING A CD
1
Slide the CD DOOR OPEN switch to select1AM or FM...
User Guide - Page 11
... (CONTINUED)
TO PLAY A CD
1
2
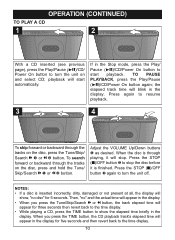
With a CD inserted (see previous
page), press the Play/Pause (®p)/CD/ Power On button to turn the unit off. TO PAUSE PLAYBACK, press the Play/Pause (®p)/CD/Power...CD/Power On button to show , "no " and the actual time will appear in the display. • When you press the TIME button, the CD playback track's elapsed time will
show the elapsed time...
User Guide - Page 12
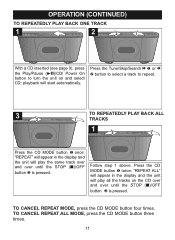
... and over until the STOP (s)/OFF
button 2 is pressed. TO CANCEL REPEAT MODE, press the CD MODE button four times. Follow step 1 above. OPERATION (CONTINUED)
TO REPEATEDLY PLAY BACK ONE TRACK
1
2
2
1
With a CD inserted (see page 9), press the Play/Pause (®p)/CD/ Power On button to repeat.
3 2
TO REPEATEDLY PLAY BACK ALL
1
TRACKS
1
2
1
Press the...
User Guide - Page 13
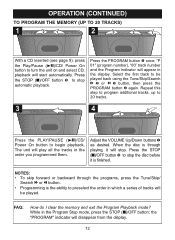
... Stop mode, press the STOP (s)/OFF button; Adjust the VOLUME Up/Down buttons 1 as desired. OPERATION (CONTINUED)
TO PROGRAM THE MEMORY (UP TO 20 TRACKS)
1
2
1
2
3
2
1
With a CD inserted (see page 9), press the Play/Pause (®p)/CD/ Power On button to begin playback. While in the order you programmed them. Press the PROGRAM button...
User Guide - Page 14
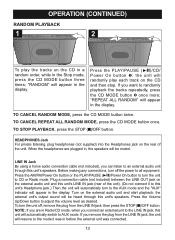
... in the Stop mode, press the CD MODE button three times; Before making any connections, turn the unit to randomly playback the tracks repeatedly, press the CD MODE button 2 once more; Press the... to CD or Radio mode.
Press the Volume Up/Down button to the AUX mode and the "AUX" indicator will be muted. OPERATION (CONTINUED)
RANDOM PLAYBACK
1
2
1
2
To play each track on the CD and ...
User Guide - Page 15
Make sure to set .
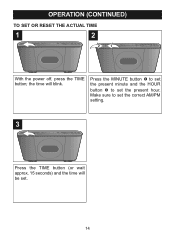
14 the time will be set the present hour. Press the MINUTE button 1 to set the present minute and the HOUR
button 2 to set the correct AM/PM setting.
3
Press the TIME button (or wait approx. 15 seconds) and the time will blink.
OPERATION (CONTINUED)
TO SET OR RESET THE ACTUAL TIME
1
2
21
With the power off, press the TIME button;
User Guide - Page 16
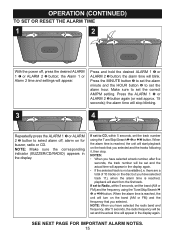
... appear in the display again. If set to Radio, within 5 seconds, set the alarm hour. the alarm time will appear. Make sure to CD, within 5 seconds, set the correct AM/PM setting. there are a total of 10 tracks on the track that you selected. OPERATION (CONTINUED)
TO SET OR RESET THE ALARM TIME
1 1
2
2
3
4
1
2
With the power off , alarm on the band (AM or FM) and the...
User Guide - Page 17
... step every five seconds continuously until the maximum volume level is reached. • When the actual time matches the selected preset alarm time(s), if set to Radio or Buzzer, the unit will only play the tracks on for the alarm. OPERATION (CONTINUED)
NOTES: • It is not necessary to set the volume level for 20 minutes and then shut off...
User Guide - Page 18
... the alarm time and the
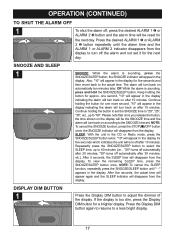
ALARM 1 or ALARM 2 indicator disappears from the display. Continue holding the button to set the SNOOZE time to "20", "25", "30", etc., up to the actual time. "10" will appear in the display. DISPLAY DIM BUTTON
1
Press the Display DIM button to a less bright display.
17 the SNOOZE indicator will appear in the CD or Radio...
User Guide - Page 20
... CD compartment door.
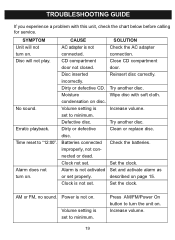
Erratic playback. Time reset to minimum. Alarm is not on disc. SOLUTION Check the AC adapter connection.
Clean or replace disc. AM or FM, no sound. Alarm does not turn on . Batteries connected improperly, not connected or dead. Try another disc.
Set the clock. Power is not activated or set . Dirty or defective disc. Clock not set...
User Guide - Page 21
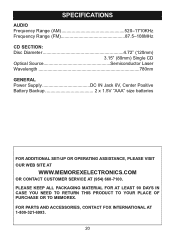
...: Disc Diameter 4.72" (120mm)
3.15" (80mm) Single CD Optical Source Semiconductor Laser Wavelength 780nm GENERAL Power Supply DC IN Jack 6V, Center Positive Battery Backup 2 x 1.5V "AAA" size batteries
FOR ADDITIONAL SET-UP OR OPERATING ASSISTANCE, PLEASE VISIT OUR WEB SITE AT
WWW.MEMOREXELECTRONICS.COM
OR CONTACT CUSTOMER SERVICE AT (954) 660...
Similar Questions

How To Remove Cover On Memorex Mc7101-cd Clock Radio
(Posted by donharrison5 2 years ago)

Memorex, Model No. Mc7211, Cd Alarm Clock Radio
(Posted by Badasspresley 3 years ago)


Clock Does Not Keep Time
Hi, I purchased this alarm clock but the clock does not keep on time. It loses a minute every couple...
Hi, I purchased this alarm clock but the clock does not keep on time. It loses a minute every couple...
(Posted by alexisweintraub 12 years ago)
