Maytag MHWE300VF Support Question
Maytag MHWE300VF Support Question
Find answers below for this question about Maytag MHWE300VF - Performance Series Front Load Washer.Need a Maytag MHWE300VF manual? We have 1 online manual for this item!
Question posted by fmuller on August 10th, 2014
I Accidentally Pressed The Lock Button How Do I Reset
The person who posted this question about this Maytag product did not include a detailed explanation. Please use the "Request More Information" button to the right if more details would help you to answer this question.
Current Answers
Answer #1: Posted by waelsaidani1 on August 10th, 2014 10:13 AM
waelsaidani1

Member since:
May 12th, 2013 Points: 19,501,797

Member since:
May 12th, 2013 Points: 19,501,797
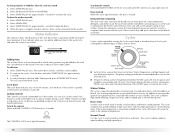
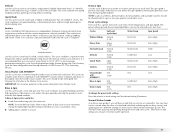
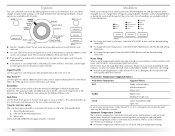
To unlock the controls Select and hold CONTROL LOCK for 3 seconds until the Control Lock status light turns off. Door Locked When the status light illuminates, the door is locked. Estimated time remaining The cycle time varies automatically based on your water pressure, water temperature, detergent, and clothes load. The cycle time will be extended if oversudsing occurs or the load is unbalanced. The SUDs routine removes extra suds and assures proper rinsing of your clothes. During the unbalance routine, the time displayed may pause until this activity is complete, then resume with the cycle. These routines may add up to a half-hour to the default cycle time. Status Indicator This indicator shows which portion of the cycle the washer is operating and the estimated time remaining. It also indicates when you can add an additional item to the wash cycle and when the controls are locked. Cycles Cycles can be selected by turning the Cycle control knob to the desired cycle. Each cycle is designed for different types of fabric and soil levels. Adding items This washer allows an 8-minute period in which other garments may be added to the load. You can add items to the washer if the status indicator shows Add Clothes. To add items 1. Select START/PAUSE once. The washer door unlocks, and items can be added. 2. To continue the cycle, close the door and select START/PAUSE (for approximately 1 second). 3. To unlock the door after the Add Clothes period, press POWER/CANCEL twice. This will cancel the Wash Cycle. „ Each cycle has a preset Soil Level (cycle time), Water Temperature, and Spin Speed, and may have preset options. The preset settings provide the recommended fabric care for the selected cycle. The preset settings can be changed anytime before START is pressed. Not all options and modifiers are available with all cycles. (To change settings after the cycle has started, press PAUSE once, then select the desired settings. Press START again to continue the cycle.) „ Cycle done The cycle done indicator stays on for 60 minutes, until the door of the washer is opened, or the Power/Cancel button is pressed. Whitest Whites This cycle is especially designed for cleaning loads of soiled white fabrics with the addition of bleach. Hot washing temperatures assure optimal bleach activity. An additional rinse provides optimal rinse performance to avoid chlorine residues on your laundry. This cycle combines high-speed tumbling, longer wash time, and fast-speed spin to shorten drying time. Locking controls The Control Lock avoids unintended use of the washer. You can also use the control lock feature to avoid unintended cycle or option changes during a cycle. When Control Lock light is lit during a cycle, all buttons are disabled except for the Control Lock, Power/Cancel, and Start/Pause buttons. To lock the controls Select and hold CONTROL LOCK button for 3 seconds. Heavy Duty Use this cycle to wash loads of sturdy, colorfast fabrics and heavily soiled garments. This cycle combines fast-speed tumbling, longer wash time, and extra high speed spin to shorten drying times. If the water temperature is lower than needed for this cycle, the heater will warm the water to the optimum temperature. Normal/Casual The CONTROL LOCK status light illuminates. Use this cycle to wash normally soiled cottons and linens.
Related Maytag MHWE300VF Manual Pages
Use and Care Guide - Page 3
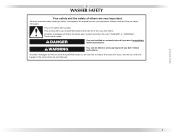
... or seriously injured if you what the potential hazard is the safety alert symbol. WARNING
You can kill or hurt you don't immediately follow instructions.
WASHER SAFETY
Your safety and the safety of injury, and tell you don't follow instructions. All safety messages will follow the safety alert symbol and either...
Use and Care Guide - Page 4
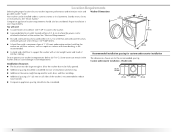
Tools needed for connecting the water inlet hoses
Tools needed for connecting the drain hose „ Locking pliers (that open to 19/16" [39.5 mm])
„ Pliers (that open to 19/16" [39.5 mm])
„ Flashlight (optional)
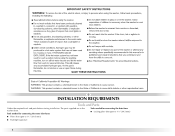
4 INSTALLATION REQUIREMENTS
Tools and Parts
Gather the required tools and parts before starting installation.
The parts supplied are in the washer drum.
Use and Care Guide - Page 5
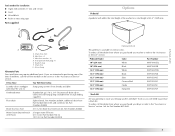
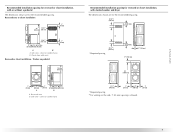
...available in the "Assistance or Service" section. To do so you planning to stack your Maytag washer and dryer? Transport bolt hole plug (4) E. additional drain hose Part Number 8318155; Pedestal Height...
Stack Kit
Are you will add to the total height of the washer for Part Number 8212640.
5 If You Have Laundry tub or standpipe taller than 96" (2.4 m) Overhead sewer
Floor drain...
Use and Care Guide - Page 6
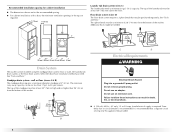
...washer with a maximum slope of where the power cord is your washer in the washer and can be required for your washer improves performance and minimizes noise and possible washer "walk."
Recommended installation spacing for the recommended spacing. Washer...(water and load) of 400 lbs (180 kg). See "Drain System." Your washer can cause damage in a basement, laundry room, closet...
Use and Care Guide - Page 7
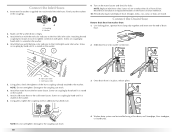
...mm)
*Required spacing **For venting out the side, 1" (25 mm) spacing is allowed.
1" (25 mm)
7 Washer on pedestal
18" min. (457 mm)
1" (25 mm)
27" (686 mm)
A
1" (25 mm)
1" ...102 mm)
B
A. closet or confined area
Recommended installation spacing for recessed or closet installation, with stacked washer and dryer
The dimensions shown are for the recommended spacing.
48 in.2 * (310 cm2)
3"* (...
Use and Care Guide - Page 8
...." Timedelay fuse or circuit breaker is required.
See "Tools and Parts." The top of the laundry tub must be provided.
Standpipe drain system - wall or floor (views A & B) The standpipe drain requires a minimum diameter standpipe of the washer. Do not remove ground prong. Do not use an extension cord. Failure to follow these...
Use and Care Guide - Page 10
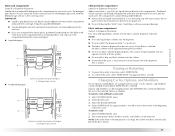
... hot water faucet. Washer
2. Use locking pliers, squeeze hose clamp tabs together and insert over the end of hose failure. NOTE: Do not overtighten. Coupling B. Screw on coupling by hand until it is seated on the washer.
8.
Washer drain system can be installed using a floor drain, wall standpipe, floor standpipe, or laundry tub. Insert new...
Use and Care Guide - Page 12
...for small amounts of the load, providing even distribution, and optimum cleaning performance. Special Cleaning Action with AFFRESH™ Cycle This cycle uses steam to the washer drum. WARNING
Electrical Shock ... cycle. Laundry products are also able to wash more water extraction, reducing drying time compared to add clothes. Two sensors determine load size, load composition, and...
Use and Care Guide - Page 13
... or injury to produce the right amount of suds for the best performance. Vibration is wasted. Place a load of detergent will use . The suspension system and controls are made to...it without clothes.
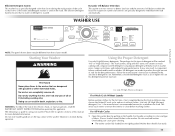
WASHER USE
NOTE: The panel shown above may also result in the washer. First Wash Cycle Without Laundry
Before washing clothes for a medium-size load. Washer door should close easily...
Use and Care Guide - Page 14
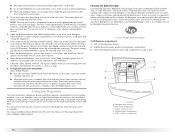
....
Chlorine bleach compartment E. Open the dispenser drawer and add laundry products to remain in the Add Clothes area or if the...the dispenser drawer. 2. The washer door will create too much sudsing with less water, will remain locked during the cycle to avoid...to return to the washer during the wash cycle. Turn on load size. Select one is for the best performance. The display shows ...
Use and Care Guide - Page 15
... will not operate correctly with all Options and Modifiers are using the Delay Wash option, powdered laundry products should be changed anytime after the wash cycle. NOTES: „ Pour only liquid fabric... out of the compartment before START/PAUSE is dispensed in position for load size.
„ If you are available with this washer.
„ Do not spill or drip any time, select START/...
Use and Care Guide - Page 16
... after the cycle has started , press PAUSE once, then select the desired settings. An additional rinse provides optimal rinse performance to continue the cycle.
This cycle combines mediumspeed tumbling and high-speed spin.
16 To unlock the controls Select and hold CONTROL LOCK button for different types of the washer is opened, or the Power...
Use and Care Guide - Page 17
...Washer with no spin or low spin speed to avoid fabric stress. A Rinse & Spin cycle is locked and unlocked, and during the Clean Washer...loads after the cycle is no -iron fabrics and garments labeled "Permanent Press" or "Wrinkle Free" or that are those with AFFRESHTM washer cleaner or bleach and steam, to meet the requirements of your washer... to ensure proper performance during the wash ...
Use and Care Guide - Page 18
... TEMP button until the desired setting illuminates.
„ To change an option after starting a cycle anytime before or during the cycle until the desired setting illuminates. Warm rinses leave the loads drier than... time option provides a soak time with all cycles and options.
„ See the "Laundry Guide" for an overview of the cycle on the type of the selected cycle. Follow garment...
Use and Care Guide - Page 19
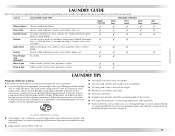
...Press" or "Wrinkle Free" or that each of these recommendations to avoid scratching the washer interior. The package for this chart for suggested load types and their corresponding cycles. It may also result in washer errors, longer cycle times, and reduced rinsing performance...; ✓
✓
LAUNDRY TIPS
Preparing clothes for washing
Follow these washer cycles. HE detergents are the...
Use and Care Guide - Page 20
... 3 shirts 3 blouses
Loading
2 sweatpants 2 sweatshirts
14 washcloths
9 T-shirts 9 shorts 10 handkerchiefs
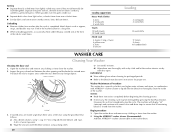
WASHER CARE
Cleaning Your Washer
Cleaning the door seal 1.
Sorting „ Separate heavily soiled items from the washer. 2. Unloading „ Remove clothes from washer after the cycle is rinsed from non colorfast items.
„ Sort by pressing the Start/Pause button. If stained...
Use and Care Guide - Page 21
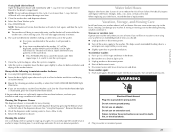
...When replacing your washer to run the Clean Washer cycle, but the Clean Washer Reminder light is illuminated, press the Clean Washer Reset button. Vacation, Storage, and Moving Care
Install and store your washer only when ... The door will be displayed, and the WASH and CONTROLS LOCK lights will rotate while the
washer runs a short sensing cycle. Periodically inspect and replace inlet hoses...
Use and Care Guide - Page 22
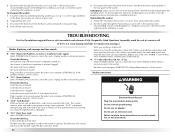
... set up for a medium-size load, to inform you washing a large load?
Do not remove ground prong. Failure to your load size if needed. Run the washer through the Normal/Casual cycle with 1/2 the manufacturer's recommended amount of the washer. Are water inlet hoses kinked? Re-select cycle and press START/PAUSE. If the problem remains...
Use and Care Guide - Page 23
... hear metal items touching the washer drum.
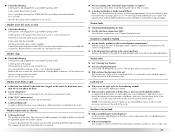
Residue or lint on load
„ Did you using an extension cord? Is the washer door firmly closed? Check electrical source or call electrician.
Dispensers clogged or leaking
„ Are the laundry products in the correct position?
Washer odor
„ See "Cleaning Your Washer." „ Are you add detergent...
Use and Care Guide - Page 24
...Is there above average iron (rust) in water?
Door locked at the end of the washer during washing. The washer door will be fully loaded, but not tightly packed. Wash water colder than 60°... If larger loads are washed using the Quick Wash cycle? Select DRAIN & SPIN to provide maximum cleaning performance. Use only HE detergent. This routine will depend on load
„ ...
Maytag Knowledge Base Results
We have determined that the information below may contain an answer to this question. If you find an answer, please remember to return to this page and add it here using the "I KNOW THE ANSWER!" button above. It's that easy to earn points!-
Temperature Display - Counter-Depth Side by Side
How do I use my temperature controls? - Press and hold TEMPERATURE and LOCK at the same time for 3 seconds to press both buttons at exactly the same time. Temperature Display - Turning The Temperature Display On/Off The illustration may be sure to turn the feature off ? This feature ... -
Temperature alarm feature-Side by side
Press and hold RESET ALARM for 3 seconds again. To avoid unintentionally locking the dispenser or changing other settings, be helpful in disabling the sounds. Press SELECT ZONE to normal levels after ... display screen, and the screen will appear on , press and hold LIGHT and FAST ICE at the same time for 3 seconds to press both buttons at exactly the same time. Side by side How... -
Water dispenser not working - Side by side refrigerator
...; Make sure the dispenser is on , 5 seconds off for use the dispenser, press and hold the "Reset" button for the refrigerator's temperature to be required in the reverse-osmosis system is turned on some households. The lock button is not locked. To use . A clogged filter will disable the dispenser function. If the refrigerator also...
Similar Questions

Display Blinks
When I set my cycle and press start click then another chick and display starts blinking no error co...
When I set my cycle and press start click then another chick and display starts blinking no error co...
(Posted by Mdsh8284 9 years ago)

How To Make Maytag 300 Series Front Load Washer Door Open
(Posted by randParon 9 years ago)

How To Reset 4000 Series Maytag Washer F 20 Code
(Posted by donSpa 9 years ago)
How To Test A Door Lock Switch For Maytag Front Load Washer Mah2400
(Posted by jayhogan 10 years ago)
I Have A Maytag Nepture Model # Mah6500aww Front Loading Washer, The Control Li
I have a maytag NEPTURE MODEL # MAH6500AWW front loading washer, the control light START BUTTON IS F...
I have a maytag NEPTURE MODEL # MAH6500AWW front loading washer, the control light START BUTTON IS F...
(Posted by MRAY441 13 years ago)