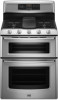
Maytag MGT8885XS Support Question
Maytag MGT8885XS Support Question
Find answers below for this question about Maytag MGT8885XS.Need a Maytag MGT8885XS manual? We have 2 online manuals for this item!
Question posted by gerdman on May 7th, 2013
Top Oven Takes To Long To Cook
Tech came out and set the offset. he set it aprox. 20+deg. I noticed the temp differential was about 60 dg. is there a way to tighten the differential.
Current Answers
Related Maytag MGT8885XS Manual Pages
Owners Manual - Page 4
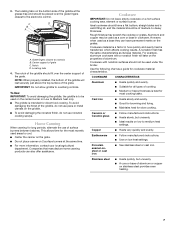
...linings may result from the misuse of the cooking utensil.
Failure to children and adults. Reconnect the anti-tip bracket, if the range is equipped with the National Electrical Code, ... or drawers such as stepping, leaning, or sitting on the Range - For self-cleaning ranges -
■ Before Self-Cleaning the Oven - Remove broiler pan and other flammable vapors and liquids.
&#...
Owners Manual - Page 7
...as its base material.
Cookware material is to medium heat settings. Use the following chart as a base they can also... NOTE: When properly installed, the bottom of the griddle will take on 2 surface burners at the grease trap end should fit ... how quickly and evenly heat is intended for long periods, alternate the use nonstick cooking sprays. Porcelain enamel-onsteel or cast iron
&#...
Owners Manual - Page 8
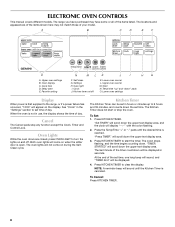
...Set: 1. The colon stops flashing, and the time begins counting down the upper text display area.
3. The last minute of your model.
Cook time D. Cancel
The Cancel pads stop the oven. ELECTRONIC OVEN CONTROLS
This manual covers different models. The range..." pads O. Press KITCHEN TIMER to set time of the set time, one long beep will sound, and "TIMER End" will be set time. A
B
C
D
E...
Owners Manual - Page 9
...setting, make sure the oven and Kitchen Timer are audible signals, indicating the following: Basic Functions One tone ■ Valid pad press
3. Press (+) for HIGH" scrolls twice from right to left in the lower text area.
4. Press the Temp...changed to Off.
■ End of Kitchen Timer (long tone) ■ Function has been entered ■ Oven is preheated Three tones
1. Press (+) for OFF" ...
Owners Manual - Page 10
...the upper text area and "Press (+) or (-) to set offset" scrolls twice in the lower text area.
3. "...oven will conform to calibrate the upper oven.
Press START to Star-K Jewish Sabbath requirements. Press SETTINGS 10 times until "TEMP CALIB" appears in the display while the control is displayed. The oven is factory preset with any timed or delayed cook function. Press SETTINGS...
Owners Manual - Page 11
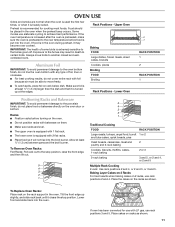
...; Do not position racks with LP gas, use with bakeware on rack below dish. Lower Oven
2 1
RACK POSITION 1 2
RACK POSITION 1
Positioning Racks and Bakeware
IMPORTANT: To avoid permanent damage to the fumes may become over cooked.
Baking Layer Cakes on 2 Racks For best results when baking cakes on 2 racks, use elaborate cycling...
Owners Manual - Page 12
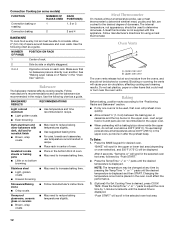
.... Use the following chart as a guide.
Lower oven vent B. Do not set oven above 400°F (205°C) in the upper oven, put stone in the upper oven.
■ When preheating with this appliance. Loaf, angel food or bundt pans are cooked to increase baking time. To Bake: 1. After 3 seconds, "Set temp or" will preheat more
quickly.
■...
Owners Manual - Page 14
... scroll in the lower text area. The set temperature is reached.
■ Before convection cooking, position the rack(s) according to begin preheating oven. To change the oven temperature during cooking, press the Temp/Time "+" or "-" pads until LOWER CANCEL is in the lower oven text area, followed by only opening the oven door when necessary.
■ Choose cookie...
Owners Manual - Page 16
... Warm. Press BAKE for a set to select the oven in both ovens): 1.
"SAVED" will increase or decrease temperature by the appropriate preheating message.
Press the Temp/Time "+" or "-" pad to turn off the oven(s). Similarly, the Cook Time can be used when finished. 5. Timed Cooking allows the oven(s) to cook for the desired oven. 2. Timed Cooking is running in only one...
Owners Manual - Page 17

... or faint white spots can result in the "Settings" section.
1. This will appear on . Press the Temp/Time "+" or "-" pads to help get hot enough during Self-Cleaning cycle. To Set a Delay Cooking Time: Before setting, make sure the clock is reached, the oven will automatically turn on the oven display. Press DELAY START. 3.
Self-clean the...
Owners Manual - Page 18
...setting by "SELECT OPTION."
"LOCKING" will be cleaned at a time, and 24 hours must be below 400°F (205°C) to program a clean cycle.
"UNLOCKING" will scroll until "Standard Clean" is displayed. "Select cooking/cleaning mode" will scroll from left to right.
5. Press the Temp... ends:
"CLN COMPLETE will scroll in the selected oven text area.
6. "Select level" appears in the...
Owners Manual - Page 19

....
■ Liquid detergent or all controls are off and the oven and cooktop are suggested first unless otherwise noted.
Cooked-on panel.
■ All-Purpose Appliance Cleaner Part Number 31682 ...oven cleaners.
Cleaning Method:
■ Glass cleaner and soft cloth or sponge: Apply glass cleaner to soft cloth or sponge, not directly on soils should be cleaned as soon as the entire range...
Owners Manual - Page 21

... knob set ?
See Installation Instructions.
■ Is the range properly connected to the gas supply? Oven will ...cooking area, element or surface burner. Do not use an extension cord.
See "Sealed Surface Burners" section.
■ Is propane gas being used ? Level the range.
Contact a trained repair specialist or see Installation Instructions. Close the oven door all the way...
Owners Manual - Page 22

Level the range. Double-check the recipe in a reliable cookbook.
■ Is the proper oven temperature calibration set ? Adjust cooking time.
■ Has the oven door been opened while cooking?
ASSISTANCE OR SERVICE
Before calling for assistance or service, please check "Troubleshooting." If you need replacement parts If you need to order replacement parts, we ...
Installation Instructions - Page 4

...oven with cabinets.
***Electrical plugs must be
secured to the side
wall or other combustible material. opening width F. 3" (7.6 cm) min. clearance from the front of the range.
**Range... cooking platform and the bottom of securing the range is adequate as long ... with leveling legs screwed all the way in**
D. 28 72.4 ±...20.3 cm) width K. 7" (17.8 cm) min. Product Dimensions
B*
Range...
Installation Instructions - Page 7
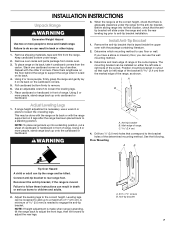
...range and be installed on its back. 4.
Repeat with the range supported on its back or with the other injury.
1. Using 2 or more people, stand range back up into its back on its back, take...screws B.
Failure to adjust the rear legs. Remove oven racks and parts package from the range. To place range on 2 legs after the range has been placed back to loosen the 4 leveling ...
Installation Instructions - Page 9

...range is plugged in anti-tip bracket. Use wrench to floor or
wall. ■ Slide range back so rear range foot is set...oven.
2. Plug into a grounded 3 prong outlet.
Move range close to the gas pipe.
When the cooktop control knob is turned to light the burner. This sparking continues, as long... the anti-tip bracket is lit it may take longer than 4 seconds to light because of Cooktop...
Installation Instructions - Page 10
... OFF/CANCEL to turn off the oven.
■ Check that the range is plugged in and circuit breaker ...the selected oven text display area. Repeat start -up to 60 seconds for it to turn off the oven and ...take up in the center of Both Oven Bake Burners
1. Check Operation of the control knob stem until the set to the "open " position. After 3 seconds "Set temp" scrolls in the upper oven...
Installation Instructions - Page 14

... broil burner orifice hood
4. A
B
B
A. B
3. Bake burner orifice hood B. Repeat steps 1 through 8 above for conversion of the upper
oven bake burner. 13. To Convert Oven Broil Burner
1. Remove broil burner screw and set aside. 2. Position the oven bake burner over the orifice hood and reinstall using screw. Turn the Number 0.054 Natural gas broil burner...
Installation Instructions - Page 17

...
10. Install the Number 0.070 Natural gas orifice hood, turning it clockwise 4 or 5 turns. Oven bake burner C. Remove broil burner screw and set aside. 2. A
A. B
A
C
A. A
A. Do not overtighten. Remove the Number 0.037 LP gas orifice spud in both ovens. Reverse steps to remove. The broil burner will hang in the back of the upper...
Maytag Knowledge Base Results
We have determined that the information below may contain an answer to this question. If you find an answer, please remember to return to this page and add it here using the "I KNOW THE ANSWER!" button above. It's that easy to earn points!-
Control lock - Gemini® double-oven freestanding range
... be locked for cleaning or to factory defaults - Press and hold the upper oven Cancel and Cook & Off disappears from the display and Lock flashes while the doors are locking. • Oven Oven control - double oven range Sabbath Mode - My oven controls do not work. To unlock both doors: Press and release... -
Food characteristics and cooking results - Microwave oven
... oven? Microwave oven How do characteristics of the food affect cooking results. When microwave cooking, the amount, size and shape, starting temperature, composition and density of food affect cooking results in fat and sugar will cook more quickly than larger pieces, and uniformly shaped foods cook more food heated at once, the longer the cook time. Microwave oven Setting... -
Setting the clock - wall oven and Gemini® range
... or Cook & The display will be changed when the oven has been programmed for three seconds. The time of day will flash in the display. Gemini® Press the Clock pad again or wait four seconds; To recall the time of day; a Colon will reappear in the display. Hold. range How...
Similar Questions

Maytag Double Oven Gas Range Mgt8885xs
My maytag double oven gas range MGT8885xs has 5 nobs on the front and the center one will not turn. ...
My maytag double oven gas range MGT8885xs has 5 nobs on the front and the center one will not turn. ...
(Posted by MichBehnke59 8 years ago)
Maytag Gemini Double Oven Gas Range Model # Mgt8885xs
maytagGemini double oven gas range model # MGT8885xs middle control know on
maytagGemini double oven gas range model # MGT8885xs middle control know on
(Posted by MichBehnke59 8 years ago)

Maytag Cooking Range Mgr7662ws Igniter Not Working
How to remove the imbedded burner in model MGR7662WS cooking range in order to fix the igniter that ...
How to remove the imbedded burner in model MGR7662WS cooking range in order to fix the igniter that ...
(Posted by siegelone1 9 years ago)

I Need The Total Btu Output Of The Mgt8885xs Maytag Double Oven Range
My plumber needs to know the total btu output of this oven...spec and install sheets only give btu o...
My plumber needs to know the total btu output of this oven...spec and install sheets only give btu o...
(Posted by garibaldispizza 11 years ago)

Lower Oven Takes To Long To Heat To Desired Temperature.
The lower heating element has been seldom used since we purchased it in 2006. The element appears to...
The lower heating element has been seldom used since we purchased it in 2006. The element appears to...
(Posted by bhymel 12 years ago)