Maytag MGD6000AG Support Question
Maytag MGD6000AG Support Question
Find answers below for this question about Maytag MGD6000AG.Need a Maytag MGD6000AG manual? We have 4 online manuals for this item!
Question posted by chrisschubach on May 13th, 2015
After The Cycle Is Done The Lights Stay On, And I Have To Push And Hold Start C
The person who posted this question about this Maytag product did not include a detailed explanation. Please use the "Request More Information" button to the right if more details would help you to answer this question.
Current Answers
Answer #1: Posted by Odin on May 13th, 2015 10:23 AM
Odin

Member since:
April 10th, 2010 Points: 41,236,690

Member since:
April 10th, 2010 Points: 41,236,690
Your question was truncated on account of your attempting to squeeze the entire question into the title--and I can't guess what your question is. However, I hope the following will solve: Go to http://www.repairclinic.com/RepairHelp/Dryer-Repair/8-4--TUdENjAwMEFH/Maytag-Dryer-Troubleshooting, and look for the link that reflects your issue.
If this suggestion doesn't solve, please resubmit, taking care to fill the field for Question Details.
Hope this is useful. Please don't forget to click the Accept This Answer button if you do accept it. My aim is to provide reliable helpful answers, not just a lot of them. See https://www.helpowl.com/profile/Odin.
Related Maytag MGD6000AG Manual Pages
Warranty Information - Page 1

... than the limited warranty that existed when this major appliance was purchased. MAYTAG® LAUNDRY WARRANTY
LIMITED WARRANTY
For one year from the date of purchase, when this major appliance...this limited warranty. Damage resulting from unauthorized modifications made to repair or replace appliance light bulbs, air filters, or water filters. Some states and provinces do not allow ...
Use & Care Guide - Page 5

...5 n Clear away items from the entire length of who installed the dryer. During Sensor Cycles, drying air temperature and moisture level are not covered by the warranty and ... be sure to efficiently dry laundry. See Installation Instructions. The venting system attached to provide optimal energy savings.
When cleaning is best for reducing light wrinkles from your energy savings....
Use & Care Guide - Page 6

... length of cycles.
3 START Touch and hold until the LED comes on all features and cycles are registered, touch the control panel with your finger tip, not your fingernail. To ensure your selections are available on to start a cycle, or touch once while a cycle is in process to pause it.
4 TIMED DRY ADJUST for your laundry load. Turn...
Use & Care Guide - Page 7

... reduce wrinkling.
The number of moisture into the load to take clothes out of the dryer and avoid an accidental change in the dryer for Timed Cycles) will also turn on when the door is for the Sanitize cycle), if desired. The light will be used with all settings are available on or off . The...
Use & Care Guide - Page 8

...,
Bedding
Medium
More
55
Damp Dry Signal
pillows Normal
Wrinkle Prevent†
Less
Steam Boost
Cycle Details:
Offers stepped drying starting with High heat followed by Medium heat for each cycle. do not overfill dryer drum. Large load: Fill the dryer drum up to provide optimal energy savings. Uses Medium heat to about 1/2 full. This...
Use & Care Guide - Page 9

... shown in bold are unsure of fabrics in the dryer too long.
The time will adjust with High and Medium Drying Temperature settings. Load Size Recommendations For best results, follow the load size recommendations noted for items that cycle. Do not overload. Touch and hold to increase or decrease the time in 5-minute...
Use & Care Guide - Page 10

... screen straight up. Place laundry in the dryer. Close the door. Load the dryer
4. Open the door by pulling on all cycles are on the handle. ...Push the lint screen firmly back into place. Add a dryer sheet to persons, read the IMPORTANT SAFETY INSTRUCTIONS before each cycle. See the "Cycle Guide" for your fingers. IMPORTANT: Do not tightly pack the dryer. USING YOUR DRYER...
Use & Care Guide - Page 11

...1-minute increments. Touch and hold START to begin cycle
10-cycle model shown
You may change the drying settings: NOTE: The settings cannot be changed while the dryer is set, it cannot... running or paused. Select 1-3, 4-6, or 7-9 garments. The time will adjust with Steam: Reduces light wrinkles from loads consisting of your loads on fabric type, load size, and dryness setting. Your ...
Use & Care Guide - Page 12

... plastic must be used with the holes in the cycle by using the Air Only setting.
6. Start the dryer.
NOTE: Steam Boost is a blocked vent or low airflow. Sensing The Sensing indicator will light if there is not available on all models or on the dryer back ledge.
3. Check Vent The Check Vent indicator will...
Use & Care Guide - Page 13

.... See "Venting Requirements" in front of laundry in the Installation Instructions. Thoroughly dry lint screen with the brush to stop before your fingers. Wet lint is completely dry. These stains are not harmful to dry drum OR Use a microfiber cloth and hot water in dryer.
13
Push the lint screen firmly back into...
Use & Care Guide - Page 14

...the water inlet hose from
faucet; See "Cleaning the Lint Screen." 3.
To Winterize the Dryer 1.
Make sure leveling legs are at home. Disconnect wiring. 3. Use tape to a ...dryer. Transport hose separately. 5. Because some water may stay in the hose, freezing can damage your dryer for an extended period of hose failure. Unplug dryer or disconnect power. 2. For direct-wired dryers...
Use & Care Guide - Page 15

... or flexible metal vent.
The drum may be in dryer.
Thumping noise
Rattling or vibrating noise
Dryer hasn't been used during Sensor cycles. See the Installation Instructions.
Hold your hand under the outside exhaust hood is normal. Use 4" (102 mm) diameter vent material. See "Cycle Guide."
15 START not touched firmly or held long enough.
Incorrect...
Use & Care Guide - Page 16

... your garments. The air outlet grille is not blocked by dyes in clothes. Use only one to both the faucet and dryer's water inlet valve. Clothes are coming out of the cycle. Change the dryness level setting on the load size.
Do not use it is just inside the door, behind the...
Use & Care Guide - Page 17

....
"Check Vent" cycle status indicator lights up (blocked vent or low airflow condition)
The lint screen or vent is properly installed.
Select a Sensor cycle with a high temperature setting. Electric dryers use two household fuses or breakers. Select a Timed Dry heated cycle, and restart the dryer.
To unlock the control, touch and hold START to the dryer. If the message...
Use & Care Guide - Page 18

... appliance is used in materials or workmanship and is reported to repair or replace appliance light bulbs, air filters, or water filters. This warranty gives you specific legal rights, ...9900. Dealer name Address Phone number Model number Serial number Purchase date
18 MAYTAG® LAUNDRY WARRANTY
LIMITED WARRANTY
For one year from the date of purchase, when this major appliance...
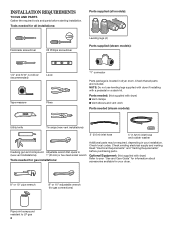
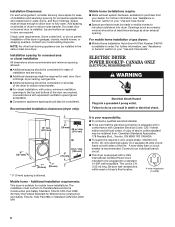
Installation Guide - Page 4
... wrench
Tools needed for all installations:
Parts supplied (all parts are included. Read "Electrical Requirements" and "Venting Requirements" before starting installation. NOTE: Do not use leveling legs supplied with dryer if installing with dryer) Refer to LP gas
4 Check existing electrical supply and venting.
INSTALLATION REQUIREMENTS
TOOLS AND PARTS Gather the required tools...
Installation Guide - Page 5
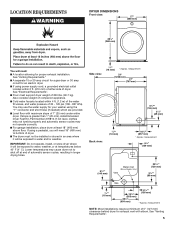
... and/or weather. Side view:
3/4"* (18 mm)
* Approx.
measurement
Back view:
* Approx. If not level, clothes may not tumble properly and automatic sensor cycles may not operate correctly.
■■For garage installation, place dryer at temperatures below 40° F (4° C).
measurement
NOTE: Most installations require a minimum of 5" (127 mm) clearance behind...
Installation Guide - Page 6
... Standard, Title 24 CFR, Part 3280 (formerly the Federal Standard for walls, doors, and floor moldings. Be sure wall receptacle is within reach of gas dryers: ■■Mobile Home Installation Hold-down Kit Part Number 346764
is installed, top and bottom air openings in the same closet as...
Installation Guide - Page 15
... the 4 screws in your tools. COMPLETE INSTALLATION CHECKLIST
q Check that all parts are on.
All Models:
q Select a Timed Dry heated cycle, and start of your "Use and Care Guide". If dryer will not start, check the following instructions are for leaks.
The odor will reduce product performance. Tools needed:
Min. 8" long TORX® †...
Installation Guide - Page 18

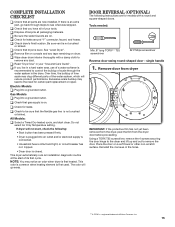
...hinge and latch
Latch
9. Reinstall door on dryer
Using a TORX T25 screwdriver, reinstall the latch plate, latch backing plate, and hinge assembly on the dryer. Reinstall the 10 screws securing the inner door...remove the 3 TORX screws securing the latch plate and latch backing plate and the 5 screws holding the hinge assembly in place with the inside of the door facing up. R einstall hinge ...
Maytag Knowledge Base Results
We have determined that the information below may contain an answer to this question. If you find an answer, please remember to return to this page and add it here using the "I KNOW THE ANSWER!" button above. It's that easy to earn points!-
Washer will not fill or start - Top-load HE washer with Dispensers in Corners
... cycle? Is there oversudsing? Cancel the current cycle. Washer will not fill or start - Display shows an error code - Top-load washer with only one second? The water level on . Press and hold Start for... lid before starting - Turn off throughout the wash. Is the Delay Wash status light on? (on some models only) Your washer will not be opened between cycles, the washer... -
Washer will not fill or start - Bravos washer with agitator
...;knob pointer is wet, there may not start . Press and hold Start for the load size. Select Spin Only to not completely fill? Is there oversudsing? Are you using Auto Water Level? Is the Delay Wash status light on? (on . Are both faucets for leaks. Some cycles use an extension cord. Bravos washer with... -
Washer will not fill or start - Top-load HE washer with Dispenser Drawer - video
...? Turn off throughout the wash. The washer will start - Press and hold Start for draining. As long as a status light is added to the load. The washer will not fill or start after the selected hours of water has been added to start a new cycle. If the lid is on the water...
Similar Questions

Check Lint Light Comes On
My Maytag MGDB725BW0 is not working properly. When ready to start the dryer the led reads 40 minutes...
My Maytag MGDB725BW0 is not working properly. When ready to start the dryer the led reads 40 minutes...
(Posted by eid00 4 years ago)

Maytag Dryer Lights Up But Wont Start
(Posted by threemoncad 9 years ago)

Maytag Epic Dryer Sensing Light Stays On Will Not Start Cycle
(Posted by rogeronghw 9 years ago)

Which Wire Go Where On The Back Of The Push To Start Switch. Model Medc400vw
dryer. one black wire one white wire.
dryer. one black wire one white wire.
(Posted by tarena 10 years ago)

Select Cycle Knob Wont Push In On Maytag Dryer
(Posted by mceadun 10 years ago)