Maytag MEW9530AW Support Question
Maytag MEW9530AW Support Question
Find answers below for this question about Maytag MEW9530AW.Need a Maytag MEW9530AW manual? We have 4 online manuals for this item!
Question posted by fflook on August 7th, 2012
Maytag Built-in Oven Mew9530aw
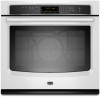
When the oven is turned off the fan continues. How can the fan be turned off after cooking? The noise is not pleasant whilst eating dinner
Current Answers
Related Maytag MEW9530AW Manual Pages
Energy Guide - Page 1
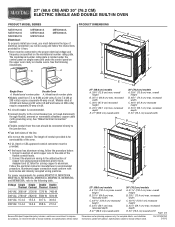
...AND DOUBLE BUILT-IN OVEN
PRODUCT MODEL SERIES
PRODUCT DIMENSIONS
MEW7527A MEW7627A MEW9527A
MEW9627A MEW7530A MEW7630A
MEW9530A MEW9630A
Electrical:
To properly install your oven, you ...A
208 VAC 13.4 A 13.6 A 26.8 A 27.0 A
Because Whirlpool Corporation policy includes a continuous commitment to improve our products, we reserve the right to the added section of 2
Dimensions are for serviceability of...
Energy Guide - Page 2
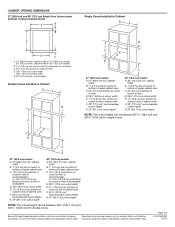
...(76.2 cm) min. Because Whirlpool Corporation policy includes a continuous commitment to change without cooktop installed above)
A
B
Single Ovens Installed in Cabinet
A
B
D F
G E
C
B...min. For complete details, see Installation
our products, we reserve the right to improve
Dimensions are for single ovens.
27" (68.6 cm) models
A. 27" (68.6 cm) min. Specifications subject to floor
D. ...
Installation Guide - Page 1
... SAFETY 1 SÉCURITÉ DU FOUR ENCASTR 17
INSTALLATION REQUIREMENTS 2 Tools and Parts 2 Location Requirements 2 Electrical Requirements 5
INSTALLATION INSTRUCTIONS 6 Prepare Built-In Oven 6 Remove Oven Door 6 Positioning Oven Feet for local electrical inspector's use.
W10351242B All safety messages will tell you what can kill or hurt you don't immediately follow the safety...
Installation Guide - Page 2

... used .
INSTALLATION REQUIREMENTS
Tools and Parts
Gather the required tools and parts before starting installation. Read and follow the instructions provided with cooktop installed above):
Ovens approved for 30" (76.2 cm) models.
bottom vent ■ Four #8-18 x ¹⁄₄" screws - See "Electrical Requirements." It is installed in accordance with the...
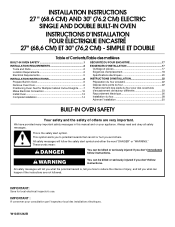
Installation Guide - Page 3
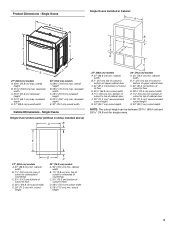
...;⁄₄" (59.1 cm) max. top of cutout to floor
D. 25¹⁄₂" (64.8 cm) cutout width
E. 28" (71.2 cm) min. cutout height
3 Single Ovens
Single Oven Undercounter (without cooktop installed above)
A
B
C
27" (68.6 cm) models
A. 27" (68.6 cm) min. bottom of
cutout to top of cutout to underside of countertop...
Installation Guide - Page 4
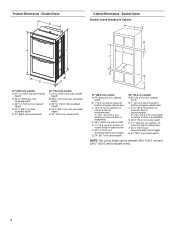
....2 cm) overall width
G E
C
27" (68.6 cm) models
A. 27" (68.6 cm) min. D. 25¹⁄₂" (64.8 cm) cutout width
E. 1¹⁄₂" (3.8 cm) min. Double Ovens Double Ovens Installed in Cabinet
A
A
C
B
D F
E
D
27" (68.6 cm) models
A. 51 130.0 cm) max. overall height
B. 28½" (72.4 cm) max. cabinet width
B. 1" (2.5 cm) top of cutout...
Installation Guide - Page 5

...This oven must be obtained from:
National Fire Protection Association 1 Batterymarch Park Quincy, MA 02169-7471
CSA International 8501 East Pleasant ... recommended that a qualified electrical installer determine that the electrical connection and wire size are not sure the oven is properly grounded. Voltage
Single
Single
Thermal Convect
Double Double Thermal Convect
240 VAC 4090 W 4120 W...
Installation Guide - Page 6
....
3. A
B
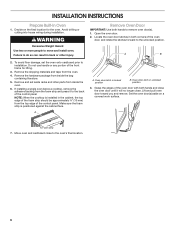
2. Remove the hardware package from the oven.
4. Avoid drilling or cutting into house wiring during installation. Oven door latch in unlocked position
3. Do not use handle or any portion of the oven door, and rotate the latches forward to remove oven door(s).
1. INSTALLATION INSTRUCTIONS
Prepare Built-In Oven
1. Remove Oven Door
IMPORTANT: Use both corners of the...
Installation Guide - Page 7
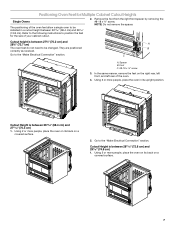
... instructions to position the feet for Multiple Cabinet Cutout Heights
Single Ovens
The positioning of the oven feet allow a single oven to be installed in its back on the right rear, left... spacer by removing the #8-18 x ³⁄₈" screw. Using 2 or more people, place the oven in a cutout height between 28 72.8 cm) and 29 74.8 cm) 1.
Cutout Height is between 26...
Installation Guide - Page 8
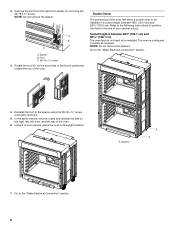
... of your cabinet cutout. Cutout height is configured correctly as received. NOTE: Do not remove the spacers. Go to the "Make Electrical Connection" section.
4.
The oven is between 48⁷⁄₈" (124.1 cm) and 52 132.6 cm). Reinstall the foot to be installed in its upright position. Foot C. #8-18 x ³...
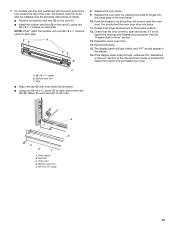
Installation Guide - Page 9
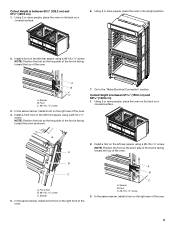
... screw
3. NOTE: Position the foot so the long side of the foot is facing
A
toward the top of the oven. Go to the "Make Electrical Connection" section.
A
B
C
A. Spacer B. Install a front foot on the left....2 cm) and 51¹⁄₈" (129.9 cm)
1. Using 2 or more people, place the oven in its back on the left rear spacer using a #8-18 x ³⁄₈" screw. Install a...
Installation Guide - Page 10
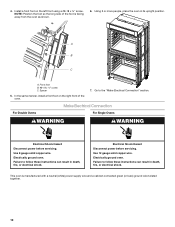
... can result in death, fire, or electrical shock. Failure to the "Make Electrical Connection" section. Electrically ground oven.
Go to follow these instructions can result in its upright position. This oven is facing away from the oven as shown.
6. Spacer
5.
Electrical Shock Hazard Disconnect power before servicing. In the same manner, install a front...
Installation Guide - Page 11
...
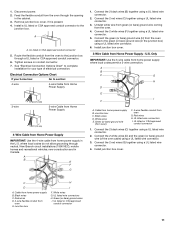
Black wires C. Junction box
H
I
F
A. UL listed wire connectors H.
Connect the 2 white wires (F) together using a UL listed wire connector.
2. Only
IMPORTANT: Use the 3-wire cable from
oven E. Red wires D. 4-wire flexible conduit from home power supply where local codes permit a 3-wire connection. White wires G. Feed the flexible conduit from home power supply...
Installation Guide - Page 13
...vent (C) using two #8-18 x ¹⁄₄" screws on each side. See the "Prepare Built-In Oven" section.
13. Reconnect power.
15. The display panel will go and open and close. Vent...vent (C). ■ Install the bottom vent trim (B) to open the oven door. Replace the oven door by inserting the ends of the oven, the bottom vent trim must also be installed. See the following instructions...
Installation Guide - Page 14

.... NOTE: Press UPPER BROIL or LOWER BROIL on single ovens. Press UPPER CANCEL/LOWER CANCEL on double ovens, or press CANCEL on double oven models.
4.
Turn power on single oven models. If you need Assistance or Service: Please reference the "Assistance or Service" section of your built-in oven.
14 For more information, read the Use and...
Warranty Information - Page 1
... is covered by Maytag.
5. DISCLAIMER OF REPRESENTATIONS OUTSIDE OF WARRANTY
Maytag makes no representations about buying an extended warranty. If you . MAYTAG® BUILT-IN ELECTRIC OVEN WARRANTY
FIRST YEAR ...not include labor.
■ Electric bake, broil and convection elements (excludes convection fan and motor assembly)
YOUR SOLE AND EXCLUSIVE REMEDY UNDER THE LIMITED WARRANTY SHALL BE ...
Use & Care Guide - Page 1
BUILT-IN ELECTRIC SINGLE AND DOUBLE OVENS
Use & Care Guide
For questions about features, operation/performance, parts, accessories or service, call: 1-800-688-9900 In Canada, call: 1-800-807-6777 or visit our website at
www.maytag.com or www.maytag.ca
FOURS ÉLECTRIQUES ENCASTRÉS À CONVECTION SIMPLE ET DOUBLE
Guide d'utilisation et...
Use & Care Guide - Page 14

... intervals. Press the quickset pad below Convect Bake.
2. WARNING
Burn Hazard Use an oven mitt to enter a desired cooking temperature. After preheat, the convection element (depending on the model), bake element, broil element and fan (depending on model) will turn on again approximately 30 seconds after the rack position number indicates that the roll...
Use & Care Guide - Page 19

... cycle. Do not clean, rub, damage or move or bend the gasket. Cook Timer
The Cook Timer allows the oven to cook for 3 seconds. Select the desired Mode, then press the quickset pad below Ok... foods react with Adjustable Levels and Auto Lock
WARNING
Burn Hazard Do not touch the oven during self-clean to turn on at the appropriate time. See the "Delay Start" section for food such as ...
Use & Care Guide - Page 24

... not include labor.
■ Electric bake, broil and convection elements (excludes convection fan and motor assembly)
YOUR SOLE AND EXCLUSIVE REMEDY UNDER THE LIMITED WARRANTY SHALL BE PRODUCT... and you should ask Maytag or your major appliance is covered by a Maytag designated service company.
In Canada, call 1-800-688-9900. MAYTAG® BUILT-IN ELECTRIC OVEN WARRANTY
FIRST YEAR LIMITED ...
Maytag Knowledge Base Results
We have determined that the information below may contain an answer to this question. If you find an answer, please remember to return to this page and add it here using the "I KNOW THE ANSWER!" button above. It's that easy to earn points!-
Clock setttings - Wall oven
... Clock pad. The time of day will remain on my built-in the display. The time of day flashes in wall oven. Hold. Wall oven Setting the clock on . To cancel the clock display: If... Mode to briefly display the time of day. NOTE: The oven clock can be set at the factory for Delay Cook, Clean, or Cook & To set the clock" below. When the clock display is... -
Setting the clock - wall oven and Gemini® range
...set the clock on a built-in wall oven or Gemini ® Hold. The time of day; To "wake up" the control from the display. A double beep will not operate. Oven Sabbath Mode - Oven Restore to set the clock:...go into Standby Mode to display, press and hold the Cancel and Clock pads for Delay Cook or Clean or Cook & To cancel the Clock display: If you do not want the time of day.&... -
Purchasing compactor bags
... needs updating and/or additional information The answer could be improved Thank you money. | Laundry Overview Washers Dryers Accessories Refrigeration Refrigerators Freezers Cooking Ranges Built-In Ovens Cooktops Microwaves Hoods Dishwashers & Kitchen Cleaning Dishwashers Disposers Compactors Kitchen Suites Whole Home New Products Product Registration Product Help Manuals & Literature Service...
Similar Questions

Oven Randomly Beeps
Oven randomly beeps when started continues beeping while cooking and also continues beeping when ove...
Oven randomly beeps when started continues beeping while cooking and also continues beeping when ove...
(Posted by mlinski1 3 years ago)

My Oven Won't Heat. I Used The 'keep Warm' Function And Forgot To Turn It Off.
My oven won't heat. I used the "keep warm" function and forgot to turn it off. I was too focused on ...
My oven won't heat. I used the "keep warm" function and forgot to turn it off. I was too focused on ...
(Posted by aliciadowne 4 years ago)

Maytag Cwe5800acb - 24 Inch Double Electric Wall Oven
My oven was recently taken out for kitchen repairs and reinstalled. Now when I use upper oven the fa...
My oven was recently taken out for kitchen repairs and reinstalled. Now when I use upper oven the fa...
(Posted by nanalindab 8 years ago)

Maytag Double Wall Oven Mew7630wds
My oven was turned off after using today, panel was black. 2 hours later I went to kitchen and oven ...
My oven was turned off after using today, panel was black. 2 hours later I went to kitchen and oven ...
(Posted by sklarsky 9 years ago)

Maytag Performa 8114p732-60 Oven Not Turning On.
the stovestop burner work. when I try to turn on the the oven the door lock starts blinking and wont...
the stovestop burner work. when I try to turn on the the oven the door lock starts blinking and wont...
(Posted by senokian 9 years ago)