
Maytag MER8650FZ Support Question
Maytag MER8650FZ Support Question
Find answers below for this question about Maytag MER8650FZ.Need a Maytag MER8650FZ manual? We have 4 online manuals for this item!
Question posted by janetfryar2 on February 10th, 2020
Storage Drawer
How do you remove the storage drawer at the bottom of the range
Current Answers
Answer #1: Posted by Odin on February 10th, 2020 4:47 PM
Odin

Member since:
April 10th, 2010 Points: 41,236,630

Member since:
April 10th, 2010 Points: 41,236,630
See https://manualsbrain.com/en/manuals/852606/?page=13.at the right. If you require further advice, or if those instructions do not seem to apply to your model, consider https://www.youtube.com/watch?v=v0Wft8GJ0bg. Otherwise, you'll have to consult Maytag. (You can if necessary find the contact information at https://www.contacthelp.com.)
Hope this is useful. Please don't forget to click the Accept This Answer button if you do accept it. My aim is to provide reliable helpful answers, not just a lot of them. See https://www.helpowl.com/profile/Odin.
Related Maytag MER8650FZ Manual Pages
Installation Guide - Page 1
...Verify Anti-Tip Bracket Is Installed and Engaged 12 Level Range 13 Warming Drawer or Premium Storage Drawer 13 Storage Drawer 14 Oven Door 14 Complete Installation 14 Moving the Range 15
IMPORTANT:
Save for local electrical inspector's use. Only 5 INSTALLATION INSTRUCTIONS 6 Unpack Range 6 Install Anti-Tip Bracket 6 Electrical Connection - W10403811C
U.S.A. U.S.A. INSTALLATION...
Installation Guide - Page 3
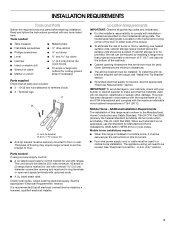
...range is located on the frame behind a top corner of the door or either side of the drawer.
■ To eliminate the risk of burns or fire by reaching over heated surface units, cabinet storage...8309;⁄₈" screws (2)
■ Anti-tip bracket must be revised.
If cabinet storage is the installer's responsibility to floor or wall.
INSTALLATION REQUIREMENTS
Tools and Parts
Gather ...
Installation Guide - Page 4
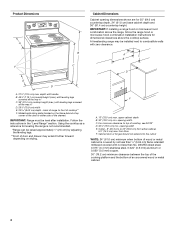
... either side of cooktop, see NOTE* D. 30¹⁄₈" (76.5 cm) min.
A
C
B
D
E
D
A. 27³⁄₄" (70.5 cm) max. back of range to top of the drawer)
IMPORTANT: Range must be level after installation. Model/serial rating plate (located on styling. For minimum clearance to front of wood or metal cabinet is...
Installation Guide - Page 5

... on the back of slack in a risk of the drawer. Refer to the neutral by a qualified electrician. If connecting to a 4-wire system:
This range is manufactured with a nominal 1³⁄₈" (34...or open -end spade terminals with the neutral terminal connected to 91.4 cm) of the range inside a clear plastic bag. Only" section. Electrical Requirements - The fourth (grounding) ...
Installation Guide - Page 6
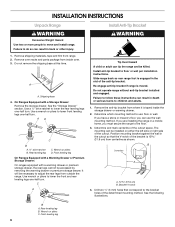
... and parts package from inside the storage drawer or warming drawer.
2. A
A. See the "Storage Drawer" section. Rear leveling leg
C.
B
Centerline
A
A. 12 31.9 cm) B. B
A. Wrench or pliers C. Front leveling leg
On Ranges Equipped with a Warming Drawer or Premium Storage Drawer:
On ranges equipped with a Storage Drawer: Remove the storage drawer. Re-engage anti-tip bracket if...
Installation Guide - Page 7

... its final location, making sure rear leveling leg slides into anti-tip bracket. Move range forward onto shipping base, cardboard or hardboard to allow for final electrical connections. Remove shipping base, cardboard or hardboard from under range.
7. Using the Phillips screwdriver, mount anti-tip bracket to the wall or floor with the two...
Installation Guide - Page 8
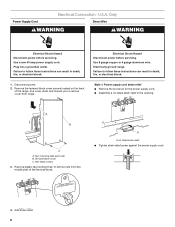
... knockout for the power supply cord. ■ Assemble a UL listed strain relief in death, fire, or electrical shock. Remove plastic tag holding three 10-32 hex nuts from range.
Use 8 gauge copper or 6 gauge aluminum wire. Plug into a grounded outlet. Two mounting tabs each side B. Use a new 40 amp power supply cord...
Installation Guide - Page 9
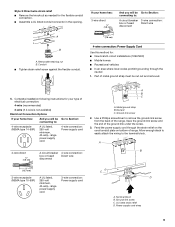
...;₈" (1.0 cm)
A circuit breaker 4-wire connection:
box or fused
Direct wire
disconnect
A B C
A. Save the ground-link screw and the end of range. Feed the power supply cord through the
neutral 1.
Removable retaining nut B. Complete installation following instructions for your type of electrical connection:
4-wire (recommended)
3-wire (if 4-wire is not available) Electrical...
Installation Guide - Page 11
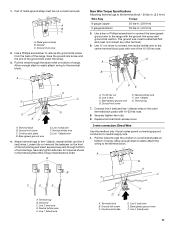
... the 10-32 hex nuts. Cord/conduit plate D. Use ³⁄₈" nut driver to connect the neutral (white) wire to remove the ground-link screw from the back of range. Line 2 (red) C. Securely tighten hex nuts.
9. Setscrew C. Line 2 (red) wire D. Bare (green) ground wire F. Part of metal ground strap must not...
Installation Guide - Page 12
... of the 10-32 hex nuts. Line 2 (red) wire D. Attach terminal lugs to the wall or keeping the range foot from sliding to line 2 (red), bare (green) ground, and line 1 (black) wires. Remove the storage drawer. Verify that the bracket is mounted with one of the control panel as shown in the illustration.
IMPORTANT...
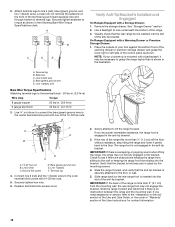
Installation Guide - Page 13
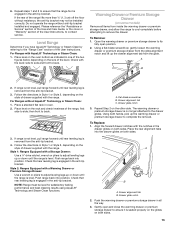
...: side to side and front to ensure that the range foot is removed from the glide.
If range is not level, pull range forward until the range is removed from inside the warming drawer or premium storage drawer, and allow the range to cool completely before attempting to complete the removal. 6. For Ranges with a Storage Drawer: Use a ¼" drive ratchet, wrench or pliers to...
Installation Guide - Page 14
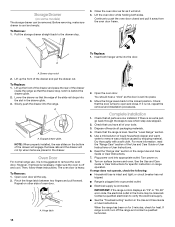
... of oven door. Open oven door all parts are placed in the range Use and Care Guide or User Instructions. 7. Repeat on the bottom of the slide rail drops into place.
3. Before removing, make sure the oven is level. Pull the storage drawer straight back to the locked position.
You should hear a "click" as...
Installation Guide - Page 15
...removing the range is moved. See
the "Verify Anti-Tip Bracket Is Installed and Engaged" section. 6. Failure to avoid damaging the floor covering. Slide range forward. 3. See
the "Verify Anti-Tip Bracket Is Installed and Engaged" section. 5. Check that the anti-tip bracket is installed and engaged.
When moving range, slide range...
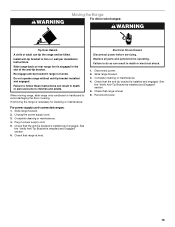
Moving the Range
For direct-wired ranges:
WARNING
Tip...
Use & Care Guide - Page 3

...alone or unattended in area where the range is turned inward, and does not extend over adjacent surface units.
■ Do Not Soak Removable Heating Elements - All other utensils. Moist...escape before removing or replacing food.
■ Do Not Heat Unopened Food Containers - Remove broiler pan and other servicing should never be referred to a qualified technician.
■ Storage in Manual...
Use & Care Guide - Page 5

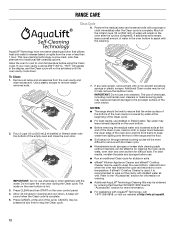
... turn to setting. The cooktop functions are also recommended for additional information.
REMEMBER: When range is on the cooktop. Ceramic Glass The surface cooking area will return to its original ...color. It may become trapped between HIGH and LOW. Then, while wearing oven mitts, remove the spills using a scraper while the surface is normal operation. If sugary spills are hot...
Use & Care Guide - Page 6

...after each use to help avoid scratches, pitting, abrasions and to remove all of food, and home canning. IMPORTANT: To avoid permanent damage to the cooktop surface and ...outside the area. Single size can leave deposits when heated.
■ To avoid damage to the "Range Care" section for larger size cookware. Melt option B. Cookware with slightly indented bottoms or small expansion ...
Use & Care Guide - Page 12
... the initial 2 cups (16 oz [500 mL]) of the range and the floor.
■ Soil baked on the oven bottom.
■ Before removing the residual water and loosened soils at any soils remain, remove them with a non-scratch scrubbing sponge or plastic scraper. Remove all racks and accessories from spilling onto the front of...
Use & Care Guide - Page 13
...
■ For racks that storage drawer or warming drawer is cool. OVEN CAVITY Use AquaLift® Technology regularly to clean oven spills.
■ affresh® Cooktop Cleaner and Cooktop Cleaning Pads: Clean as soon as the entire range is cool and empty before cleaning.
Scratches and abrasions do not remove seals under knobs. Cleaning Method...
Use & Care Guide - Page 14
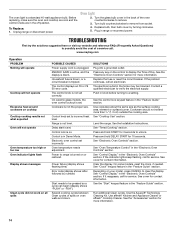
... Installation Instructions. Press and hold START for service. Depending on your model, press CANCEL to range is unplugged.
The oven light is tripped. Unplug range or disconnect power. Replace bulb, then bulb cover by number)
Start needs to remove.
3. ENERGY SAVE is active, and the display is not the proper size.
Control lock...
Dimension Guide - Page 1

... of electrical connection you will be using and follow the instructions provided for it here.
■■ Range must be level after installation. Model/serial rating plate (located on the left -side frame behind
storage drawer or right side of frame behind the top right side of 1
W10403811D 08/30/2016
PRODUCT DIMENSIONS...
Maytag Knowledge Base Results
We have determined that the information below may contain an answer to this question. If you find an answer, please remember to return to this page and add it here using the "I KNOW THE ANSWER!" button above. It's that easy to earn points!-
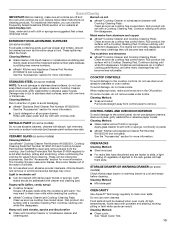
Adjusting crisper humidity control - Side by side refrigerator
... refrigerator The humidity control is located on a refrigerator shelf. High (closed paper bag on the crisper drawer. Adjust the control to use. Fruit: Wash, let dry and store in refrigerator in the crisper for best storage of humidity in the moisture-sealed crisper. Sort and keep berries in original container in crisper... -
Too cold in fresh food compartment. French Door with ice bin in the door.
... door (dispenser side) is closed. When the dispenser side door is freezing in the crisper drawer Too cold/Freezing in the fresh food compartment? Why is not placed in the door. See also...food compartment due to the seal between the ice making compartment and the ice storage bin not being produced, ice bin and door is closed , cold air can enter the fresh food ... -
Adjusting vegetable/meat drawer temperature control - Side by side refrigerator
... with Exterior Dispenser Refrigerator or freezer not cold enough - to 32° Remember to chill meats or vegetables. Adjusting vegetable/meat drawer temperature control - Side by side refrigerator Food storage tips Adjusting the control Change the control setting by side refrigerator Too cold/Freezing in Fresh Food Section - Adjusting crisper humidity control...
Similar Questions

How Can I Take Bottom Drawer Out Of Stove?
(Posted by manbarb 10 years ago)

Not Clear If Broiler Is Bottom Drawer Or The Oven Itself
(Posted by stanslem 10 years ago)

Lower Drawer Of Stove
is there supposed to be some sort of handle on the botton drawer. I keep my pans there and it has al...
is there supposed to be some sort of handle on the botton drawer. I keep my pans there and it has al...
(Posted by wsschnelli 11 years ago)

How Do You Remove Part Number W10097310 Ss On Range Model Met8665xs01?
From control panel parts. Is the panel parts 1 assembly? Will part W10097310 come off without remove...
From control panel parts. Is the panel parts 1 assembly? Will part W10097310 come off without remove...
(Posted by msgtdwanzer 11 years ago)
Maytag Gas Range
yes I have a Maytag Gas range and the bake part the oven will not bake. the broiler and top work fin...
yes I have a Maytag Gas range and the bake part the oven will not bake. the broiler and top work fin...
(Posted by nortonsharon 11 years ago)