Maytag MEDX500XW Support Question
Maytag MEDX500XW Support Question
Find answers below for this question about Maytag MEDX500XW.Need a Maytag MEDX500XW manual? We have 4 online manuals for this item!
Question posted by Anonymous-109231 on April 26th, 2013
How Do You Take The Door Panel Off To Access The Belts For Model Medx500xw
The person who posted this question about this Maytag product did not include a detailed explanation. Please use the "Request More Information" button to the right if more details would help you to answer this question.
Current Answers
Related Maytag MEDX500XW Manual Pages
Installation Instructions - Page 4
...)
13 ¾" (349 mm)
*29 1/2" (749 mm)
27" (687 mm)
A
*29 1/2" (749 mm)
27" (687 mm)
B
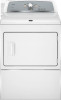
A.
Recessed area B. The opening (such as the dryer exhaust opening side-swing door B. Electrical Requirements
It is adequate and in .2*
(310 cm ) 2
3"* (76 mm)
24 in2.* 2
(155 cm )
1"
27"
1" 1"* 29 ¼" 5 ½"*
(25 mm) (686 mm...
Installation Instructions - Page 6

... can result in leveling legs
Excessive Weight Hazard Use two or more people to finish turning legs until it is no longer visible.
Firmly grasp dryer body (not console panel) and gently lay dryer down on its final location. diamond marking
1.
To avoid damaging floor, use a wrench to move and install...
Installation Instructions - Page 9

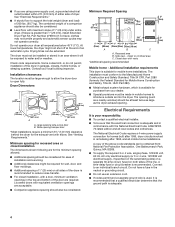
... cord to Venting Requirements. Connect remaining wires
Connect remaining wires to outer terminal block screws.
Finally, reinsert tab of terminal block cover into slot of dryer rear panel. Connect remaining wires
3-wire Power Supply Cord Connection
Use where local codes permit connecting cabinet-ground conductor to Venting Requirements.
9 Now, go to external...
Installation Instructions - Page 11

... tighten screws. Now, go to neutral wire.
3. Connect ground wire
(893m½m" )
Direct wire cable must have 5 ft. (1.52 m) of dryer rear panel. Shape wire ends into slot of extra length so dryer may be moved if needed. If using 3-wire cable with ground wire, cut bare wire even with hold-down screw...
Installation Instructions - Page 12
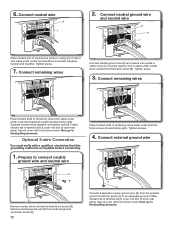
...to connect neutral
ground wire and neutral wire
Place hooked ends of dryer rear panel.
Squeeze hooked end together. Connect remaining wires
Connect neutral ground wire (E) and neutral wire ...(white or center wire) (C) of dryer rear panel. Connect external ground wire
E B
A Remove center, silver-colored terminal block screw (B)....
Installation Instructions - Page 13
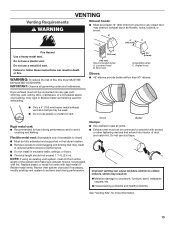
... plugged with rigid metal or flexible metal vents.
Flexible metal vent: (Acceptable only if accessible to clean) ■■ Must be connected or secured with screws or other fastening ...any gas vent, chimney, wall, ceiling, attic, crawlspace, or a concealed space of fire, this dryer MUST BE
EXHAUSTED OUTDOORS. Replace plastic or metal foil vents with lint.
Do not use duct tape. ...
Installation Instructions - Page 16

... from side to see what was skipped. If there is first used. If you feel for 5 minutes, open the dryer door and feel heat, cancel cycle and close the door. Move dryer to back.
NOTE: The dryer must be 2 household fuses or circuit breakers for
20 minutes and start , check the following : ■■ There...
Installation Instructions - Page 17

... top of hinges.
3. Lift door off screws. Reattach outer door panel to door.
5. Remove screws from dryer cabinet. NOTE: Do not pry apart with putty knife or screwdriver. Insert 5 door screws.
17 Rotate outer door
Lift door until top screws in large part of door (5 screws). Place towel on top of dryer. Remove screws from inner door. Loosen (do not remove...
Installation Instructions - Page 18

... using the same 4 screws.
10.
Transfer plugs to possibly avoid the
18
cost of dryer cabinet. Slide door up so screws are in bottom of door hinge slot is needed to reinstall door. Check door strike alignment
Reattach door hinges to adjust alignment. Flip door over screws. Position door so large end of slots. If it is over
9. 7.
Owners Manual - Page 4

... your energy savings. Good
Better
n Remove lint and debris from the front the dryer. With Timed Dry, the dryer runs the amount of vent possible. Do not use a plastic vent. Service calls... length of time set and sometimes results in shrinkage, wrinkling, and static due to efficiently dry laundry. When cleaning is complete, be paid by the customer, regardless of the vent system at least...
Owners Manual - Page 5
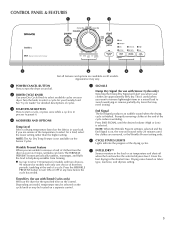
.../PAUSE BUTTON Press to start a cycle, or press once while a cycle is useful when you when your laundry load. CONTROL PANEL & FEATURES
1
2
3
7
6
5
4
5
Not all features and options are approximately 80% dry... partially dry items that may vary.
1 POWER/CANCEL BUTTON Press to turn the dryer on all models. NOTE: When the Wrinkle Prevent setting is selected and the End Signal is not...
Owners Manual - Page 6
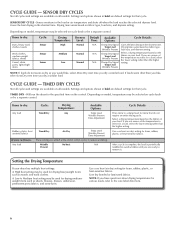
.... Temp Level Drying time varies based on fabric type, load size, and dryness setting.
Depending on model, temperature may be used for foam, rubber, plastic, or heat-sensitive fabrics. Items to dry:...your dryer has multiple heat settings: A High heat setting may be selected on the fabrics in your load.
SENSOR DRY CYCLES
Not all cycles and settings are available on all models....
Owners Manual - Page 7
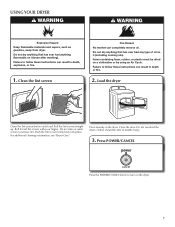
.... Place laundry in death, explosion, or fire.
1. clothes should be dried on it (even after washing). Failure to follow these instructions can completely remove oil. Close the door. Items... containing foam, rubber, or plastic must be able to turn on it (including cooking oils). Load the dryer
Clean the lint screen before...
Owners Manual - Page 8
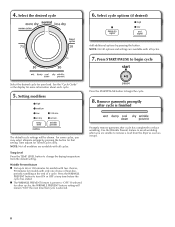
...begin the cycle.
8. Remove garments promptly
after cycle has completed to 60 or 150 minutes for models with only one choice of a cycle. NOTE: Not all modifiers are available with all cycles. Wrinkle... button. Select cycle options (if desired)
Add additional options by pressing the button for models with two choices,
90 minutes for that cycle is selected. Time adjusts for other cycles...
Owners Manual - Page 9

... a nylon brush every 6 months, or more often, depending on dryer usage. A screen blocked by a qualified servicer. Cleaning the dryer interior
To clean dryer drum 1.
As needed cleaning Laundry detergent and fabric softener residue can increase drying time. This includes clearing piles of laundry in the door opening of the drum and rub with a soft cloth until...
Owners Manual - Page 10
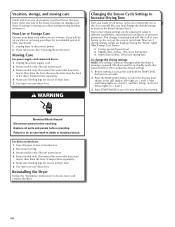
... = level 2, and Wet, Damp, and Cool Down lights on all parts and panels before servicing. Turn off ) to different installations, environmental conditions, or personal preference. Steam models only: Disconnect the water inlet hose from
faucet, then drain the hose.
Unplug dryer or disconnect power. 2. Clean lint screen. Replace all Sensor cycles are consistently...
Owners Manual - Page 11
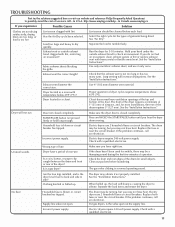
... legs installed, and is not too long or has too many turns.
Incorrect power supply.
Long venting will not run
Door not closed completely.
Separate the load items and restart the dryer.
If the problem continues, call an electrician.
Load too large and heavy to tumble freely. Separate the load to dry...
Owners Manual - Page 12
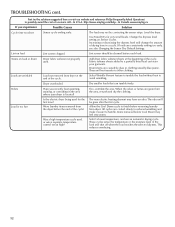
... are consistently ending too early, see also Changing the Sensor Dry Default Settings. Select a lower temperature, and use an automatic drying cycle. Level the dryer.
Were laundry items removed from the area, rewash and dry the clothing. Use Timed Dry for the first time?
All cycles are cooled slowly to reduced wrinkling...
Owners Manual - Page 13
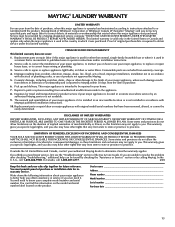
... or workmanship that vary from state to state or province to province. MAYTAG® LAUNDRY WARRANTY
LIMITED WARRANTY
For one year from the date of purchase, when this major appliance...checking the "Assistance or Service" section or by Maytag.
5. Dealer name Address Phone number Model number Serial number Purchase date
13
If you think you .
Proof of original purchase date...
Dimension Guide - Page 1
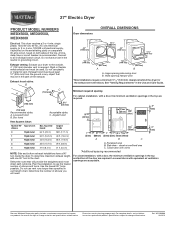
...06/2010 Plan the installation to an individual branch circuit. Wide opening side-swing door B. See "Venting Requirements" in the neutral or grounding circuit. C. Connect .... Use the fewest 90° turns possible. 27" Electric Dryer
PRODUCT MODEL NUMBERS MEDX500X, MEDX550X, MEDX600X
Dryer dimensions
OVERALL DIMENSIONS
Electrical: This dryer requires a 3 or 4 wire, single phase, 120/240 ...
Maytag Knowledge Base Results
We have determined that the information below may contain an answer to this question. If you find an answer, please remember to return to this page and add it here using the "I KNOW THE ANSWER!" button above. It's that easy to earn points!-
Door not closing completely
... bin should sit level. Be sure food and beverage containers are pushed back to avoid damage during shipping could keep the door from closing. For models with an ice storage bin located on the right side of the bin and lift straight up less space. Be sure all the way, it... -
Can I change the door-swing direction? - Front-load washer
... you do not have your Installation Instructions, enter your front-load washer and dryer FAQs Knowledgebase search tips Loads are tangling and twisting - Front-load washer Can I change the door-swing direction? - Can I change the door-swing direction? - Dryer Moving your dryer model number in the search tool below to find them online. Front-load... -
Refrigerator door not closing completely
... straight up less space. make sure all the way. Answers others found helpful Door not closing completely Door pops open - If your refrigerator was recently installed, make sure it is properly aligned and securely snapped into place. For models with an interior ice storage bin, push the ice storage bin in the...
Similar Questions

How Do I Remove The Back Panel From My Maytag Bravo X Model#medx500xw?
my dryer is not heating up and I want to test the fuse and heating element but can't remove the pane...
my dryer is not heating up and I want to test the fuse and heating element but can't remove the pane...
(Posted by buddha6910 7 years ago)


Looking For Electrical Drawing For Maytag Dryer Model: Medx500xw0
(Posted by kmcdonald1969 10 years ago)

How To Remove Door Panel On Maytag Centennial Dryer
(Posted by franksteve3 10 years ago)

How To Remove The Front Panel Of Maytag Model Mgd200vq0
(Posted by Sllangmade 11 years ago)