Installation Instructions
Page 3
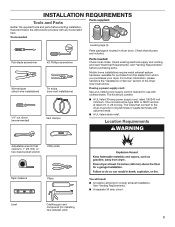
...22 m) long. If using a power supply cord: Use a UL listed power supply cord kit marked for purchase from the dealer from whom you purchased your dryer. The wires that all parts are included. Location Requirements Adjustable wrench that opens to the dryer must end in dryer drum. Tools needed : Check local codes. Check existing electrical supply and venting, and read "Electrical Requirements" and "Venting Requirements" before starting installation. INSTALLATION REQUIREMENTS Tools and Parts Parts supplied: Gather the required tools and parts before purchasing parts.
...22 m) long. If using a power supply cord: Use a UL listed power supply cord kit marked for purchase from the dealer from whom you purchased your dryer. The wires that all parts are included. Location Requirements Adjustable wrench that opens to the dryer must end in dryer drum. Tools needed : Check local codes. Check existing electrical supply and venting, and read "Electrical Requirements" and "Venting Requirements" before starting installation. INSTALLATION REQUIREMENTS Tools and Parts Parts supplied: Gather the required tools and parts before purchasing parts.
Installation Instructions
Page 4
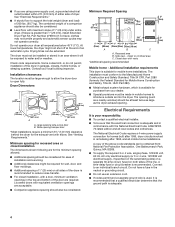
... edition and all sides of the dryer is recommended. The opening . The National Electrical Code requires a 4-wire power supply connection for mobile home installations. A copy of a companion appliance should also be exposed to an individual branch circuit. A time-delay fuse or circuit breaker is recommended to support the total weight (dryer and load) of the dryer in the top and bottom of the door are for the minimum spacing...
... edition and all sides of the dryer is recommended. The opening . The National Electrical Code requires a 4-wire power supply connection for mobile home installations. A copy of a companion appliance should also be exposed to an individual branch circuit. A time-delay fuse or circuit breaker is recommended to support the total weight (dryer and load) of the dryer in the top and bottom of the door are for the minimum spacing...

Installation Instructions
Page 5
... a location where grounding through the neutral conductor is prohibited. If using and follow the instructions provided for use aluminum). ■■ At least 5 ft. (1.52 m) long. If the dryer is installed with a 4-wire electrical supply connection, the neutral ground wire must be removed from the external ground connector screw (green screw), and secured under the neutral terminal (center or white wire) of the terminal block, the dryer cabinet...
... a location where grounding through the neutral conductor is prohibited. If using and follow the instructions provided for use aluminum). ■■ At least 5 ft. (1.52 m) long. If the dryer is installed with a 4-wire electrical supply connection, the neutral ground wire must be removed from the external ground connector screw (green screw), and secured under the neutral terminal (center or white wire) of the terminal block, the dryer cabinet...

Installation Instructions
Page 8
... clamp sections (C) together. 2. Spade terminals with the dryer cabinet and be in place. E B A Put power supply cord through the strain relief. For 3-wire Power Supply Cord Connection, see page 8. Attach power supply cord to connect neutral ground wire and neutral wire. Prepare to strain relief 4-wire Power Supply Cord Connection IMPORTANT: A 4-wire connection is required for mobile homes and where local codes do not permit the use of 3-wire connections. Do not further tighten...
... clamp sections (C) together. 2. Spade terminals with the dryer cabinet and be in place. E B A Put power supply cord through the strain relief. For 3-wire Power Supply Cord Connection, see page 8. Attach power supply cord to connect neutral ground wire and neutral wire. Prepare to strain relief 4-wire Power Supply Cord Connection IMPORTANT: A 4-wire connection is required for mobile homes and where local codes do not permit the use of 3-wire connections. Do not further tighten...

Installation Instructions
Page 10
... fit with the dryer cabinet and be moved if needed. Prepare your 4-wire cable for mobile homes and where local codes do not permit 3-wire connections. Put the threaded section of outer covering from a 3/4" (19 mm) UL listed strain relief (UL marking on this page. Reaching inside the terminal block opening (B). Attach direct wire cable to terminal block, place hooked end of wires into hooks. 4. The strain relief...
... fit with the dryer cabinet and be moved if needed. Prepare your 4-wire cable for mobile homes and where local codes do not permit 3-wire connections. Put the threaded section of outer covering from a 3/4" (19 mm) UL listed strain relief (UL marking on this page. Reaching inside the terminal block opening (B). Attach direct wire cable to terminal block, place hooked end of wires into hooks. 4. The strain relief...
Installation Instructions
Page 12
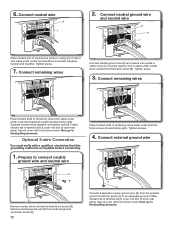
... of dryer rear panel. 6. Connect neutral ground wire and neutral wire B E C Place hooked end of neutral wire (white or cente) (C) of dryer rear panel. Squeeze hooked ends together and tighten screws. Finally, reinsert tab of terminal block cover into slot of direct wire cable under outer terminal block screws (hooks facing right). Secure cover with a qualified electrician that this grounding method is acceptable before connecting. 1. Optional 3-wire Connection You must verify with hold -down screw. Remove...
... of dryer rear panel. 6. Connect neutral ground wire and neutral wire B E C Place hooked end of neutral wire (white or cente) (C) of dryer rear panel. Squeeze hooked ends together and tighten screws. Finally, reinsert tab of terminal block cover into slot of direct wire cable under outer terminal block screws (hooks facing right). Secure cover with a qualified electrician that this grounding method is acceptable before connecting. 1. Optional 3-wire Connection You must verify with hold -down screw. Remove...
Installation Instructions
Page 13
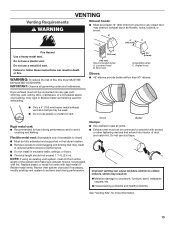
...; The total length should not exceed 7 3/4 ft. (2.4 m). Do not use a plastic vent. Review Vent system chart and if necessary, modify existing vent system to woodwork, furniture, paint, wallpaper, carpets, etc. Dryer exhaust must not be fully extended and supported in : Moisture damage to achieve best drying performance. Flexible metal vent: (Acceptable only if accessible to clean) ■■ Must be connected or secured with...
...; The total length should not exceed 7 3/4 ft. (2.4 m). Do not use a plastic vent. Review Vent system chart and if necessary, modify existing vent system to woodwork, furniture, paint, wallpaper, carpets, etc. Dryer exhaust must not be fully extended and supported in : Moisture damage to achieve best drying performance. Flexible metal vent: (Acceptable only if accessible to clean) ■■ Must be connected or secured with...
Installation Instructions
Page 14
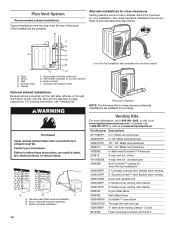
...the bottom (4-way vent kit). Plan Vent System Recommended exhaust installations Typical installations vent the dryer from the rear of the dryer. Select the type best for purchase. Vent length necessary to the manufacturer's instructions. Left or right side exhaust installation C. Refer to connect elbows H. Standard rear offset exhaust installation B. Bottom exhaust installation 14 Venting Kits For more information, call 1-800-807-6777 or visit us at www.whirlpoolparts.ca. Exhaust outlet I H F. Wall D. A B C A. Part Number Descriptions 8171587RP 0-5" Metal...
...the bottom (4-way vent kit). Plan Vent System Recommended exhaust installations Typical installations vent the dryer from the rear of the dryer. Select the type best for purchase. Vent length necessary to the manufacturer's instructions. Left or right side exhaust installation C. Refer to connect elbows H. Standard rear offset exhaust installation B. Bottom exhaust installation 14 Venting Kits For more information, call 1-800-807-6777 or visit us at www.whirlpoolparts.ca. Exhaust outlet I H F. Wall D. A B C A. Part Number Descriptions 8171587RP 0-5" Metal...

Installation Instructions
Page 15
...; turn inside exhaust hood. Dryer vent must not terminate beneath the mobile home. Check that extend into interior of vent material and hood combinations acceptable to use caulking compound to use duct tape, screws, or other fastening devices that vent is clean. Determine vent length and elbows needed for mobile home installations: The exhaust vent must be securely fastened to exhaust outlet in Vent system chart. The Vent system chart provides venting requirements that...
...; turn inside exhaust hood. Dryer vent must not terminate beneath the mobile home. Check that extend into interior of vent material and hood combinations acceptable to use caulking compound to use duct tape, screws, or other fastening devices that vent is clean. Determine vent length and elbows needed for mobile home installations: The exhaust vent must be securely fastened to exhaust outlet in Vent system chart. The Vent system chart provides venting requirements that...

Installation Instructions
Page 16
... heating element is in place, remove corner posts and cardboard from under the dryer. q Check that both fuses are now installed. q When the dryer has been running or "On" position. ■■ Start button has been pushed firmly. ■■ Dryer is plugged into an outlet and/or electrical supply is on. ■■ Household fuse is intact and tight, or circuit breaker has not tripped. ■■ Dryer door...
... heating element is in place, remove corner posts and cardboard from under the dryer. q Check that both fuses are now installed. q When the dryer has been running or "On" position. ■■ Start button has been pushed firmly. ■■ Dryer is plugged into an outlet and/or electrical supply is on. ■■ Household fuse is intact and tight, or circuit breaker has not tripped. ■■ Dryer door...

Owners Manual
Page 4
... good air flow. Failure to over-drying. n Use no more drying time or when using the drying rack. 4 n Remove lint from the dryer. This sensing occurs throughout the drying cycle and the dryer shuts off when the load reaches the selected dryness. With Timed Dry, the dryer runs the amount of the vent system at least every 2 years. Fire Hazard Use a heavy metal vent. See Installation Instructions. Service calls caused by improper venting are sensed in shrinkage, wrinkling, and...
... good air flow. Failure to over-drying. n Use no more drying time or when using the drying rack. 4 n Remove lint from the dryer. This sensing occurs throughout the drying cycle and the dryer shuts off when the load reaches the selected dryness. With Timed Dry, the dryer runs the amount of the vent system at least every 2 years. Fire Hazard Use a heavy metal vent. See Installation Instructions. Service calls caused by improper venting are sensed in shrinkage, wrinkling, and...
Owners Manual
Page 5
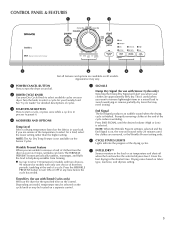
... you want to avoid overdrying or remove partially dry items that may vary. 1 POWER/CANCEL BUTTON Press to select a cycle for the specified time on the fabrics in the load or air temperature and shuts off . 2 DRYER CYCLE KNOB Use your Dry Cycle Knob to select available cycles on your clothes are removed, or the Wrinkle Prevent setting ends. 6 CYCLE STATUS LIGHTS Lights indicate the progress of cycles. 3 START/PAUSE BUTTON Press to pause it stops...
... you want to avoid overdrying or remove partially dry items that may vary. 1 POWER/CANCEL BUTTON Press to select a cycle for the specified time on the fabrics in the load or air temperature and shuts off . 2 DRYER CYCLE KNOB Use your Dry Cycle Knob to select available cycles on your clothes are removed, or the Wrinkle Prevent setting ends. 6 CYCLE STATUS LIGHTS Lights indicate the progress of cycles. 3 START/PAUSE BUTTON Press to pause it stops...
Owners Manual
Page 6
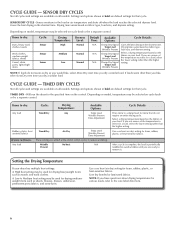
Drying time varies based on fabric type, Wrinkle Prevent load size, and dryness setting. Temp Level Drying time varies based on fabric type, load size, and dryness setting. If loads seem drier than you like , select More Dry next time you are available on all cycles and settings are unsure of the temperature to remove it. TIMED DRY CYCLES Not all models. Depending on model, temperature may be a separate control. If you dry a similar load. Use a no heat (air dry) setting for a load, select the lower setting rather...
Drying time varies based on fabric type, Wrinkle Prevent load size, and dryness setting. Temp Level Drying time varies based on fabric type, load size, and dryness setting. If loads seem drier than you like , select More Dry next time you are available on all cycles and settings are unsure of the temperature to remove it. TIMED DRY CYCLES Not all models. Depending on model, temperature may be a separate control. If you dry a similar load. Use a no heat (air dry) setting for a load, select the lower setting rather...

Owners Manual
Page 9
... drum and rub with hot water. 5. Scrub lint screen with hot water and liquid detergent. Cleaning the lint screen Every load cleaning The lint screen is located in front of lint screen with your load is removed. 2. Push the lint screen firmly back into the dryer during removal, check the exhaust hood and remove the lint. Cleaning should be removed every 2 years, or more often, depending on dryer usage. 2. Rinse screen with a soft cloth until stain is completely dry. See "Venting Requirements." Roll lint off the screen...
... drum and rub with hot water. 5. Scrub lint screen with hot water and liquid detergent. Cleaning the lint screen Every load cleaning The lint screen is located in front of lint screen with your load is removed. 2. Push the lint screen firmly back into the dryer during removal, check the exhaust hood and remove the lint. Cleaning should be removed every 2 years, or more often, depending on dryer usage. 2. Rinse screen with a soft cloth until stain is completely dry. See "Venting Requirements." Roll lint off the screen...
Owners Manual
Page 10
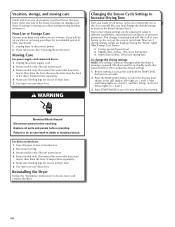
.... 2 Slightly drier clothes, 15% more drying time. 3 Much drier clothes, 30% more drying time. Replace all parts and panels before servicing. Failure to select the dryness level shown in dryer base. 6. Clean lint screen. The dryer must be on = level 3. 3. Press START/PAUSE to adjust the default settings. 1. If storing or moving care Install and store your dryer where it . If you should: 1. Steam models only: Shut off water faucet. 4. Use tape to secure dryer door. For direct-wired dryers: 1. Disconnect wiring. 3. Use tape...
.... 2 Slightly drier clothes, 15% more drying time. 3 Much drier clothes, 30% more drying time. Replace all parts and panels before servicing. Failure to select the dryness level shown in dryer base. 6. Clean lint screen. The dryer must be on = level 3. 3. Press START/PAUSE to adjust the default settings. 1. If storing or moving care Install and store your dryer where it . If you should: 1. Steam models only: Shut off water faucet. 4. Use tape to secure dryer door. For direct-wired dryers: 1. Disconnect wiring. 3. Use tape...
Owners Manual
Page 11
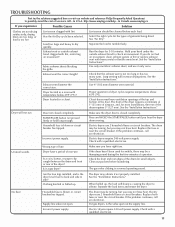
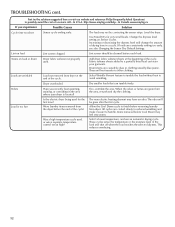
... Air Dry cycle been selected. See "Air Dry." Household fuse is a normal operating sound. For gas dryers, is blown or circuit breaker has tripped. Fabric softener sheets blocking the grille. Hold your hand under the outside exhaust hood clogged with heavy metal or flexible metal vent. See the "Installation Instructions." Exhaust vent diameter the correct size. Proper operation of the dryer? Dryer will increase drying times. START/PAUSE button not pressed firmly or held long enough. Electric dryers require 240-volt power...
... Air Dry cycle been selected. See "Air Dry." Household fuse is a normal operating sound. For gas dryers, is blown or circuit breaker has tripped. Fabric softener sheets blocking the grille. Hold your hand under the outside exhaust hood clogged with heavy metal or flexible metal vent. See the "Installation Instructions." Exhaust vent diameter the correct size. Proper operation of the dryer? Dryer will increase drying times. START/PAUSE button not pressed firmly or held long enough. Electric dryers require 240-volt power...
Owners Manual
Page 12
... the cycle. Use Timed Dry for the first time? Drum stains are consistently ending too early, see also Changing the Sensor Dry Default Settings. Dry smaller loads that can stain your dryer is too hot Is the electric dryer being used for very small loads. Change the dryness level setting on load Lint screen clogged. Lint screen should be contacting the sensor strips. Fabric softener sheets added to handle. Loads are wrinkled Load not removed from dryer. Load is located? Add dryer fabric softener sheets at...
... the cycle. Use Timed Dry for the first time? Drum stains are consistently ending too early, see also Changing the Sensor Dry Default Settings. Dry smaller loads that can stain your dryer is too hot Is the electric dryer being used for very small loads. Change the dryness level setting on load Lint screen clogged. Lint screen should be contacting the sensor strips. Fabric softener sheets added to handle. Loads are wrinkled Load not removed from dryer. Load is located? Add dryer fabric softener sheets at...
Owners Manual
Page 13
... pay for product service if your complete model number and serial number. Replacement parts or repair labor on the product. LIMITATION OF REMEDIES; MAYTAG® LAUNDRY WARRANTY LIMITED WARRANTY For one year from state to state or province to province. ITEMS EXCLUDED FROM WARRANTY This limited warranty does not cover: 1. Replacement parts or repair labor if this limited warranty. Consumable parts are unable to resolve the problem after checking "Troubleshooting," additional help...
... pay for product service if your complete model number and serial number. Replacement parts or repair labor on the product. LIMITATION OF REMEDIES; MAYTAG® LAUNDRY WARRANTY LIMITED WARRANTY For one year from state to state or province to province. ITEMS EXCLUDED FROM WARRANTY This limited warranty does not cover: 1. Replacement parts or repair labor if this limited warranty. Consumable parts are unable to resolve the problem after checking "Troubleshooting," additional help...

Warranty Information
Page 1
... appliance, to replace or repair house fuses, or to the appliance. 8. MAYTAG SHALL NOT BE LIABLE FOR INCIDENTAL OR CONSEQUENTIAL DAMAGES. Replacement parts or repair labor on how to use of products not approved by calling Maytag. You can be easily determined. If you also may have other damage to published user or operator instructions and/or installation instructions. 2. This warranty gives you specific legal rights, and...
... appliance, to replace or repair house fuses, or to the appliance. 8. MAYTAG SHALL NOT BE LIABLE FOR INCIDENTAL OR CONSEQUENTIAL DAMAGES. Replacement parts or repair labor on how to use of products not approved by calling Maytag. You can be easily determined. If you also may have other damage to published user or operator instructions and/or installation instructions. 2. This warranty gives you specific legal rights, and...
Dimension Guide
Page 1
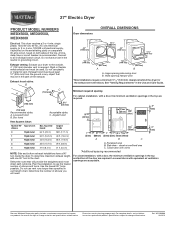
... right to use plastic or metal foil vent. 27" Electric Dryer PRODUCT MODEL NUMBERS MEDX500X, MEDX550X, MEDX600X Dryer dimensions OVERALL DIMENSIONS Electrical: This dryer requires a 3 or 4 wire, single phase, 120/240 volt, 60 Hz., AC only electrical supply (or 3 or 4 wire, 120/208 volt electrical supply, if specified on the serial/rating plate) on a separate 30-amp circuit, fused on both sides of elbows you will provide the straightest and most direct...
... right to use plastic or metal foil vent. 27" Electric Dryer PRODUCT MODEL NUMBERS MEDX500X, MEDX550X, MEDX600X Dryer dimensions OVERALL DIMENSIONS Electrical: This dryer requires a 3 or 4 wire, single phase, 120/240 volt, 60 Hz., AC only electrical supply (or 3 or 4 wire, 120/208 volt electrical supply, if specified on the serial/rating plate) on a separate 30-amp circuit, fused on both sides of elbows you will provide the straightest and most direct...


