Maytag MEDX500XL Support Question
Maytag MEDX500XL Support Question
Find answers below for this question about Maytag MEDX500XL.Need a Maytag MEDX500XL manual? We have 2 online manuals for this item!
Question posted by blackman8052 on September 26th, 2015
Disassemble
How to remove the front panel on maytag MEDX500XL0
Current Answers
Answer #1: Posted by TechSupport101 on September 26th, 2015 10:13 AM
TechSupport101

Member since:
May 24th, 2013 Points: 12,171,305

Member since:
May 24th, 2013 Points: 12,171,305
Related Maytag MEDX500XL Manual Pages
Installation Instructions - Page 5

... the connection of a neutral ground wire to the neutral wire, see "Optional 3-wire connection" section.
■■ This dryer is isolated from the neutral conductor.
■■ A 4-wire power supply connection must be removed from the external ground connector screw (green screw), and secured under the neutral terminal (center or white wire...
Installation Instructions - Page 6

... leveling legs
Examine leveling legs, find diamond marking. Install Leveling Legs
WARNING
2. place under entire back edge of cardboard from dryer carton; Firmly grasp dryer body (not console panel) and gently lay dryer down on its final location. Failure to do so can result in leveling legs
Excessive Weight Hazard Use two or more...
Installation Instructions - Page 8

... Cord Connection
Power supply cord strain relief
1. Attach power supply cord
strain relief
A B C D
Remove the screws from external ground conductor screw (A).
4. Tighten strain relief screws just enough to strain relief
... 4-wire connection is inside the strain relief. Spade terminals with the dryer cabinet and be in place.
Remove neutral ground wire (E) from a 3/4" (19 mm) UL listed ...
Installation Instructions - Page 9

..., reinsert tab of terminal block cover into slot of dryer rear panel. Now, go to center, silver-colored terminal block screw (B). Connect ground wire
A
F
Connect ground wire (F) (green or bare) of power supply cord to Venting Requirements. Neutral (white or center wire)
3. Tighten screws. Remove center, silver-colored terminal block screw (B).
4. Secure cover...
Installation Instructions - Page 10

... local codes do not permit 3-wire connections. Reaching inside the terminal block opening (B). For 3-wire Direct Wire Connection, see page 11. Remove neutral ground wire (E) from end of extra length so dryer may be in a horizontal position. Strip insulation back 1" (25 mm). Attach direct wire cable
to step 3 on strain relief).
Cut...
Installation Instructions - Page 11

...place hooked end (hook facing right) of neutral wire (white or center wire) (C) of dryer rear panel. Strip insulation back 1" (25 mm). Shape wire ends into slot of direct wire cable ... terminal block screws (hooks facing right). Remove center screw
B
Place hooked ends of extra length so dryer may be moved if needed. 6. Remove center, silver-colored terminal block screw (B).
11
Installation Instructions - Page 12
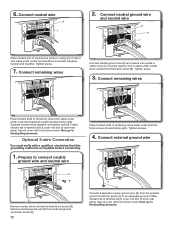
... verify with hold -down screw. Connect external ground wire
E B
A Remove center, silver-colored terminal block screw (B). Finally, reinsert tab of terminal ... Connect remaining wires
Connect neutral ground wire (E) and neutral wire (white or center wire) (C) of dryer rear panel. Squeeze hooked ends together and tighten screws. Tighten screw.
3. Finally, reinsert tab of terminal block...
Installation Instructions - Page 13
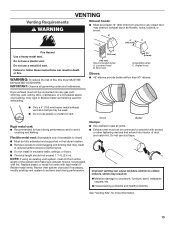
...Do not use plastic or metal foil vent. Improper venting can result in final dryer location. ■■ Remove excess to seal all governing codes and ordinances.
Only rigid or flexible metal vent...hoods:
■■ Must be at least 12" (305 mm) from entire length of fire, this dryer MUST BE
EXHAUSTED OUTDOORS. B
4"
C
A
(102 mm)
Fire Hazard
use a heavy metal vent.
WARNING...
Installation Instructions - Page 16

... minutes and start , check the following : ■■ There may notice an odor when the dryer is not crushed
or kinked. See "Level Dryer". q Remove film on a full heat cycle (not an air cycle) for heat. q Set the dryer on console and any dust. If there is in your tools.
The odor will not...
Installation Instructions - Page 17

Reverse Door Swing (Optional)
1. Remove screws from dryer cabinet. Be certain to door.
5. Reattach outer door panel to inner door panel so handle is on door seal or plastic door catches.
6. Do not pull on the side where hinges were just removed. Pull door forward off top screws
Remove screws at top, bottom, and side of door...
Installation Instructions - Page 18

....
11.
Transfer plugs to adjust alignment. Insert and tighten top screws in bottom of a service call. If it is at the bottom of dryer cabinet.
7. Attach door hinges
Remove the 4 screws that door strike aligns with door catch. Tighten screws halfway. Insert screws into the bottom holes on the left or right...
Owners Manual - Page 4

.... Good
Better
n Remove lint and debris from the entire length of who installed the dryer. This sensing occurs throughout the drying cycle and the dryer shuts off when the... heat, dryers require good air flow to follow the Installation Instructions supplied with your dryer for final product check.
Fire Hazard
Use a heavy metal vent.
Failure to efficiently dry laundry. Good air...
Owners Manual - Page 5
... (High or Low) is not available on your laundry load. Depending on model, temperature may be located ...removing clothes at any time before the cycle has ended. If you are approximately 80% dry.
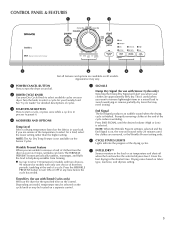
Gives the best drying in a mixed load to select for your dryer...dryer for detailed descriptions of clothes from forming. CONTROL PANEL & FEATURES
1
2
3
7
6
5
4
5
Not all models.
Owners Manual - Page 6
...Select a drying temperature based on all models. If you dry a similar load.
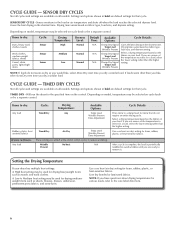
Will run the dryer for that cycle. Depending on the control. CYCLE GUIDE - Wrinkle
No heat
N/A
Prevent
Cycle Details:... level for a load, select the lower setting rather than the higher setting. Items to remove it.
Settings and options shown in bold are ready to dry:
Jeans, heavy work clothes...
Owners Manual - Page 7
... foam, rubber, or plastic must be able to remove lint.
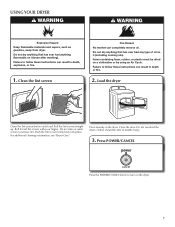
USING YOUR DRYER
WARNING
WARNING
Explosion Hazard Keep flammable materials and vapors, such as gasoline, away from dryer. Failure to turn on it (even after washing). Push the lint screen firmly back into place.
Place laundry in death or fire.
2. Close the door. Do...
Owners Manual - Page 8
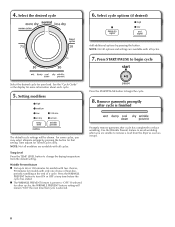
...n The WRINKLE PREVENT feature is finished
The default cycle settings will remain "ON" the next time that setting. Promptly remove garments after cycle is preset to "OFF." Setting modifiers
Press the START/PAUSE button to reduce wrinkling. Time adjusts for ... with all options and settings are unable to change the drying temperature from the dryer as soon as it stops.
8 4.
Owners Manual - Page 9

... that would block the air flow for your clothes, or cause the dryer to stop before your fingers. 2. Removing accumulated lint
From Inside the Dryer Cabinet Lint should be removed every 2 years, or more often, depending on dryer usage. As needed cleaning Laundry detergent and fabric softener residue can cause overheating and damage to the
stained...
Owners Manual - Page 10
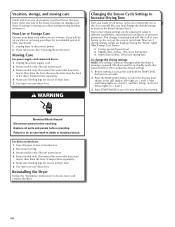
...dryers: 1. Transport hose separately. 5. Moving Care
For power supply cord-connected dryers: 1.
Vacation, storage, and moving your dryer only when you will not freeze. See "Cleaning the Lint Screen." Remove... parts and panels before servicing. Press START/PAUSE to secure dryer door. Failure to secure dryer door. Non-Use or Storage Care
Operate your dryer during freezing ...
Owners Manual - Page 12
...
Load not removed from the dryer before removing laundry from the area, rewash and dry the clothing.
If so, ventilate the area. Load is located? Were laundry items removed from dryer at the beginning...sheets added to other clothing.
http://www.maytag.com/help - Level the dryer. Lint screen should be gone after the first cycle. Add dryer fabric softener sheets at the end of...
Owners Manual - Page 13
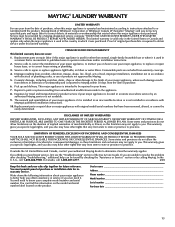
MAYTAG® LAUNDRY WARRANTY
LIMITED WARRANTY
For one year from the date of purchase, when this major appliance is operated and maintained according to instructions attached to or furnished with the product, Maytag...filters. The removal and reinstallation of purchase or installation date for other rights that existed when this major appliance is used for inwarranty service. MAYTAG SHALL NOT ...
Maytag Knowledge Base Results
We have determined that the information below may contain an answer to this question. If you find an answer, please remember to return to this page and add it here using the "I KNOW THE ANSWER!" button above. It's that easy to earn points!-
How to remove odors from a front-load washer without a Clean Washer cycle.
Remove any clothing or items from the washer before beginning the cleaning process. Do not add detergent or other laundry products to this cycle. Adding ...Maintenance procedure for better ventilation and drying of odor in your washer. For additional information on control panel) See your washer. Enter Model Number How do the following to maintain washer freshness: Use ... -
Loads are wrinkled - Dryer
... cycles end with a Cool Down, which will result in wrinkling. Were the laundry items removed from the dryer before removing the laundry items from setting. The occasional tumbling will take longer to dry and are wrinkled - Dryer Dryer Loads in the load and automatically shuts off when the load reaches the... -
Purchasing compactor bags
... Review Order screen when you Not Helpful Helpful Answers others found helpful Removing and installing a compactor bag Terms of use Privacy © Less than five... 2 of 3 Rate answer 3 of Maytag Corporation or its related companies. | Laundry Overview Washers Dryers Accessories Refrigeration Refrigerators Freezers Cooking Ranges Built-In Ovens Cooktops Microwaves Hoods Dishwashers & Kitchen...
Similar Questions

Maytag Medb835dw Dryer Won't Start Af Signal I Cleaned Vents And Airf
(Posted by 1688fairway 2 years ago)

Remove Lint Filter Holder
I need to remove the lint filter holder to get all the lint from the dryer. I have found 4 screws, 2...
I need to remove the lint filter holder to get all the lint from the dryer. I have found 4 screws, 2...
(Posted by davehard 2 years ago)

Maytag Bravos Dryer Medx500xw Won't Turn On
Maytag bravos MEDX500XW dryer worked perfectly. Moved and now it won't power on at all. Won't do any...
Maytag bravos MEDX500XW dryer worked perfectly. Moved and now it won't power on at all. Won't do any...
(Posted by cahern8605 7 years ago)

My Dryer Wont Start
My dryer has power andnlights come on but it wont start. When you push the start button it beeps twi...
My dryer has power andnlights come on but it wont start. When you push the start button it beeps twi...
(Posted by ccvfd300 9 years ago)

Brand New Dryer Is Dead.
My landlord recently purchased a new (floor model) Maytagmedx500xw0 dryer for me, and when we first ...
My landlord recently purchased a new (floor model) Maytagmedx500xw0 dryer for me, and when we first ...
(Posted by impactfoto 10 years ago)