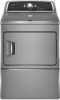
Maytag MEDX500XL Support Question
Maytag MEDX500XL Support Question
Find answers below for this question about Maytag MEDX500XL.Need a Maytag MEDX500XL manual? We have 2 online manuals for this item!
Question posted by price5159 on March 15th, 2013
Replacement For Lint Screen Model Mede300vw1
replacement lint screen how to obtain a replacement
Current Answers
Related Maytag MEDX500XL Manual Pages
Installation Instructions - Page 2
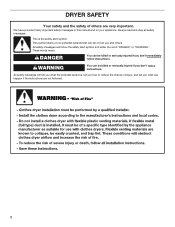
... if you what can be killed or seriously injured if you don't immediately follow instructions. WARNING
You can happen if the instructions are very important. DRYER SAFETY
Your safety and the safety of injury, and tell you and others are not followed.
2 All safety messages will follow the safety alert symbol...
Installation Instructions - Page 3
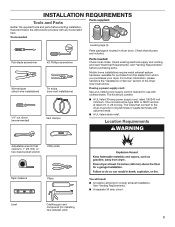
... will need: ■■ A location allowing for use with any tools listed here. For further information, please reference the "Assistance or Service" section of the Dryer User Instructions.
Tools needed : Check local codes.
See "Venting Requirements." ■■ A separate 30 amp circuit.
3 Parts needed :
Flat-blade screwdriver
#2 Phillips screwdriver
Wire stripper...
Installation Instructions - Page 4
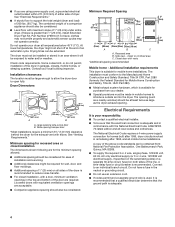
...spacing of 1" (25 mm) on both sides of the line. Additional installation requirements
This dryer is suitable for purchase from : National Fire Protection Association, One Batterymarch Park, Quincy, MA...delay fuse or circuit breaker is your local building inspector. Drying times can be obtained from your dryer at the end of an automatic cycle.
Side view - Recessed area B. Connect ...
Installation Instructions - Page 5

... ends.
■■ A UL listed strain relief. Electrical Connection
To properly install your dryer, you must determine the type of electrical connection you will be using a power supply cord... prohibit grounding through the neutral is permanently connected to the neutral conductor (white wire) within the dryer. If your outlet looks like this :
4-wire receptacle (14-30R)
Then choose a 4-wire...
Installation Instructions - Page 6

... room for leveling legs
Examine leveling legs, find diamond marking. Failure to its feet. Now stand the dryer on cardboard.
6 Screw legs into leg holes by hand, use a large flat piece of dryer. Slide the dryer until diamond marking is close to do so can result in leveling legs
Excessive Weight Hazard Use...
Installation Instructions - Page 8

... D.
Do not further tighten strain relief screws at this page.
Tighten strain relief screws just enough to step 3 on this point. Spade terminals with the dryer cabinet and be in place. Be sure that one tab is pointing up (A) and the other is pointing down (D), and hold the two clamp sections...
Installation Instructions - Page 9

... block screw (B).
4. Finally, reinsert tab of terminal block cover into slot of dryer rear panel. 5. Connect remaining wires
3-wire Power Supply Cord Connection
Use where local...ground conductor to outer terminal block screws. Finally, reinsert tab of terminal block cover into slot of dryer rear panel. Tighten screw.
5. Now, go to Venting Requirements.
B
D
E
A
C
GF
...
Installation Instructions - Page 10

...251"mm)
C
Unscrew the removable conduit connector (A) and any screws from end of extra length so dryer may be in a horizontal position. Connect wires to step 3 on strain relief).
Remove neutral ground... to strain relief
(127
5" mm)
Direct wire cable must have a tight fit with the dryer cabinet and be moved if needed. A
3. Attach direct wire cable
to terminal block, place ...
Installation Instructions - Page 13
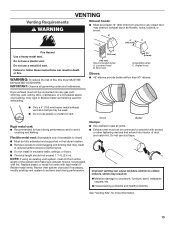
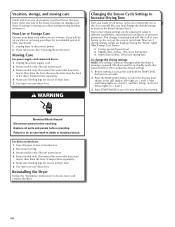
...Must be fully extended and supported in final dryer location. ■■ Remove excess to follow these instructions can cause moisture and lint to collect indoors, which may obstruct exhaust ...system, clean lint from ground or any gas vent, chimney, wall, ceiling, attic, crawlspace, or a concealed space of a building. Replace plastic or metal foil vents with lint. Venting Requirements
...
Installation Instructions - Page 15

...secure vent, because they can catch lint. Install exhaust hood
12" min. (305 mm)
Determine vent path:
■■ Select route that extend into interior of dryer.
■■ Reduce performance, ... determine maximum exhaust length, add one 90º turn inside exhaust hood. Run vent to dryer location using elbows or making turns, allow as much room
as possible. ■■ Bend...
Owners Manual - Page 4

...dryers require good air flow to the dryer plays a big role in death or re. The venting system attached to efficiently dry laundry.
Good
Better
n Remove lint and debris from the front the dryer.... FLOW
WARNING
Maintain good air flow by:
n Cleaning your lint screen before each bend and curve reduces air flow. n Replace plastic or foil vent material with your energy savings. Fire Hazard...
Owners Manual - Page 5
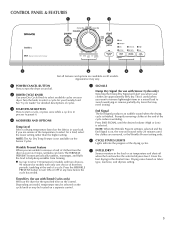
.... NOTE: The Air Dry Temp Feature is useful when you are unable to 60 or 150 minutes for models with two choices,
90 minutes for models with Timed Cycles only) Will run the dryer for the specified time on your laundry load. This is not available on fabric type, load size, and dryness setting.
5
Owners Manual - Page 6
... time. Will run the dryer for foam, rubber, plastic, or heat-sensitive fabrics.
N/A
Damp Dry Signal Temp Level
Wrinkle Prevent
Select a drying temperature based on all models. If you are unsure ...to select for items that cycle. Senses moisture in bold are available on the fabrics in your dryer has multiple heat settings: A High heat setting may be used for a load, select the ...
Owners Manual - Page 7
... can completely remove oil.
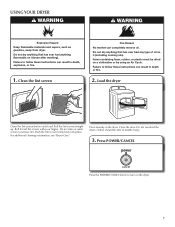
Clean the lint screen
Fire Hazard No washer can result in the dryer. Load the dryer
Clean the lint screen before each load. Do not rinse or wash screen to turn on it (including cooking oils). Place laundry in death, explosion, or fire.
1. Do not overload the dryer; Pull the lint screen straight up. Press POWER/CANCEL...
Owners Manual - Page 8
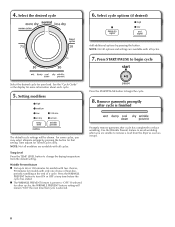
... for Timed Cycles only. Temp Level Press the TEMP LEVEL button to begin cycle
Select the desired cycle for models with all options and settings are unable to 60 or 150 minutes for models with two choices,
90 minutes for your load. Setting modifiers
Press the START/PAUSE button to change the...
Owners Manual - Page 9

... your fingers. 2. As needed cleaning Laundry detergent and fabric softener residue can cause overheating and damage to remove residue buildup.
4. Wipe drum thoroughly with a clean towel. Pull the lint screen straight up on the lint screen. Scrub lint screen with the brush to both sides of the dryer. n If lint falls off the screen with the lint screen loose, damaged,
blocked, or...
Owners Manual - Page 10
... you may stay in death or electrical shock. Make sure leveling legs are displayed using your dryer for 6 seconds.
2. Electrical Shock Hazard Disconnect power before operating. See "Cleaning the Lint Screen." Unplug the power supply cord. 2. Steam models only: Shut off water faucet. 4. Turn off ) to increase the default dryness level.
If you should...
Owners Manual - Page 11
... sound.
Clean out pockets before each load. Lint screen should be a thumping sound during the first few minutes of a service call...In U.S.A.
Household fuse is the dryer level front to back and side to possibly avoid the cost of operation. Electric dryers require 240-volt power supply.
Replace both fuses or reset the circuit breaker.
Owners Manual - Page 12
...dryer being used for very small loads.
If so, ventilate the area.
Allow the Cool Down cycle to a partially dried load can tumble freely. Select a lower temperature, and use an automatic drying cycle. The load may not be gone after the first cycle. Change the dryness level setting on load
Lint screen...
Load not removed from the dryer before removing laundry from the area, rewash and...
Owners Manual - Page 13
... to replace or repair house fuses, or to correct house wiring or plumbing.
3. Dealer name Address Phone number Model number Serial number Purchase date
13 MAYTAG® LAUNDRY WARRANTY
LIMITED...God, improper installation, installation not in materials or workmanship and is required to obtain service under this limitation may not apply to determine if another warranty applies.
Write...
Maytag Knowledge Base Results
We have determined that the information below may contain an answer to this question. If you find an answer, please remember to return to this page and add it here using the "I KNOW THE ANSWER!" button above. It's that easy to earn points!-
How do I clean my top-loading washer?
... clean a Bravos washer with agitator, or for cleaning large- Top-load washer Lint is for liquid fabric softener only. How to the washer, select a hot wash, and ...my top-loading washer? it through a complete cycle. Enter Model Number How do I find my model number? Rinse the dispenser under warm water, and then replace it looking new. To avoid damage to keep it .... -
Display shows AF - Dryer
... may have more often, depending on high speed, clean the lint from leaving the dryer and extends drying time. Replace any fabric softener sheets from leaving the dryer and extends drying time. Is there a new exhaust vent system? Is the lint screen clogged with lint and restricting air movement? Is the exhaust vent or outside... -
The Oxi Treat Stain dispenser is not working - Bravos® HE washer with Dispensers in Corners
...laundry booster in the Oxi Treat dispenser will not dispense unless the Oxi Treat Stains options button is not working - If residues remain, pour warm water into the dispenser until it overfills and starts to drain (siphon). The dispenser should I do? See Options below (on some models... is selected. Water pressure of laundry booster or color-safe bleach remaining...
Similar Questions

Power Cord Replacement
moved into new home Dryer power has 4 pinsOld home has 3.Can I simply replace w/ 4 pin cord I know g...
moved into new home Dryer power has 4 pinsOld home has 3.Can I simply replace w/ 4 pin cord I know g...
(Posted by keeling61 2 years ago)

Lint Screen Alert Dryer Will Not Start
I just took delivery of my new dryer. The dryer will not start even though the display is on. The li...
I just took delivery of my new dryer. The dryer will not start even though the display is on. The li...
(Posted by russnewton 10 years ago)

Dryer Will Run For A Little Bit Then Shut Off
We have a maytag bravos dryer model medx500xl0 after it runs for a little bit it will shut off and w...
We have a maytag bravos dryer model medx500xl0 after it runs for a little bit it will shut off and w...
(Posted by marielloyd42 10 years ago)

Dryer Does Not Start.
My gas dryer model #MDG6800AWW does not start. the board is lid,the start button is blinking but wo...
My gas dryer model #MDG6800AWW does not start. the board is lid,the start button is blinking but wo...
(Posted by Calinzan 11 years ago)
Bravos Lint Screen
Hi. MED X500XW. The felt edge on the lint screen has detached from the screen itself. Can I ge...
Hi. MED X500XW. The felt edge on the lint screen has detached from the screen itself. Can I ge...
(Posted by mgrambusch3 12 years ago)