
Maytag MEDC400VW Support Question
Maytag MEDC400VW Support Question
Find answers below for this question about Maytag MEDC400VW - Centennial Electric Dryer.Need a Maytag MEDC400VW manual? We have 2 online manuals for this item!
Question posted by haburnb on December 20th, 2013
How To Remove Control Back Panel On Maytag Centennial Electric Dryer
The person who posted this question about this Maytag product did not include a detailed explanation. Please use the "Request More Information" button to the right if more details would help you to answer this question.
Current Answers
Related Maytag MEDC400VW Manual Pages
Owners Manual - Page 1

... service sous garantie, vous devez présenter un document prouvant la date d'achat ou d'installation. W10287571A
1 DRYER USER INSTRUCTIONS
INSTRUCTIONS POUR L'UTILISATEUR DE LA SÉCHEUSE
Table of Contents
DRYER SAFETY 1 CONTROL PANEL 4 CYCLE GUIDE 5 DRYER USE 6 DRYER CARE 7 TROUBLESHOOTING 8 WARRANTY 11 ASSISTANCE OR SERVICE Back Cover
Keep this book and your sales slip together...
Owners Manual - Page 2

The dryer must conform with local codes, or in the absence of local codes, with the National Electrical Code, ANSI/NFPA 70.
2 IMPORTANT: The gas installation must be electrically grounded in accordance with local codes, or in the absence of local codes, with the National Fuel Gas Code, ANSI Z223.1/NFPA 54.
Owners Manual - Page 3

...the information in this or any electrical switch; If a gas leak... Use the shortest length of re or explosion, or to efficiently dry laundry. Do not store or use gasoline or other appliance.
- Gas suppliers... dryers require good air flow to prevent property damage, personal injury, or death.
- Good
Better
■■ Remove lint and debris from the exhaust hood.
■■ Remove ...
Owners Manual - Page 4

...selected. The signal stops when you are available on , the signal sounds every few minutes. CONTROL PANEL
Not all features and options are unsure of the temperature to the type of fabric, size of... such as towels and work clothes.
■■ A Low to On.
Temperature Tips If your dryer has multiple heat settings:
■■ A High heat setting may check the dryness of the cycle...
Owners Manual - Page 5
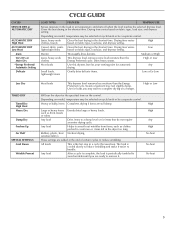
... in the dryer too long. Drying time varies based on the control. Small loads, lightweight items
Gently dries delicate items.
Low or Ex-Low
Less Dry
TIMED DRY
Timed Dry High Heat
Heavy Dry
Damp Dry Freshen Up Air Fluff SPECIAL SETTINGS Cool Down
Wrinkle Prevent
Most loads
This dryness level removes less...
Owners Manual - Page 6

... lay flat on the back wall of fire, electric shock, or injury to follow these instructions can completely remove oil.
Items containing foam, rubber, or plastic ...dryer Open the dryer door or turn the Cycle Control knob to rest on top of oil on a clothesline or by using your dryer.
Select a Timed Dry cycle and temperature, or an air cycle.
Your dryer may be removed...
Owners Manual - Page 7

... Style 1: 1.
Vacation and Moving Care
Vacation Care
Operate your dryer only when you should:
1. This includes clearing piles of laundry in dryer. A screen blocked by a qualified servicer. Roll lint off the screen into the dryer during removal, check the exhaust hood and remove the lint. Unplug dryer or disconnect power. 2. Roll lint off the screen with your...
Owners Manual - Page 8

..., or has a circuit breaker tripped? Unplug dryer or disconnect power. 2. Remove the cover. Disconnect wiring. 3.
Close shutoff valve in dryer base. 6.
The drum may be turning,...://www.maytag.com/help - Electric dryers require 240-volt power supply. If the dryer hasn't been used ? Electric dryers use 2 household fuses or circuit breakers. Replace all parts and panels before ...
Owners Manual - Page 10

...dryer is too hot
■■ Were laundry items removed from the area, rewash, and dry the clothing.
■■ Is the electric dryer being used for the first time?
m) - ft. (0.20 cu. Drum stains are gone from the dryer...load or drum
■■ Was the dryer fabric softener properly used , or was a separate temperature control set on high? Part Number 3404351
3406839...
Owners Manual - Page 11

...need it is installed in accordance with electrical or plumbing codes, or use your authorized Maytag dealer to determine if another warranty ... SHALL BE PRODUCT REPAIR AS PROVIDED HEREIN. MAYTAG® LAUNDRY WARRANTY
LIMITED WARRANTY
For one year from the...appliance, to the finish of your home.
7. The removal and reinstallation of your major appliance, unless such damage ...
Installation Instructions - Page 1

...;ces 16 Exigences d'emplacement 17 Spécifications électriques-
U.S.A 3 Electrical Requirements -
DRYER SAFETY
Your safety and the safety of injury, and tell you what the potential... or seriously injured if you don't follow instructions. 29" (73.7 CM) ELECTRIC DRYER INSTALLATION INSTRUCTIONS
INSTRUCTIONS POUR L'INSTALLATION DE LA SÉCHEUSE ÉLECTRIQUE DE 29" (73...
Installation Instructions - Page 2

...Tape measure
Parts supplied:
Remove parts package from dryer. Do not operate your dryer at the end of an automatic cycle. At lower temperatures, the dryer might not shut off at... code requirements. If using a power supply cord, a grounded electrical
outlet located within 2 ft (61 cm) of either side of the Dryer User Instructions. See
"Venting Requirements." ■ A separate 30...
Installation Instructions - Page 4

... run with flexible metallic conduit.
Do not modify the plug on the dryer. If your outlet looks like this :
3-wire receptacle (10-30R)
Then choose a 3-wire power supply cord with a 4-wire electrical supply connection, the neutral ground wire must be removed from the neutral conductor.
■ A 4-wire power supply connection must have a proper...
Installation Instructions - Page 7

... screws at this point. Hole below the terminal block opening. Electrical Connection Options
If your type of 3-wire connections.
A B
...NEMA type 14-30R) B. 4-prong plug C.
Spade terminals with the dryer cabinet and be in a horizontal position. Style 2: Direct wire strain relief ■ Unscrew the removable conduit connector and any screws from a ³⁄₄" (1.9 cm...
Installation Instructions - Page 8

...B. 1. Direct wire cable must have completed your electrical connections. Connect ground wire (green or bare) of dryer rear panel.
Connect the other wires to center silver-colored terminal block screw. Remove center silver-colored terminal block screw.
2.
Remove center silver-colored terminal block screw.
2. Remove neutral ground wire from external ground conductor screw...
Installation Instructions - Page 9

...-ground conductor to neutral wire. 3. Tighten screw. A
B
C
1. Loosen or remove center silver-colored terminal block screw.
2. Connect neutral wire (white or center wire)...dryer can be moved if needed. Neutral ground wire
4. Place the hooked ends of dryer rear panel. Tighten strain relief screws.
6. Secure cover with hold -down screw.
6. You have completed your electrical...
Installation Instructions - Page 10

...right). Tighten screws.
4. You have completed your electrical connections. A. Neutral wire (white or center wire) ...screws.
5. Insert tab of terminal block cover into slot of dryer rear panel. Now go to neutral wire. 1. Center silver-colored terminal block...center, silver-colored terminal block screw. Loosen or remove center silver-colored terminal block screw.
2. Tighten...
Installation Instructions - Page 13

... other fastening devices that the vent is made, remove the corner
posts and cardboard.
13 Firmly grasp the body of cardboard from dryer packaging under the entire back side of 90º... flat piece of the dryer (not the top or console panel). To determine maximum exhaust length, add one 90º turn inside the dryer. Use caulking compound to move and install dryer. Avoid 90º turns...
Installation Instructions - Page 14

... part of hinge slot. Loosen (do not remove) top screws from cabinet.
4. Reattach outer door panel to gently remove 4 hinge hole plugs (F) on right side of cabinet.
9. If needed , slide door catch left -side opening, if desired.
Remove top screws from cabinet. Remove door strike (E) from cabinet.
4. Open dryer door. Holding door over screws. Slide door...
Installation Instructions - Page 15

... direct wire installation, turn off the dryer and check the following :
3. Read "Dryer Use" in the Dryer User Instructions.
■ Controls are set in a running for 20...Dryer is plugged into an outlet and/or electrical supply is on.
■ Household fuse is intact and tight, or circuit breaker has not tripped.
■ Dryer door is level. In Canada
■ Plug into an outlet. Remove...
Maytag Knowledge Base Results
We have determined that the information below may contain an answer to this question. If you find an answer, please remember to return to this page and add it here using the "I KNOW THE ANSWER!" button above. It's that easy to earn points!-
Loads are damp; dryer does not dry
...or Sensor Dry cycle times. Dryers Dryer Dryer does not heat - Dryer For dryers with digital display - the dryer does not dry. Electric Dryer Dryer does not heat - Gas Dryer Cycle is shown. To select a ... dryness. This change will increase all Sensor Dry cycles. Electronic controls with digital displays: Changing the Preset Dryness Level Settings (available on some ... -
Dispensing Water and Ice - Counter Depth
... it for the refrigerator to cool down and chill water. The display screen on the dispenser control panel has a backlight, which will not operate when the freezer door is normal, and pieces of...special light that turns on , 5 seconds off) until water begins to 10 seconds after dispensing. Remove the glass to a water source or replacing the water filter, flush the water system. Hold the... -
Dispensing Water and Ice - Side by Side
.... Dispensing Water and Ice - Allow 24 hours to flow. The display screen on the dispenser control panel has a backlight, which will turn off , the first press of crushed ice will not affect ice dispensing. This is pressed. Remove the glass OR release the button to select water instead of ice for a few ounces...
Similar Questions

What Is The Capacity Of Maytag Centennial Electric Dryer Model No. Medc400vw0?
(Posted by rhalliburton1 9 years ago)

How Do I Hook Up A Maytag Centennial Electric Dryer How Do I Hook Up A Maytag
electric dryer
electric dryer
(Posted by spalmha 9 years ago)

How Do I Remove The Heating Element In My Maytag Centennial Electric Dryer
(Posted by bobisciub 10 years ago)

How To Remove Dryer Cabinet Maytag Centennial Electric Dryer
(Posted by suoBobCa 10 years ago)

Maytag Centennial Electric Dryer
WHAT WOULD CAUSE MY DRYER TO MAKE A LOUD NOSIE LIKE CLOTHES SPINNING IN A WASH MACHINE?
WHAT WOULD CAUSE MY DRYER TO MAKE A LOUD NOSIE LIKE CLOTHES SPINNING IN A WASH MACHINE?
(Posted by gthurston 12 years ago)