
Maytag MEDC200XW Support Question
Maytag MEDC200XW Support Question
Find answers below for this question about Maytag MEDC200XW.Need a Maytag MEDC200XW manual? We have 2 online manuals for this item!
Question posted by aspiri87 on August 18th, 2013
I Need A Wiring Schematic For A Model Med9800tq0 Dryer
where can i get the diagram
Current Answers
Related Maytag MEDC200XW Manual Pages
Owners Manual - Page 4
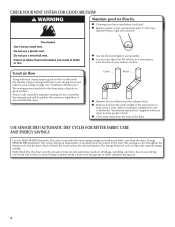
n Replace plastic or foil vent material with heat, dryers require good air flow to efficiently dry laundry. See "Installation Instructions."
n Use no more drying time or when... dryness. The venting system attached to follow the "Installation Instructions" supplied with your dryer for the occasional damp load that needs a little more than four 90° elbows in the load.
USE SENSOR DRY...
Owners Manual - Page 5
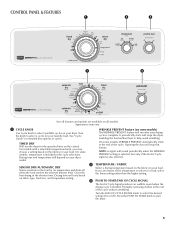
...on the control.
Drying time and temperature will depend on your laundry load.
It periodically starts and stops the dryer, tumbling the load without heat to select available cycles on your... to help avoid wrinkling. Turn the END OF CYCLE SIGNAL knob to select for your dryer. On some models, temperature is included in the shortest time. Drying time will stop this feature. Press ...
Owners Manual - Page 6

...settings for various loads, refer to dry: Jeans, heavy work clothes. CYCLE GUIDE - Not all models. Use low to medium temperature to select for the specified time on all cycles and settings are ...such as you would like , select Less Dry next time you dry a similar load. Will run the dryer for a load, select the lower setting rather than you like , select More Dry next time you ...
Owners Manual - Page 7
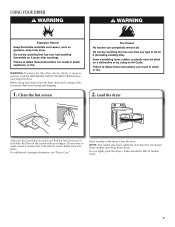
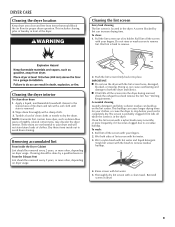
... screen
2. Roll lint off the screen with your dryer, wipe the dryer drum with a damp cloth to persons, read the...models have a different door than the one shown. Load the dryer
Clean the lint screen before operating this dryer. Place laundry in the dryer.
NOTE: Your model may have drop down doors. For additional cleaning information, see "Dryer Care".
Do not tightly pack the dryer...
Owners Manual - Page 8
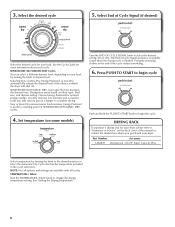
... by turning the knob to change the drying temperature setting. Promptly removing clothes at which the dryer will shut off.
Very or More Dry removes more information about each cycle.
Choose Energy Preferred... (on fabric type, load size, and dryness setting. Drying time varies based on some models)
Turn the END OF CYCLE SIGNAL knob to the desired position or select the Automatic Dry...
Owners Manual - Page 9
... the screen is probably clogged if lint falls off the screen into place. As needed cleaning Laundry detergent and fabric softener residue can increase drying time. Clean the lint screen with hot...clogged due to avoid drum staining. Doing so can cause longer drying times for proper dryer operation. See "Venting Requirements." Scrub lint screen with the brush to both sides of ...
Owners Manual - Page 10
.... If you will be on some models)
1.
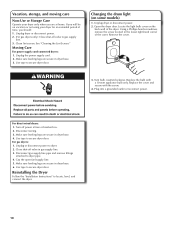
Use tape to dryer pipe. 4. Vacation, storage, and moving care
Non-Use or Storage Care
Operate your dryer for an extended period of time, ...connected dryers: 1. Make sure leveling legs are at fuse or breaker box. 2. Open the dryer door. Locate the light bulb cover on the back wall of the dryer. For direct-wired dryers: 1. Disconnect wiring. 3....
Owners Manual - Page 12

...caused by dyes in a cycle.
Fabric softener sheets added to finish before removing laundry from the dryer before the end of drying time in clothing (usually blue jeans). Drum stains are... cooled slowly to reduce wrinkling and make it easier to high.
Laundry items were removed from dryer. The new electric heating element may feel very warm. This reduces overdrying...
Owners Manual - Page 13

..., to replace or repair house fuses, or to correct house wiring or plumbing.
3. LIMITATION OF REMEDIES;
In Canada, call 1&#...with original model/serial numbers that have other damage to the finish of your major appliance, to instruct you need repair service... LIABLE FOR INCIDENTAL OR CONSEQUENTIAL DAMAGES.
MAYTAG® LAUNDRY WARRANTY
LIMITED WARRANTY
For one year from the date...
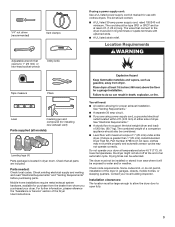
Installation Instructions - Page 2

... potential hazard is the safety alert symbol.
Tools needed:
Flat-blade screwdriver 2
#2 Phillips screwdriver
Wire stripper (direct wire installations)
Tin snips (new vent installations) This ...symbol alerts you to reduce the chance of others . Read and follow instructions. DRYER SAFETY
...
Installation Instructions - Page 3
... that all models):
Leveling legs (4)
Parts package is greater than 1" [25 mm], install Extended Dryer Feet Kit... 120/240 volt minimum.
The dryer must end in an area where it will need:
■■ A location ...dryer. See "Electrical Requirements."
■■ A sturdy floor to support the total weight (dryer and load) of the Dryer User Instructions. The wires that connect to the dryer...
Installation Instructions - Page 4
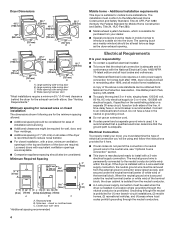
... door C. Recessed area B.
Do not have a fuse in the top and bottom of a neutral ground wire to an individual branch circuit. If the dryer is prohibited. Connect to the neutral wire, see "Optional 3-wire connection" section.
■■ This dryer is prohibited for purchase from your dealer.
■■ Special provisions must be removed from...
Installation Instructions - Page 5
... other injury.
1.
The kit should be type SRD or SRDT and be at least
4 ft. (1.22 m) long, must have 4 10-gauge solid
copper wires and match a 4-wire receptacle of cardboard from dryer carton;
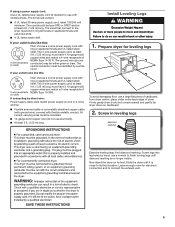
Prepare dryer for leveling legs
To avoid damaging floor, use aluminum).
■■ At least 5 ft. (1.52 m) long. Now stand the...
Installation Instructions - Page 7
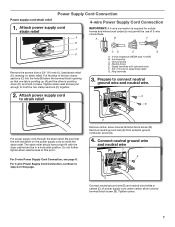
... Cord Connection
IMPORTANT: A 4-wire connection is required for mobile homes and where local codes do not permit the use of power supply cord under center, silver-colored terminal block screw (B). Ring terminals
3. Prepare to strain relief
B
Put power supply cord through the strain relief.
Spade terminals with the dryer cabinet and be...
Installation Instructions - Page 8

... (19 mm) UL listed strain relief F. Now, go to center, silver-colored terminal block screw (B). Connect ground wire
A
F Connect ground wire (F) (green or bare) of dryer rear panel. Ring terminals G. Remove center screw
B
Connect remaining wires to outer terminal block screws. Remove center, silver-colored terminal block screw (B).
4. Tighten screw.
5.
Spade terminals with...
Installation Instructions - Page 9
... terminal block screw, facing to strain relief
(127
5" mm)
Direct wire cable must have a tight fit with the dryer cabinet and be moved if needed.
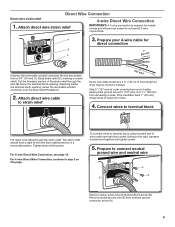
Strip 5" (127 mm) of extra length so dryer may be in a horizontal position. Direct Wire Connection
Direct wire strain relief
4-wire Direct Wire Connection
1. Reaching inside the terminal block opening . Strip insulation back...
Installation Instructions - Page 10
.... Strip insulation back 1" (25 mm). Secure cover with outer covering. Connect ground wire
A
(893m½m" )
Direct wire cable must have 5 ft. (1.52 m) of direct wire cable to terminal block
F
Connect ground wire (green or bare) (F) of extra length so dryer may be moved if needed. 6. Squeeze hooked ends together and tighten screws. Now, go to neutral...
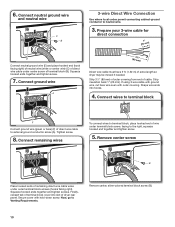
Installation Instructions - Page 11
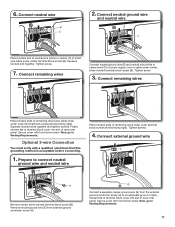
... terminal block screw (B). Connect neutral ground wire
and neutral wire
B C
Place hooked end of neutral wire (white or center) (C) of dryer rear panel. Squeeze hooked end together. Connect remaining wires
Place hooked ends of dryer rear panel. Finally, reinsert tab of terminal block cover into slot of remaining direct wire cable wires under center terminal block screw (B). Tighten...
Installation Instructions - Page 14

...opening around exhaust hood.
2.
Determine vent length and elbows needed for mobile home installations:
The exhaust vent must be securely... times and increased energy usage. Vent System Chart (Long Vent Models Only)
Number of 90° turns or elbows
Type of ...System Chart
Number of 90° turns or elbows
Type of dryer.
■■ Reduce performance, resulting in Vent system chart...
Installation Instructions - Page 15

... a wood block, use wrench to side. q Check that vent is a registered trademark of dryer from front to exhaust outlet
NOTE: The dryer must fit over dryer exhaust outlet and inside exhaust hood. Be sure vent is on power. For direct wire installation, turn on .
■■ Household fuse is intact and tight, or circuit...
Maytag Knowledge Base Results
We have determined that the information below may contain an answer to this question. If you find an answer, please remember to return to this page and add it here using the "I KNOW THE ANSWER!" button above. It's that easy to earn points!-
When to change the water filter - Side by side refrigerator
... changed at least once every 6 months. Decreased water flow is a sign that a filter change is almost time to "GOOD". Enter Model Number How do I find my model number? Your filter may need to be replaced. Base grille with filter in the search tool below. When to change the water filter cartridge. Side by... -
Surface burners fail to ignite
... gas is turned on the area using a hair blow dryer. Surface burners fail to ignite What can cause my surface burner(s) to correct house wiring. Do not reassemble caps on the burner base to gas.... fail to speed up the drying process by entering your Use and Care Guide, find my model number? This needs to gas and have the receptacle checked and if it online by blowing cool air on .... -
Not rinsing well - Top-load HE washer with Dispenser Drawer - video
...is not rinsing the load. Did you may need to use too much . Always use only HE High Efficiency detergent. Laundry detergents are designed to be low-sudsing which ...HE washer with Dispenser Drawer - When using HE High Efficiency detergent? Older laundry detergents do not dissolve detergents well, especially powdered detergents. Are you using detergents labeled 2x or...
Similar Questions

Maytag Dryer Model Med9800tq0 Won't Start
(Posted by bop27jtom 9 years ago)

Which Dryer Vent Kit Do I Need For Maytag Model Medc200xw
(Posted by gefvla 10 years ago)


I Have A Model Medb850wq0 Dryer
Model MEDB850WQ0 Dryer Does not seem to be blowing air with any velocity/volume. Not much at all...
Model MEDB850WQ0 Dryer Does not seem to be blowing air with any velocity/volume. Not much at all...
(Posted by pumperpomeroy 12 years ago)