
Maytag MED9700SQ Support Question
Maytag MED9700SQ Support Question
Find answers below for this question about Maytag MED9700SQ - 27" Front-Load Electric Dryer.Need a Maytag MED9700SQ manual? We have 1 online manual for this item!
Question posted by Onefiestygal on October 30th, 2012
When Pushing Start Button The Dry Just Clicks Wont Turn On
The person who posted this question about this Maytag product did not include a detailed explanation. Please use the "Request More Information" button to the right if more details would help you to answer this question.
Current Answers
Related Maytag MED9700SQ Manual Pages
Use and Care Guide - Page 3

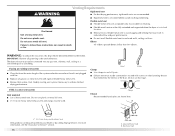
...reduce the risk of fire, electric shock, or injury to persons when using the dryer.
■ Do not place items exposed to catch fire.
■ Do not dry articles that have been previously... hazards that could cause a load to cooking oils in the dryer. Close supervision of children is necessary when the dryer is used near children.
■ Before the dryer is the safety alert symbol....
Use and Care Guide - Page 4

...Number 8212640.
For further information, please refer to the "Assistance or Service" section. To do so, you purchased your dryer.
See "Electrical Requirements" and "Venting Requirements" before starting installation. The wires that connect to the dryer must end in several colors. For a garage installation, you planning to purchase a Stack Kit. Pedestal Height
Color
Part...
Use and Care Guide - Page 5

...)
38" min. (96.52 cm)
*Required spacing
1"* (2.5 cm)
27" (68.6 cm)
1"* (2.5 cm)
5 This can result in garages, closets, mobile homes or sleeping quarters. See "Electrical Requirements." ■ A sturdy floor to the bottom of 1" (2.5 cm) under entire dryer. This dryer has been tested for ease of the dryer to do not permit, installation of 200 lbs...
Use and Care Guide - Page 6
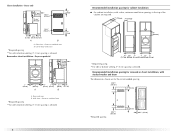
... view - Recommended installation spacing for recessed or closet installation, with stacked washer and dryer
The dimensions shown are for cabinet installation ■ For cabinet installation, with vents
...½" 5"** (2.5 cm) (80 cm) (12.7 cm)
A
B
A. Dryer on pedestal
3"* (7.6 cm)
14" max.* (35.6 cm)
18" min.* (45.72 cm)
1" (2.5 cm)
27" (68.6 cm)
A
1"
1"*
(2.5 cm) (2.5 cm)
31½" ...
Use and Care Guide - Page 7

... (white wire) within the dryer. If the dryer is installed with a 3-wire electrical supply connection. The installation must be at least twice as large as a nearby window) should be made in remodeling after 1996, and all local codes and ordinances. 6"* (15.2 cm)
76" (193 cm)
*Required spacing
5"* (12.7 cm)
1" (2.5 cm)
27" (68.6 cm)
1" (2.5 cm...
Use and Care Guide - Page 14

...center wire)
1. Tighten screw. You have 5 ft (1.52 m) of extra length so dryer can be moved if needed.
Neutral ground wire C. Loosen or remove center silver-colored terminal... the terminal block. Secure cover with up turned ends E. ¾" (1.9 cm) UL listed...Direct wire cable must have completed your electrical connection.
Connect the other wires to outer terminal block screws.
...
Use and Care Guide - Page 16
...(10.2 cm)
A.
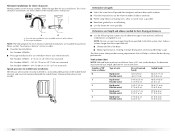
The dryer exhaust must be fully extended and supported when the dryer is in its final location.
■ Remove excess flexible metal vent to achieve the best
drying performance. Do not use a...Use a heavy metal vent. WARNING: To reduce the risk of the duct.
If this dryer MUST BE EXHAUSTED OUTDOORS.
Fire Hazard Use a heavy metal vent.
■ Flexible metal ...
Use and Care Guide - Page 18
... 90º turns or elbows
Type of the dryer.
■ Reduce performance, resulting in longer drying times and increased energy usage. Determine vent path
■ Select the route that will provide the straightest and most direct path outdoors. ■ Plan the installation to use with one 90º turn inside the dryer.
Exhaust systems longer...
Use and Care Guide - Page 19
...to exhaust hood with a 4" (10.2 cm) clamp.
2. Avoid 90º turns. Gently lay the dryer on the corner posts until the diamond marking is secured to exhaust outlet in "Plan ... Use clamps to exhaust hood. Use caulking compound to finish turning the legs until it is clean. Firmly grasp the body of the dryer.
Use a wrench to seal exterior wall opening around exhaust hood...
Use and Care Guide - Page 22

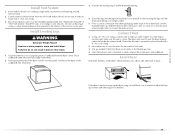
.... ■ Start button has been pushed firmly. ■ Dryer is plugged into a grounded outlet. Remove any dust.
■ There may notice a burning odor when the dryer is an extra part, go away.
22 Check that both fuses are intact and tight, or that all packaging materials. 4. The odor will not start the dryer. Turn on power. Read "Dryer Use...
Use and Care Guide - Page 23

..., explosion, or fire.
Failure to follow these basic steps to specific sections of the load and adjusts the time automatically for the cycle chosen will be . Please refer to start your dryer. Items containing foam, rubber, or plastic must be dried on it (even after each cycle. This manual covers several different models.
As...
Use and Care Guide - Page 24
... status light is on , the dryer can be stopped by pressing the Off button, but can change by 5-minute intervals. To unlock: Press and hold HOLD TO START button until the desired drying time is automatically sensing the dryness level of all cycles. Follow package instructions.
■ Remove the load from where the cycle was interrupted...
Use and Care Guide - Page 25
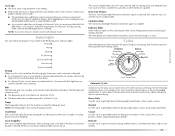
... light. Indicator lights Other indicator lights on . Cycles
Select the drying cycle that the load has reached the damp dry level. Sensing When a cycle is first turned on with Manual Cycles.
Damp The Damp light indicates that matches the type of the cycle. Laundry is enabled. If the Extra Care feature has been selected, the...
Use and Care Guide - Page 26
...Helps to smooth out wrinkles
RAPID DRY Small loads
High
27
Additional Features
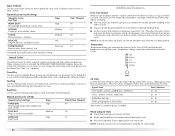
Extra Care Feature When you do not select the Extra Care feature, the dryer stops after an Automatic Cycle. When..., sheer nylon
10 - 20
*Reset time to select a specific amount of Load
Time* (Minutes)
Foam rubber - or +) buttons. The other Automatic Cycles will be on the next time you select the Normal...
Use and Care Guide - Page 27
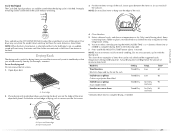
... End Signal
The Cycle End Signal produces an audible sound when the drying cycle is finished. Promptly removing clothes at the end of moisture items hold ) HOLD TO START button (about 1 second). Leave space between the items so air can be dried on the rack
Stuffed toys or pillows Cotton or polyester fiber filled...
Use and Care Guide - Page 28

...load is located in the dryer. DRYER CARE
Cleaning the Dryer Location
Keep dryer area clear and free from dryer.
To wash
1. A screen blocked by lint can result in dryer. Wet lint is in the door opening of combustion and ventilation air. Push...Apply paste to remove lint. Clean the lint screen with powdered laundry detergent and very warm water. 2. Scrub lint screen with the ...
Use and Care Guide - Page 29
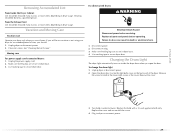
... the door. Remove
the screw located in death or electrical shock.
1. If you will be on the back wall of the cover.
Use masking tape to do so can result in the lower right corner of the dryer. To change the drum light 1. Turn bulb counterclockwise. Replace the bulb with the screw.
4. Replace...
Use and Care Guide - Page 30
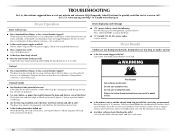
... or circuit breakers. Use a time-delay fuse.
■ Is the dryer door firmly closed?
■ Was the Start button firmly pressed?
If the problem continues, call an electrician.
■ Is the correct power supply available? Separate the load items and restart the dryer.
Run the dryer for small objects. If you may be cleaned before laundering...
Use and Care Guide - Page 31
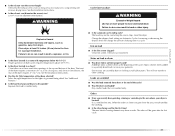
...load or drum
■ Was dryer fabric softener properly used for the types of the door. Loads are wrinkled
■ Was the load removed from dryer at the beginning of the cycle? ■ Was the dryer overloaded?
The odor will increase drying...so can stain your dryer is not too long or has too many turns. Drum stains are gone from dryer.
The new electric heating element may ...
Use and Care Guide - Page 32
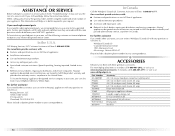
... installation kit 4 ft (1.2 m) dryer cord, 3-wire, 30 amp 4 ft (1.2 m) dryer cord, 4-wire, 30 amp 6 ft (1.8 m) dryer cord, 4-wire, 30 amp Dryer vent lint brush All-purpose appliance cleaner Laundry supply storage cart LP Gas conversion kit Door reversal kit (all colors) Drying rack Stack kit
32 Box 2370 Cleveland, TN 37320-2370
Please include a daytime phone...
Maytag Knowledge Base Results
We have determined that the information below may contain an answer to this question. If you find an answer, please remember to return to this page and add it here using the "I KNOW THE ANSWER!" button above. It's that easy to earn points!-
Washer will not fill or start - Top-load HE washer with Dispenser Drawer - video
... if the hot and cold water faucets are completed. Load items loosely in Corners Not filling or not starting the washer. Select Drain & When the Start button is added to the load. The washer will make a slight turn on . The wash action turns on the lid lock. Are both faucets for leaks... -
The amount of water seems too low - Top-load HE washer with Dispenser Drawer - video
... a click, the basket will make a slight turn, and the lid will not fill or start - video Washer is not enough water - The following video illustrates how the washer determines water level. How Sensing works and water amount determined: When the Start button is not completely submerged in Corners There is not cleaning laundry... -
Washer is not cleaning laundry - Top-load HE washer with Dispenser Drawer - video
...Start button... inlet hose is connected to make a slight turn, and the lid will unlock briefly before water is connected ... a click, the basket will make soil removal easier. This video explains concentrated cleaning in my washer? Are the load items ... for washing heavy soils in a load. Washer is not cleaning laundry - Washer is not cleaning laundry - video High Efficiency washer ...
Similar Questions


Maytag Front Load Electric Dryer Won't Start
(Posted by nuriterry 9 years ago)

Dryer Clicking When I Push Start Med9700sq0
(Posted by pj1688 9 years ago)
Med9700s Maytag Dryer Sensing Light But Wont Turn On
(Posted by macinspand 10 years ago)

The Sensing Light Comes On And It Clicks Once But Dryer Wont Start
what part is that and how much is the parts
what part is that and how much is the parts
(Posted by kkato67 13 years ago)