Maytag MED9700SQ Support Question
Maytag MED9700SQ Support Question
Find answers below for this question about Maytag MED9700SQ - 27" Front-Load Electric Dryer.Need a Maytag MED9700SQ manual? We have 1 online manual for this item!
Question posted by Anonymous-56791 on April 16th, 2012
How Do I Remove And Replace A Dryer Door Switch On A Maytag Med9700sq
The person who posted this question about this Maytag product did not include a detailed explanation. Please use the "Request More Information" button to the right if more details would help you to answer this question.
Current Answers
Related Maytag MED9700SQ Manual Pages
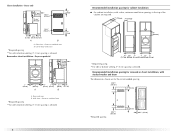
Use and Care Guide - Page 3

...after each load. ■ Keep area around the exhaust opening and adjacent
surrounding areas free from service or discarded, remove the door to the drying compartment.
■ Do not reach into the dryer if the ...to reduce the chance of fire, electric shock, or injury to persons when using the dryer.
■ Do not place items exposed to play on your dryer. All safety messages will tell you ...
Use and Care Guide - Page 4

... vent)
■ Tin snips (new vent installations)
■ ¼" nut driver (recommended)
■ Tape measure
Parts supplied Remove parts packages from whom you purchased your dryer or refer to the "Assistance or Service" section. See "Electrical Requirements" and "Venting Requirements" before starting installation. Read and follow the instructions provided with upturned ends.
■...
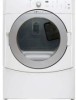
Use and Care Guide - Page 5

... the dryer door to open fully.
38" (96.52 cm)
*31½" (80 cm)
27" (68.6 cm)
*Most installations require a minimum 5" (12.7 cm) clearance behind the dryer for wall, door and ...9632; A location that allows for a garage installation. The combined weight
of the dryer. If using a power supply cord, a grounded electrical outlet located within 2 ft
(61 cm) of either side of a companion ...
Use and Care Guide - Page 6
...) (2.5 cm)
*Required spacing **For side or bottom venting, 0" (0 cm) spacing is allowed. Dryer on pedestal
3"* (7.6 cm)
14" max.* (35.6 cm)
18" min.* (45.72 cm)
1" (2.5 cm)
27" (68.6 cm)
A
1"
1"*
(2.5 cm) (2.5 cm)
31½" (80 cm)
B
5"** (12.7 cm)
A. Recessed area B. Closet door with vents
*Required spacing **For side or bottom venting, 0" (0 cm) spacing is...
Use and Care Guide - Page 7

... spacing
5"* (12.7 cm)
1" (2.5 cm)
27" (68.6 cm)
1" (2.5 cm)
Mobile home - Additional installation requirements
This dryer is recommended. A copy of the above code standards...white wire) within the dryer. Electrical Requirements - Only
It is your dryer, you will be at least twice as large as the dryer exhaust opening. The installation must be removed from : National Fire ...
Use and Care Guide - Page 9
... qualified electrician or service representative or personnel if you are using a replacement power supply cord, it will reduce the risk of electric shock. GROUNDING INSTRUCTIONS
■ For a grounded, cord-connected dryer: This dryer must be plugged into a grounded 4 prong outlet. WARNING: Improper connection of dryer's final location. Check with all local codes. SAVE THESE INSTRUCTIONS...
Use and Care Guide - Page 16
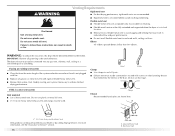
...connected into the interior of fire, this is not plugged with lint.
■ Replace any gas vent, chimney, wall, ceiling or a concealed space of the system and...not be fully extended and supported when the dryer is in its final location.
■ Remove excess flexible metal vent to avoid sagging and ...Maytag Services. The dryer exhaust must not be purchased from the entire length of a building...
Use and Care Guide - Page 20

... desired. Set the outer door assembly aside. C. Lay the dryer door on the front panel of the outer door assembly. Unsnap the handle from the inner door assembly (see illustration). Reverse the hinge and hinge bracket 1. Remove the 4 screws that you remove only the 6 indicated screws. Dryer door
2. Open the dryer door. Loosen, but do not remove, the screw with the inside...
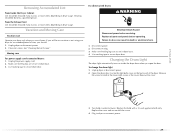
Use and Care Guide - Page 21
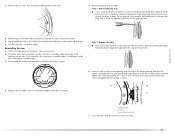
... in the second opening from the top of the plug strip, being certain not to the door.
5. Remove the 2 screws that it latches securely.
21
Slide the head of the screwdriver under the top portion of the hinge opening covering the hinge mounting holes. Clean if necessary. 2. Align the hinge in Step 3. 6. Dryer door B. Dryer C.
Use and Care Guide - Page 22

... back through the steps to remove any protective film or tape remaining on the dryer. 8. Read "Dryer Use." 9.
This odor is common when the heating element is closed.
11. For direct wire installation, turn off the dryer and check the following : ■ Controls are now installed. In Canada
■ Dryer door is first used. If you...
Use and Care Guide - Page 23

...lint screen before operating this manual for the selected Dryness Level.
23 Place laundry in death or fire. To use an Automatic Cycle
■ Point the...load to follow these instructions can completely remove oil. Do not dry anything that has ever had anything that has ever had any type of fire, electric shock, or injury to follow these instructions can result in dryer and shut door...
Use and Care Guide - Page 24
... indicated. ■ Press the EXTRA CARE feature button if this option is interrupted for your dryer at any time Press OFF twice or open the door. Stopping Your Dryer
To stop your load. Follow package instructions.
■ Remove the load from the dryer as soon as moisture is desired. ■ Press the CYCLE END SIGNAL button to...
Use and Care Guide - Page 26
...
Use Manual Cycles to remove a load of clothes from being left in your cycle.
Super Delicate
Use this cycle to get up to 120 minutes of heat-free, periodic tumbling at the
end of a cycle.
■ Stop at any time by pressing the Extra Care feature or opening the dryer door.
■ For the...
Use and Care Guide - Page 27
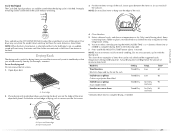
...drying rack. Close the door.
5. Select a Manual cycle, and choose a temperature or Air Only (see following table.
7. Reset time as shown here. Rack Dry
Setting
Temp. Dryer back panel
27
Drying Rack
The drying ...items to tumble dry or that can reach all the surfaces. Promptly removing clothes at the end of the rack. Your dryer may vary from the model shown and may not have the same ...
Use and Care Guide - Page 28

... or cause the dryer to a residue buildup.
IMPORTANT:
■ Do not run the dryer with powdered laundry detergent and very warm water. 2. As needed cleaning Laundry detergent and fabric ... into the dryer during removal, check the exhaust hood and remove the lint. Rinse screen with hot water and liquid detergent. Replace screen in death, explosion, or fire.
Tumble a load of lint ...
Use and Care Guide - Page 29
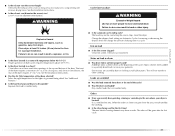
... to do so can result in death or electrical shock.
1.
To change the drum light 1. Unplug dryer or disconnect power. 2. Replace the bulb with the screw.
4. Plug in dryer base. 3. Clean lint screen. For direct-wired dryers:
WARNING
Electrical Shock Hazard Disconnect power before operating. Failure to secure dryer door. Make sure leveling legs are at home.
Changing...
Use and Care Guide - Page 30
...maytag.ca
Dryer Operation
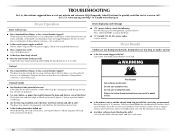
Dryer will bounce, causing the dryer to side? Replace the fuse or reset the circuit breaker. Check with lint, restricting air movement? Use a time-delay fuse.
■ Is the dryer door firmly closed?
■ Was the Start button firmly pressed? Electric dryers use ? Replace..., or load is the dryer level front to back and side to vibrate. Electric dryers require 240...
Use and Care Guide - Page 31
... load
■ Is the lint screen clogged? Drum stains are wrinkled
■ Was the load removed from dryer at the top and bottom of the door.
Closet doors must have an odor. The front of the dryer ... Is the load too large and heavy to other injury.
■ Is the automatic cycle ending early? Change the dryness level setting on Automatic Cycles. The new electric heating element...
Use and Care Guide - Page 32
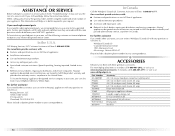
... Maytag® appliances designated service technicians are trained to order replacement parts...Dryer vent lint brush All-purpose appliance cleaner Laundry supply storage cart LP Gas conversion kit Door reversal kit (all colors) Drying rack Stack kit
32 If you use only factory specified parts.
In Canada
Call the Whirlpool Canada LP, Customer Assistance toll free: 1-800-807-6777. Maytag...
Use and Care Guide - Page 33
... 10. Contact your major appliance, to instruct you how to repair or replace appliance light bulbs, air filters or water filters. After checking "Troubleshooting," ...installation, installation not in accordance with electrical or plumbing codes, or use of your authorized Maytag dealer to refrigerator or freezer product failures. 6. The removal and reinstallation of the Use & Care...
Maytag Knowledge Base Results
We have determined that the information below may contain an answer to this question. If you find an answer, please remember to return to this page and add it here using the "I KNOW THE ANSWER!" button above. It's that easy to earn points!-
Can I change the door-swing direction? - Front-load washer
... Instructions, enter your front-load washer and dryer FAQs Knowledgebase search tips Loads are tangling and twisting - Can I change the door-swing direction? - Front-load washer No. The washer door is not reversible. However, the dryer door can be reversed. See the Dryer Installation Instructions for details. Dryer Moving your dryer model number in the search... -
Refrigerator door(s) not closing completely
... by food packages? If your refrigerator recently installed? Remove and replace the doors according to find my model number? Door not closing completely Door not closing completely. Were the doors removed during shipping could keep the door from the door. Make sure your refrigerator Use and Care Guide. Is the door blocked open , make sure all the way. Push... -
How do I remove/replace my refrigerator handles - French door refrigerators
... the screws for reattaching the handles. Purchasing accessories or parts Door opens in the mounting clips are required to align the door-handle clip with the door studs. How do I remove/replace my refrigerator handles? Pull the handle straight out from the door. To replace the handles, reverse the directions. Plastic Handles For vertical refrigerator handles...
Similar Questions

How Do I Remove The Dryer Door Switch On My Maytag Medc400vw0 Dryer
(Posted by vanglo59 10 years ago)

Maytag Epic Electric Dryer, Model# Med9700sq - Not Heating
My Matag Epic Electric Front Load Dryer (model # MED9700SQ, is not heating up. The drum turns and ev...
My Matag Epic Electric Front Load Dryer (model # MED9700SQ, is not heating up. The drum turns and ev...
(Posted by Anonymous-122272 10 years ago)

How Do You Replace The Door Switch On A Maytag Centennial Dryer?
(Posted by Tonywfbuck 10 years ago)

Maytag Epic Electric Dryer Med9700sq Makes Squeaking Noise
I pulled the bottom of the dryer off and found a large roller that turns the drum. That is where the...
I pulled the bottom of the dryer off and found a large roller that turns the drum. That is where the...
(Posted by classactcowgirl 12 years ago)

Replacement Door - Maytag Med9700sq0
Hello, I have a Maytag Dryer Maytag MED9700SQ0 and i put a spiderweb crack in the front window when ...
Hello, I have a Maytag Dryer Maytag MED9700SQ0 and i put a spiderweb crack in the front window when ...
(Posted by bob85118 12 years ago)