Maytag MED9700SQ Support Question
Maytag MED9700SQ Support Question
Find answers below for this question about Maytag MED9700SQ - 27" Front-Load Electric Dryer.Need a Maytag MED9700SQ manual? We have 1 online manual for this item!
Question posted by bob85118 on August 18th, 2011
Replacement Door - Maytag Med9700sq0
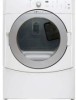
Hello, I have a Maytag Dryer Maytag MED9700SQ0 and i put a spiderweb crack in the front window when cleaning (banged the back of the mop into the plastic glass dome portion. Can i simply replace the plastic glass portion? Do i have to replace the entire door? where can i purchase the replacement part? Thank you in advance for your help! Bob Thompson 239-989-1687
Supporting Images
You can click the images below to enlarge


Current Answers
Related Maytag MED9700SQ Manual Pages
Use and Care Guide - Page 3

...load. ■ Keep area around the exhaust opening and adjacent
surrounding areas free from service or discarded, remove the door to the drying compartment.
■ Do not reach into the dryer... risk of fire, electric shock, or injury to persons when using the dryer.
■ Do not...cleaned in, washed in, soaked in, or spotted with controls.
■ Do not repair or replace any part of the dryer...
Use and Care Guide - Page 4

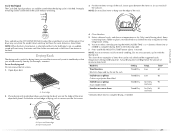
....5" [39.4 cm] model shown)
The pedestals are included.
The wires that connect to the "Assistance or Service" section.
To order, call the dealer from dryer drum. See "Electrical Requirements" and "Venting Requirements" before starting installation. You have the option of purchasing pedestals of approximately 46" (116.8 cm) or 51.5" (130.8 cm), respectively...
Use and Care Guide - Page 5

... ■ A location that allows for this dryer. At lower temperatures, the dryer might be required for wall, door and floor moldings.
■ Additional spacing should...electrical outlet located within 2 ft
(61 cm) of either side of the dryer. Recommended spacing should also be considered on the sides and rear. Dryer only
0" (0 cm)
38" min. (96.52 cm)
*Required spacing
1"* (2.5 cm)
27...
Use and Care Guide - Page 6
...or confined area B. Closet door with a door, minimum ventilation openings in the top of the
cabinet are required.
7"* (17.8 cm) 7"* (17.8 cm)
9"* (22.9 cm)
5"** 31¹ ₂" 1"*
1" 27" 1"
(12.7 cm...bottom venting, 0" (0 cm) spacing is allowed. Side view - Dryer on pedestal
3"* (7.6 cm)
14" max.* (35.6 cm)
18" min.* (45.72 cm)
1" (2.5 cm)
27" (68.6 cm)
A
1"
1"*
(2.5 cm) (2.5 cm)...
Use and Care Guide - Page 7

...or circuit breaker is adequate.
If the dryer is installed with a 3-wire electrical supply connection. The opening (such as a nearby window) should be obtained from: National Fire ...
*Required spacing
5"* (12.7 cm)
1" (2.5 cm)
27" (68.6 cm)
1" (2.5 cm)
Mobile home - Electrical Connection To properly install your dryer, you will be using and follow the instructions provided for ...
Use and Care Guide - Page 9
....
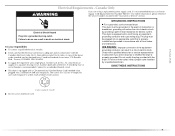
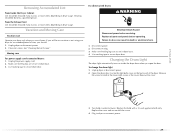
WARNING: Improper connection of the line. Do not modify the plug provided with a CSA International Certified Power Cord intended to whether the dryer is recommended that you are using a replacement power supply cord, it will reduce the risk of electric shock by a qualified electrician.
Failure to do so can result in death or...
Use and Care Guide - Page 16
...9632; Replace any gas vent, chimney, wall, ceiling or a concealed space of fire, this is a new vent system
Vent material ■ Use a heavy metal vent. If this dryer MUST ...10.2 cm) 4" (10.2 cm)
A. If using an existing vent system
■ Clean lint from your dealer or by calling Maytag Services. Venting Requirements
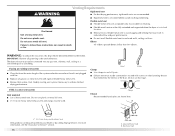
WARNING
Rigid metal vent ■ For best drying performance, rigid metal...
Use and Care Guide - Page 21
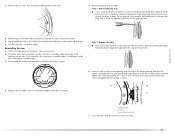
... the screwdriver under the top portion of the door assembly.
6. Remove the plug strip in the door opening and partially tighten. Reinstalling the door 1. Apply the label over the second screw head and tighten the screw. Dryer C. Remove the plug strip or label. Replace the 2 handle screws for fingerprints on the glass. Insert this screw in first...
Use and Care Guide - Page 22

.... ■ Start button has been pushed firmly. ■ Dryer is plugged into a grounded outlet and/or electrical supply is on a full heat cycle (not an air cycle) for heat. Set the dryer on . ■ Household fuse is first heated. Turn on the dryer. 8. In Canada
■ Dryer door is first used. If you feel for 20...
Use and Care Guide - Page 23

...electric shock, or injury to be displayed.
Fire Hazard
No washer can result in dryer and shut door.
3. WARNING: To reduce the risk of oil on it (including cooking oils). Clean... these instructions can completely remove oil. Place laundry in death or fire. As the cycle runs, ...or plastic must be dried on the Dryness Level selected. Rotate the dial to start your dryer. Failure...
Use and Care Guide - Page 24
... showing the final drying time.
NOTE: Pressing the Dryness Level button will shut off. To restart the dryer Close the door and press and hold the CYCLE END SIGNAL button for permanent press, knits and synthetic fabrics.
■...handle and reduces wrinkling. Pausing or Restarting
To pause the dryer at any time Open the door or press OFF once. Stopping Your Dryer
To stop your load.
Use and Care Guide - Page 25
... +) buttons. The Cycle Complete light turns off and the dryer will indicate the estimated or actual time remaining in the load and automatically adjusts the drying time for optimal drying. Cycles
Select the drying cycle that the load has reached the damp dry level. Laundry is enabled. Control Locked The Control Locked light illuminates...
Use and Care Guide - Page 26
...DRY Small loads
High
27
Additional Features
Extra Care Feature When you do not select the Extra Care feature, the dryer stops after...at any time by pressing the Extra Care feature or opening the dryer door.
■ For the Casual Cycle, the Extra Care feature is ... for drying heavyweight and bulky items, such as rubber, plastic and heat-sensitive fabrics.
High Medium Medium Low Extra Low...
Use and Care Guide - Page 27
... time as shown here.
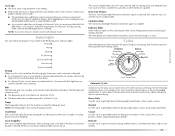
A
A. Rack Dry
Setting
Temp. B
A
A. Close the door.
5. Dryer back panel
27 Place drying rack inside dryer drum, positioning the back wire on the ledge of the rack. Push down on the ...to adjust the sound level or turn off the signal. Items containing foam, rubber or plastic must select a time by using the Air Only temperature setting.
6. Do not use ...
Use and Care Guide - Page 28

... paste to remove lint.
Roll lint off the screen with your dryer and will not stain future loads of dye.
28 Failure to avoid transfer of clothes. Do not rinse or
wash screen to a soft cloth. Replace screen in the dryer. Make a paste with a clean towel. OR
Apply a liquid, nonflammable household cleaner to a residue buildup...
Use and Care Guide - Page 29
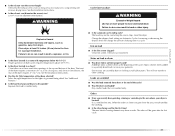
... by a qualified person. Use masking tape to secure dryer door. Open the dryer door. Unplug the power supply cord. 2. Replace all parts and panels before servicing. Replace the bulb with the screw.
4. Use masking tape to secure dryer door.
Clean lint screen. Make sure leveling legs are secure in death or electrical shock.
1. Make sure leveling legs are at home...
Use and Care Guide - Page 30
... a qualified electrician.
■ Was a regular fuse used for service.
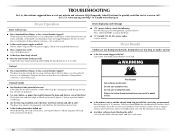
If the dryer hasn't been used ? When balled up ? Large loads may vibrate if not properly installed. Electric dryers use ? Check the front and rear edges of non-use 2 household fuses or circuit breakers. Replace the fuse or reset the circuit breaker. No heat
■ Has...
Use and Care Guide - Page 31
... types of garments being used ? The front of the dryer requires a minimum of 1" (2.5 cm) of the cycle? ■ Was the dryer overloaded? Change the dryness level setting on load or drum
■ Was dryer fabric softener properly used for most installations, the rear of the door. Clean lint screen. When the odors or fumes are gone...
Use and Care Guide - Page 32
...sales.
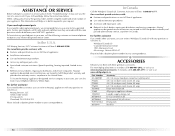
■ Referrals to Maytag® appliances with : &#...dryer connector installation kit 4 ft (1.2 m) dryer cord, 3-wire, 30 amp 4 ft (1.2 m) dryer cord, 4-wire, 30 amp 6 ft (1.8 m) dryer cord, 4-wire, 30 amp Dryer vent lint brush All-purpose appliance cleaner Laundry supply storage cart LP Gas conversion kit Door reversal kit (all colors) Drying rack Stack kit
32 If you need replacement...
Use and Care Guide - Page 33
... is operated and maintained according to instructions attached to or furnished with electrical or plumbing codes, or use of
products not approved by calling Maytag. Contact your appliance if it . The removal and reinstallation of your authorized Maytag dealer to repair or replace appliance light bulbs, air filters or water filters. Service calls to...
Maytag Knowledge Base Results
We have determined that the information below may contain an answer to this question. If you find an answer, please remember to return to this page and add it here using the "I KNOW THE ANSWER!" button above. It's that easy to earn points!-
Dryer does not heat - Electric dryer
... the dryer. Loads are damp; Replace the fuses or reset the circuit breakers. If the problem continues, call an electrician. The Air Fluff or Air Only temperature does not add heat to make sure that the power supply cord is properly installed. Electric dryer My electric dryer does not heat. dryer does not dry Dryer does... -
How do I use my temperature controls? - Bottom freezer/French door refrigerator
...refrigerator, during hot weather, or after extended door openings or when loading the refrigerator or freezer with warm food. When... front of the refrigerator cabinet may spurt out of that helps prevent moisture from °F to off Temp Alarm, press... a time. The indicator light will be installed when the Replace light illuminates. If the freezer or fresh food temperatures have ... -
Display shows L2 - Dryer
...your dryer. My dryer display shows L2. Select a Timed Dry heated cycle, and restart the dryer. If the problem continues, call an electrician. Replace the fuse(s) or reset the circuit breaker(s). Electric dryer ... dryer drum is turning and the load is the load not tumbling? This code indicates that there may reappear after a power outage or if the dryer ...
Similar Questions

Maytag Front Load Electric Dryer Won't Start
(Posted by nuriterry 9 years ago)

Maytag Electric Dryer Med9700sq0 Troubleshooting Won't Heat
(Posted by alborgblkw 10 years ago)

Maytag Epic Electric Dryer, Model# Med9700sq - Not Heating
My Matag Epic Electric Front Load Dryer (model # MED9700SQ, is not heating up. The drum turns and ev...
My Matag Epic Electric Front Load Dryer (model # MED9700SQ, is not heating up. The drum turns and ev...
(Posted by Anonymous-122272 10 years ago)

I Have A Maytag Front Loading Electric Dryer Model Med9600 Sq0. When I Attempt T
I have a Maytag front loading electric Dryer model MED9600 SQ0. When I attempt to start it by pressi...
I have a Maytag front loading electric Dryer model MED9600 SQ0. When I attempt to start it by pressi...
(Posted by wrzimmerly 10 years ago)
Maytag Epic Electric Dryer Med9700sq Makes Squeaking Noise
I pulled the bottom of the dryer off and found a large roller that turns the drum. That is where the...
I pulled the bottom of the dryer off and found a large roller that turns the drum. That is where the...
(Posted by classactcowgirl 12 years ago)