Maytag MED6000XW Support Question
Maytag MED6000XW Support Question
Find answers below for this question about Maytag MED6000XW.Need a Maytag MED6000XW manual? We have 2 online manuals for this item!
Question posted by Adairsm on June 3rd, 2014
Thank You For The Help. The Dryer Will Power On But Gets Stuck On The Sensing
mode. Can you tell me how to get it off sensing more and start drying?
Current Answers
Answer #1: Posted by Odin on June 3rd, 2014 3:05 PM
Odin

Member since:
April 10th, 2010 Points: 41,236,700

Member since:
April 10th, 2010 Points: 41,236,700
Go to http://www.repairclinic.com/RepairHelp/Dryer-Repair/8-4--TUVENjAwMFhX/Maytag-Dryer-Troubleshooting and follow the link that best describes your situation.
Hope this is useful. Please don't forget to click the Accept This Answer button if you do accept it. My aim is to provide reliable helpful answers, not just a lot of them. See https://www.helpowl.com/profile/Odin.
Related Maytag MED6000XW Manual Pages
Owners Manual - Page 5
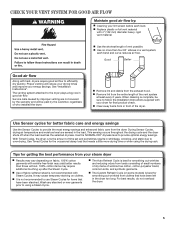
... the amount of who installed the dryer. Wash any starched or new garments prior to efficiently dry laundry. n The Auto Refresh Cycle is complete, be paid by the customer, regardless of time set and sometimes results in a vent system; This sensing occurs throughout the drying cycle and the dryer shuts off when the load reaches the...
Owners Manual - Page 6
... for detailed descriptions of a Timed Dry or Small Load cycle.
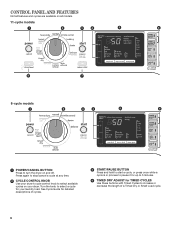
6 CONTROL PANEL AND FEATURES
Not all features and cycles are available on all models.
11-cycle models
1
2
3
4
5
6
8
7
8-cycle models
1
2
3
4
5
6
1 POWER/CANCEL BUTTON Press to increase or decrease the length of cycles.
3 START/PAUSE BUTTON Press and hold to start a cycle, or press once while...
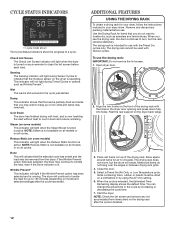
Owners Manual - Page 7
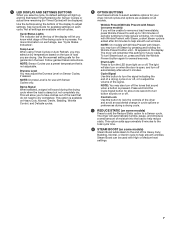
...one second to turn the signal indicating the end of a drying cycle on some models) If you are drying. The dryer will sound during a drying cycle.
7 REDUCE STATIC (on , press and hold the...each cycle. This option adds approximately 8 minutes to lock the controls of periodic tumbling to help reduce wrinkling. For more information on some models) Press to add the Reduce Static option...
Owners Manual - Page 8
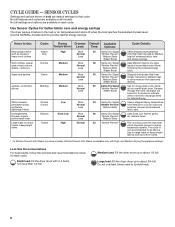
...dryer senses moisture in bold are default settings for improved moisture removal and enhanced fabric care.
Undergarments,
Delicate
Extra Low
blouses, lingerie,
performance wear
More
28
Normal
Less
Damp Dry...
heavy work clothes
Less
Damp Dry Signal Wrinkle Prevent†
Reduce Static Steam Boost
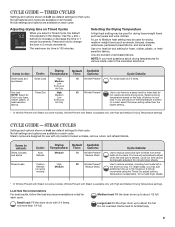
Offers stepped drying starting with high heat, which has...
Owners Manual - Page 9
...:
Use to about 1/2 full.
Large load: Fill the dryer drum up to Medium heat setting may be manually adjusted. The maximum dry time is selectable.
Items need to change the time in the...that cycle. Not all settings and options are unsure of dry items. Dry time will automatically adjust when the load size is sensed. Use to the care label directions. Load Size Recommendations...
Owners Manual - Page 10
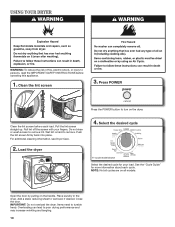
...Close the door. NOTE: Not all cycles are on the dryer. Press POWER
Press the POWER button to turn on all models. USING YOUR DRYER
WARNING: To reduce the risk of fire, electric shock,... desired. Load the dryer
4. Open the door by pulling on the handle. Place laundry in the dryer. Add a static reducing sheet to remove. Overloading can lead to poor drying performance and may increase...
Owners Manual - Page 11
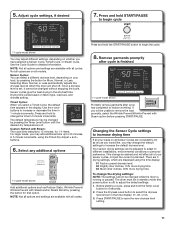
...START/PAUSE button to increase or decrease the time in the display.
See the Cycle Guide for 6 seconds.
2.
Once a dryness level is set, it cannot be changed while the dryer is running or paused. Drying...standby mode (the power button is lit.
+
-
Select any additional options
11-cycle model shown
Add additional options such as you would like, you may be unable to change the drying ...
Owners Manual - Page 12
... rotate.
Remove and discard any lint accumulated from the dryer. The drying rack does not move, but the rack remains stationary.
Start the dryer. Allow space around items for items that the moisture sensor on the dryer is not available on all models or on the drying rack after the cycle has ended. temp level dryness...
Owners Manual - Page 14
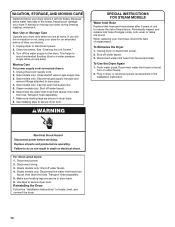
...: Shut off the water supply to faucet. Flush water pipes. Plug in dryer or reconnect power as described in gas supply line. 3. This helps to
avoid unintended flooding (due to secure dryer door. Make sure leveling legs are at home. When replacing your dryer during freezing weather, winterize it will be on water faucet. 2. To...
Owners Manual - Page 15
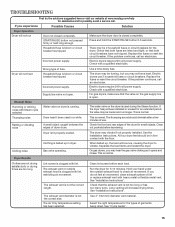
... solutions suggested here or visit our website at www.maytag.com/help for 5-10 minutes. Make sure the dryer door is blown or circuit breaker has tripped.
If the problem continues, call an electrician.
Electric dryers require 240-volt power supply. Dryer will increase drying times. Household fuse is closed completely. Supply line valve not open...
Owners Manual - Page 16
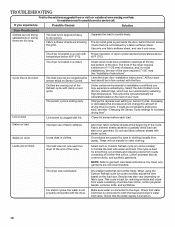
...here or visit our website at www.maytag.com/help for assistance and to increase drying time".
Check that water inlet hose is too short... sheet. Level the dryer. See "Installation Instructions". Under certain environmental or installation conditions you experience
Possible Causes
Solution
Dryer Results (cont.)
Clothes are not drying satisfactorily or drying times are wrinkled
Improper...
Owners Manual - Page 17
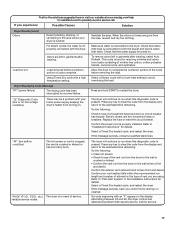
.... Select a Sensor cycle with an "F" appears in the Installaton Instructions for details. Select a Timed Dry heated cycle, and restart the dryer.
Load removed before removing the load. Dryer Displaying Code Message
"PF" (power failure)
The drying cycle has been interrupted by a power failure. "L2" Diagnostic Code (low or no line voltage condition)
There may be a problem...
Installation Instructions - Page 1
...
Para una version de estas instrucciones en español, visite www.Whirlpool.com
Table of Contents
DRYER SAFETY 2 Installation Requirements 3
Tools and Parts 3 Location Requirements 4 Electrical Requirements 4 INSTALL LEVELING LEGS 6 ELECTRICAL INSTALLATION 7
Power Supply Cord Connection 8 Direct Wire Connection 10 VENTING 13 Venting Requirements 13 Plan Vent System 14 Venting...
Installation Instructions - Page 3
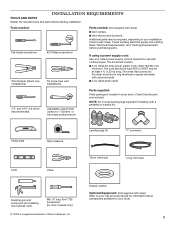
...Optional Equipment: (Not supplied with clothes dryers. Check existing electrical supply and venting. If using a power supply cord: Use a UL listed power supply cord kit marked for door reversal...use with dryer) Refer to the dryer must end in ring terminals or spade terminals with a pedestal or a stack kit. Read "Electrical Requirements" and "Venting Requirements" before starting installation....
Installation Instructions - Page 4
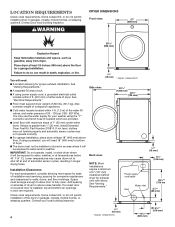
...top and bottom air openings in longer drying times.
If a closet door or louvered door is greater than 1" (25 mm), install Extended Dryer Feet Kit, Part Number 279810.
You...; LOCATION REQUIREMENTS
Check code requirements. DRYER DIMENSIONS Front view:
27" (686 mm)
381/8" (968 mm)
You will be exposed to fully open. If using power supply cord, a grounded electrical outlet...
Installation Instructions - Page 5
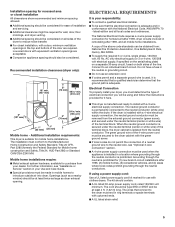
... neutral ground conductor is prohibited for it is recommended that a qualified electrician determine that connect to introduce outside air into dryer. Louvered doors with clothes dryers.
The green ground wire of the 4-wire power cord must conform to an individual branch circuit. If using and follow the instructions provided for (1) new branch-circuit...
Installation Instructions - Page 6
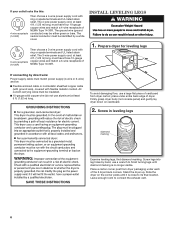
... with ring or spade terminals and UL listed strain relief.
Screw legs into leg holes by direct wire:
Power supply cable must be either green or bare. Slide the dryer on cardboard.
2. The 4-wire power supply cord, at least 4 ft. (1.22 m) long, must have four 10-gauge copper wires and match a 4-wire receptacle...
Installation Instructions - Page 8

... the screws from green external ground conductor screw (A).
2. Tighten strain relief screws just enough to strain relief
Spade terminals with the dryer cabinet and be in place. Tighten screw. Attach power supply cord to hold in a horizontal position. Remove neutral ground wire (E) from a 3/4" (19 mm) UL listed strain relief (UL marking on...
Installation Instructions - Page 9
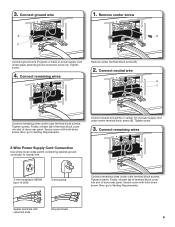
... center terminal block screw (B).
2. Connect neutral wire
B
C
Connect remaining wires under center terminal block screw (B). Connect neutral wire (white or center) (C) of dryer rear panel. Connect remaining wires
3-Wire Power Supply Cord Connection
Use where local codes permit connecting cabinet-ground conductor to neutral wire.
3-wire receptacle (NEMA type 10-30R)
3-prong...
Installation Instructions - Page 12

...dryer rear panel. Optional External Ground for your electrical connection method, as shown on page 8 or 10.
Remove center terminal block screw (B). Tighten screw.
3. Connect external ground wire
Install the correct strain relief for 3-Wire Connection
(Power...2. Tighten screws. Connect remaining wires
E
B
Place ends of dryer rear panel. A
G
Connect a separate copper ground wire ...
Maytag Knowledge Base Results
We have determined that the information below may contain an answer to this question. If you find an answer, please remember to return to this page and add it here using the "I KNOW THE ANSWER!" button above. It's that easy to earn points!-
My dryer makes sounds or vibrations
...dryer. Look inside . Tumbling tennis shoes in the dryer can get caught in the dryer. This ball of operation. When the dryer is not used for a while, there may cause the dryer to -side. dryer does not dry...is twisted or balled up. Laundry items with rivets and buckles. Play the sound of a dryer running with a towel load inside the dryer along the front and rear ... -
Spotting and filming on dishes in my dishwasher
... Glass Magic Cleaner White vinegar rinse Wash and rinse dishes. Use Jet-Dry Rinse Agent to effectively clean dishes. Order Jet-Dry Rinse Agent Here Was the incorrect amount of detergent used? To check ...Keep the rinse aid dispenser filled. The vinegar will help to remove hard water spots and the cloudy film on the bottom rack. To order Jet-Dry Rinse Agent and receive a 10% discount on the... -
My dishwasher will not start
... next to the graphic will illuminate when the controls are locked . Press and hold the Heated Dry option (button with icon) for you may be interfering with a dual-digit display, the control ... to unlock the controls. Opening the door or interrupting the power can cause my dishwasher to not start option activated? Lights flashing on top of the door seal. My dishwasher will not...
Similar Questions

Dryer Turns On And Has Power But Wont Start
dryer turns on and has power but wont start
dryer turns on and has power but wont start
(Posted by winnielou3 8 years ago)

My Maytag Centennial Dryer Heats Up But Does Not Thoroughly Dry The Clothes
(Posted by Smurfpa 9 years ago)

Sensing Mode
our dryer is stuck in sensing mode and will not start. Any suggestions?
our dryer is stuck in sensing mode and will not start. Any suggestions?
(Posted by Adairsm 9 years ago)
Neptune Dryer
bought pedestal no holes on bottom of dryer as indicated in installation instructions
bought pedestal no holes on bottom of dryer as indicated in installation instructions
(Posted by keiop46 11 years ago)

Power Comes On But It Wont Start Drying. It Just Stays On The Sensing Icon.
(Posted by rashelle205 12 years ago)