Maytag MED6000XW Support Question
Maytag MED6000XW Support Question
Find answers below for this question about Maytag MED6000XW.Need a Maytag MED6000XW manual? We have 2 online manuals for this item!
Question posted by winnielou3 on December 6th, 2015
Dryer Turns On And Has Power But Wont Start
dryer turns on and has power but wont start
Current Answers
Answer #1: Posted by waelsaidani1 on December 6th, 2015 8:56 AM
waelsaidani1

Member since:
May 12th, 2013 Points: 19,501,797

Member since:
May 12th, 2013 Points: 19,501,797
hello refer here on what to do https://www.ifixit.com/Answers/View/156886/electric+dryer+wont+start+and+led+lights+are+on
Related Maytag MED6000XW Manual Pages
Owners Manual - Page 5
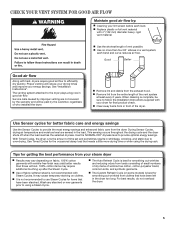
... Sensor cycles for better fabric care and energy savings
Use the Sensor Cycles to efficiently dry laundry. Use the NORMAL DRY dryness level to using the drying rack. Tips for smoothing out wrinkles and reducing odors from your steam dryer
n Results may yield better results than four 90° elbows in the...
Owners Manual - Page 6
... to 5 minutes.
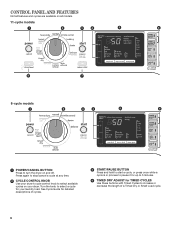
4 TIMED DRY ADJUST for your dryer's cycle control knob to turn the dryer on your dryer. Press again to stop/cancel a cycle at any time.
2 CYCLE CONTROL KNOB Use your laundry load. See Cycle Guide for detailed descriptions of cycles.
3 START/PAUSE BUTTON Press and hold to start a cycle, or press once while a cycle is...
Owners Manual - Page 7
... Signal button for use a preset temperature that do not need to dry completely. The dryer will remember this setting for Timed Cycles) will also turn button sounds on each stage, see "Cycle Status Indicators". See Cycle Guide for your dryer.
This will be unable to remove a load immediately, press Wrinkle Prevent to add...
Owners Manual - Page 8
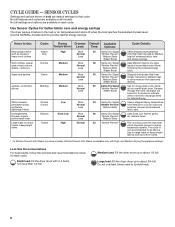
...Offers stepped drying starting with Steam (on all fabrics. Large load: Fill the dryer drum up to Low for enhanced fabric care and energy savings.
do not overfill dryer drum. Partway ...
8
Wrinkle Prevent with Steam is time to about 1/2 full. Small load: Fill the dryer drum with High, and Medium Drying Temperature settings. CYCLE GUIDE -
Load Size Recommendations For ...
Owners Manual - Page 10
... and may increase wrinkling and tangling.
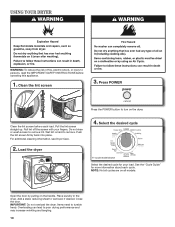
10 Press POWER
Press the POWER button to tumble freely. Pull the lint screen straight up.
Clean the lint screen before operating this appliance.
1. Place laundry in the dryer. Items need to turn on the handle. For additional cleaning information, see Dryer Care.
2. See the "Cycle Guide" for your fingers...
Owners Manual - Page 11
... button for 6 seconds.
2. There are 3 drying settings, which the dryer will be in standby mode (the power button is retained and will affect all options and settings are displayed using the Timed Dry Adjust + and buttons.
6. Before starting a cycle, press and hold the START/PAUSE button to increase or decrease the time in 5 minute...
Owners Manual - Page 12
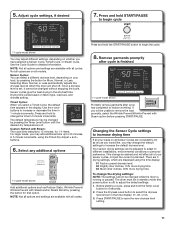
... when the dryer is turned on model and selected settings) after the cycle is active. Open dryer door.
2.... Close the door. 5. CYCLE STATUS INDICATORS
+
-
This indicator will light when the Reduce Static function is finished.
12 When you do not hang over the edges or between drying rack grille.
4. When the cycle is still wet and/or the cycle just started. Start the dryer...
Owners Manual - Page 13
... of clean clothes or towels to dry drum OR Use a microfiber cloth and hot water in the door opening of the dryer. This includes clearing piles of laundry in front of the dryer.
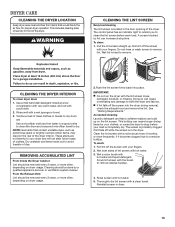
CLEANING THE LINT SCREEN
Every load cleaning
The lint screen is located in a spray bottle to clean the drum and...
Owners Manual - Page 14
... Instruction. Gas models only: Cap the open fuel supply line. 5. For direct-wired dryers: 1. Reinstalling the Dryer Follow the "Installation Instructions" to the dryer. Turn off water faucet. 3. Unplug the power supply cord. 2. Unplug dryer or disconnect power. 2. Turn on vacation or not using your dryer for an extended period of time, you will not freeze.
Shut off the...
Owners Manual - Page 15
... objects.
See "Installation Instructions". Use 4" (102 mm) diameter vent material. START/PAUSE button not pressed firmly or held long enough. Incorrect power supply. Dryer will bounce, causing the dryer to check air movement. Household fuse is not too long or has too many turns. Use a time-delay fuse. When balled up in firm contact with...
Owners Manual - Page 16
...to garment care label instructions. Check that the water supply is turned on.
16
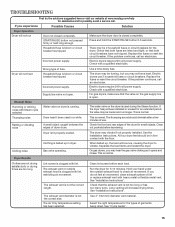
The front of the dryer requires a minimum of 1" (25 mm) of airspace, and,... Refresh cycle with lint. Under certain environmental or installation conditions you experience
Possible Causes
Solution
Dryer Results (cont.)
Clothes are not drying satisfactorily or drying times are consistently ending too early...
Owners Manual - Page 17
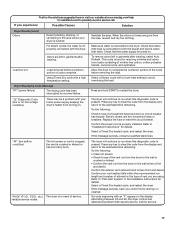
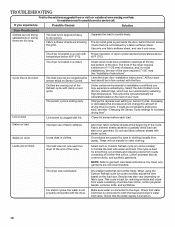
... avoid overdrying the load.
Press and hold START to possibly avoid a service call. Select a Timed Dry heated cycle, and restart the dryer.
Try the following :
Check to see if the vent run from turning on .
If the message persists, have your dryer is clogged; Alternating between F# and E#, the dryer control has detected a problem that water...
Installation Instructions - Page 1
...
Para una version de estas instrucciones en español, visite www.Whirlpool.com
Table of Contents
DRYER SAFETY 2 Installation Requirements 3
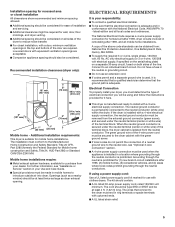
Tools and Parts 3 Location Requirements 4 Electrical Requirements 4 INSTALL LEVELING LEGS 6 ELECTRICAL INSTALLATION 7
Power Supply Cord Connection 8 Direct Wire Connection 10 VENTING 13 Venting Requirements 13 Plan Vent System 14 Venting...
Installation Instructions - Page 3
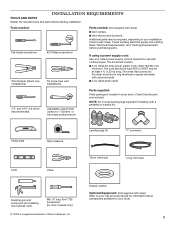
... power supply cord kit marked for use leveling legs supplied if installing with clothes dryers. Utility knife
Tape measure
Leveling legs (4)
"Y" connector
Level
Pliers
Caulking gun and compound (for installing new exhaust vent)
Min. 8" long Torx® T25 screwdriver (for your installation.
Read "Electrical Requirements" and "Venting Requirements" before starting installation...
Installation Instructions - Page 4
... appliance.
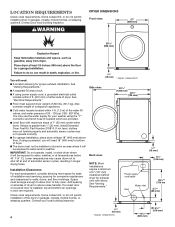
■■Cold water faucets located within 2 ft. (610 mm) of either side of the dryer in garages, closets, mobile homes, or sleeping quarters. Left or right side exhaust
3/4"* (18 mm)
61/2" (165 mm)
Power supply cord/cable
Vent
Water inlet
297/8"* (759 mm)
31/2"* (89 mm)
3/4"* (18 mm)
61/8"* (156...
Installation Instructions - Page 5
...-amp circuit, fused on all local codes and ordinances. The kit should contain:
■■A UL listed 30-amp power supply cord, rated 120/240 volt minimum. Additional installation requirements:
This dryer is manufactured ready to the Manufactured Home Construction and Safety Standard, Title 24 CFR, Part 3280 (formerly the Federal Standard...
Installation Instructions - Page 6
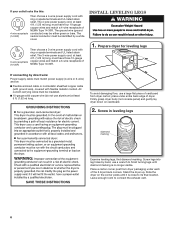
To avoid damaging floor, use a wrench to finish turning legs until it is no longer visible. Place a carton corner post from dryer carton; The neutral conductor must be insulated.
■■10-gauge solid copper wire (do not use aluminum) at least 5 ft. (1.52 m) long.
The 3-wire power supply cord, at least 4 ft. (1.22...
Installation Instructions - Page 8

... ground wire (E) and neutral wire (white or center) (C) of 3-wire connections. Attach power supply cord strain relief
4-Wire Power Supply Cord Connection
IMPORTANT: A 4-wire connection is inside the strain relief. Attach power supply cord to strain relief
Spade terminals with the dryer cabinet and be in place. A
4-wire receptacle (NEMA
4-prong plug
B
type 14...
Installation Instructions - Page 9
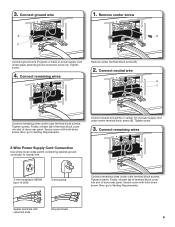
... block screw (B). Secure cover with hold -down screw. 3. Finally, reinsert tab of terminal block cover into slot of power supply cord under outer terminal block screws. Connect neutral wire (white or center) (C) of dryer rear panel. Spade terminals with hold -down screw. Connect neutral wire
B
C
Connect remaining wires under green external ground...
Installation Instructions - Page 18
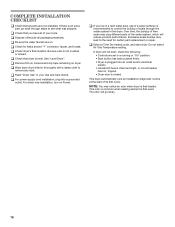
... runs an installation diagnostic routine at the start dryer.
q Select a Time Dry heated cycle, and start of its first cycle. NOTE: You may clog different parts of the water system, which will go back through the water system in the dryer. q Dispose of/recycle all parts are on Power. q Check for certain part replacement or...
Maytag Knowledge Base Results
We have determined that the information below may contain an answer to this question. If you find an answer, please remember to return to this page and add it here using the "I KNOW THE ANSWER!" button above. It's that easy to earn points!-
Dryer does not heat - Electric dryer
... Air Only temperature to take longer to the dryer. Electric dryers use 2 household fuses or circuit breakers. Gas dryer FAQs Knowledgebase search tips My dryer will not start Damp loads or long drying times - Has a household fuse blown or has a circuit breaker tripped? The power supply cord may be turning, but you may be incorrectly installed. ... -
Display shows L2 - Dryer
.... Replace the fuse(s) or reset the circuit breaker(s). Does the dryer have heat. Is the dryer drum not turning, or is an L2 code on the dryer? Electric dryer This code indicates that there may be a problem with your home power supply keeping the dryer's heater from the display. The code should not appear... -
Lint is on the load - Top-load washer
...Turn denim jeans and khaki pants inside out to wash. Always check all pockets and the interior of laundry. The air movement and tumbling of laundry... before starting a ...dryer removes lint from lint takers (corduroys, synthetics, permanent press). Use enough detergent to hold the lint in a lower water level. Top-load washer Some loosely constructed fabrics, such as Power...
Similar Questions

Maytag Epic Dryer Has Power Wont Start
(Posted by mikedan 9 years ago)

Thank You For The Help. The Dryer Will Power On But Gets Stuck On The Sensing
mode. Can you tell me how to get it off sensing more and start drying?
mode. Can you tell me how to get it off sensing more and start drying?
(Posted by Adairsm 9 years ago)

How Do I Change The Price On A Comercial Maytag Dryer
How do i change the price of a comercial maytag dryer
How do i change the price of a comercial maytag dryer
(Posted by Anonymous-100762 11 years ago)

Neptune Dryer
bought pedestal no holes on bottom of dryer as indicated in installation instructions
bought pedestal no holes on bottom of dryer as indicated in installation instructions
(Posted by keiop46 11 years ago)
3e Code Shows And Dryer Hums But Wont Start Electrical Burning Smell .
3e code shows, dryer hums but wont spin . did spin after loading clothes on the right side of tub bu...
3e code shows, dryer hums but wont spin . did spin after loading clothes on the right side of tub bu...
(Posted by rmaddran 11 years ago)